ARM Template deployment bug in Azure Stack
I came across an interesting situation at a client when trying to deploy an ARM template that I have deployed a few times in the past successfully on both Azure and Azure Stack. What the template deploys does'nt matter, but I came across a problem that you might encounter when deploying a Template with parameters, more specifically, how they're named.
I tried to deploy a template I modified back in January to a customer's Azure Stack stamp that was at the latest update version (1905) at the time of writing.
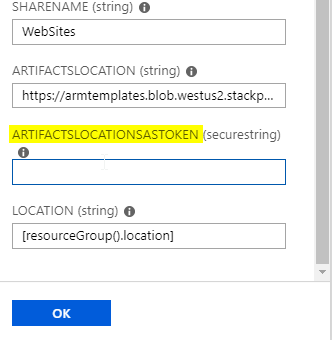
The parameters looked like this:
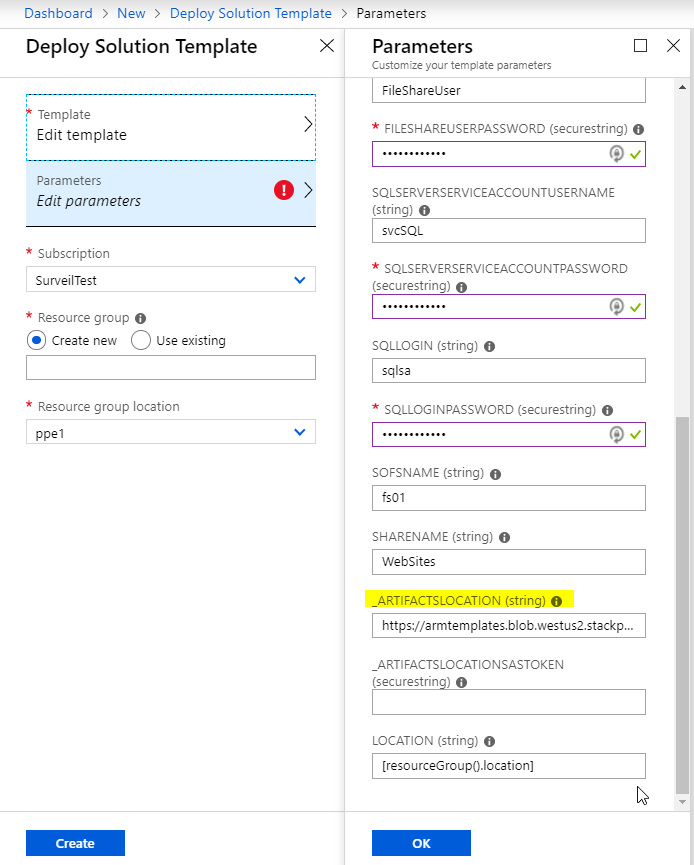
When I tried to do a custom deployment, I got the following:


I tried to deploy the same template to Azure and it worked, so I knew the template was OK. I also tried on a 1902 system and it worked. Testing on a 1903 system and I got the error above again, so whatever change is causing the problem was introduced with that update and continues onwards.
After some trial and error, doing a find/replace renaming the parameter to remove the '_' before the _artifactslocation & _artifactsLocationSasToken in my templates. It wasn’t so obvious from the error message what the issue was, one of the joys of working with ARM!
Hopefully this issue gets fixed as _artifactsLocation and _artifactsLocationSasToken are classed as standard parameters per https://github.com/Azure/azure-quickstart-templates/blob/master/1-CONTRIBUTION-GUIDE/best-practices.md

Simplifying Kubernetes deployments on ADFS Azure Stack systems
he public preview template for Kubernetes on Azure Stack has been out for a few months now, but the ability/guidance has only been available for a short while to deploy on systems using ADFS as the identity provider. That guidance is here: https://docs.microsoft.com/en-us/azure/azure-stack/user/azure-stack-solution-template-kubernetes-adfs
Feel free to follow the instructions provided, as they do work, but they are fiddly.
Before you start, you have to ensure the following pre-reqs are met before running the template (taken from the doc, but with further comments from me) :
The public preview template for Kubernetes on Azure Stack has been out for a few months now, but the ability/guidance has only been available for a short while to deploy on systems using ADFS as the identity provider. That guidance is here: https://docs.microsoft.com/en-us/azure/azure-stack/user/azure-stack-solution-template-kubernetes-adfs
Feel free to follow the instructions provided, as they do work, but they are fiddly.
Before you start, you have to ensure the following pre-reqs are met before running the template (taken from the doc, but with further comments from me) :
Generate a SSH public and private key pair for the Linux VM’s the template creates. I use PuTTyGen. (Instructions here on generating a key: https://www.ssh.com/ssh/putty/windows/puttygen )
Have a valid tenant subscription where you are at least a contributor. The subscription/region should have enough public IP addresses (at least 2 for core deployment, you’ll need more for services you run on K8s)
Your tenant subscription will need the Key Vault service assigned within the the plan/offer
You’ll need the Kubernetes Cluster marketplace item, or you can just use the ARM template from here: https://github.com/msazurestackworkloads/azurestack-gallery/blob/master/kubernetes/template/DeploymentTemplates/azuredeploy.json
The next part of the doc talks about creating a service principal. This has to be done by an Azure Stack Operator. Currently, the Kubernetes template only supports service principals with certificates for ADFS systems, despite the fact that client secrets was introduced in 1811. Hopefully this will be addressed and supported in a future version, as it will remove the requirement for the certificate and KeyVault.
Once you’ve got the certificate, it needs to be uploaded to a KeyVault within your tenant subscription. The script provided in the doc does this for you, but you need to plug in quite a bit of information and there is the prospect of getting it wrong.
I’ve simplified the process of creating the cert, service principal, creating a key vault and uploading the cert as a secret by producing a script to do the hard work for you. To run it, you need to be an Azure Stack Operator (ability to connect to the ERCS) as well as having access to tenant subscription on the stamp of which you are a contributor.
The script does the following:
Checks if a KeyVault exists on the Azure Stack region with the name you have specified (if it does, it quits)
Creates a self-signed cert on the system you’re running the script on
Connects to the ERCS and creates a service principal using the cert
Exports the cert to a PFX file, with password of your choosing
Connects to Tenant subscription (If you have more than one subscription within the region, it will let you choose which one to deploy to)
Creates a Resource Group, a KeyVault within it and sets access policy to your user account
Uploads the certificate to the KeyVault as a secret
Dumps all the information you need for the template to screen and file
Param (
    $ERCS = (Read-Host -Prompt "ERCS"),
    $OutputPath = $ENV:Temp,
    $SubscriptionID,
    [ValidateNotNullOrEmpty()]
    $appNamePrefix = "appSPN",
    [ValidateNotNullOrEmpty()]
    $ResourceGroup = "K8sDemoAdFsRG",
    [ValidateNotNullOrEmpty()]
    $KeyvaultName = "K8sDemoAdFsKV51",
    [ValidateNotNullOrEmpty()]
    $keyVaultSecretName = "K8sSecret",
    [ValidateNotNull()]
    [System.Management.Automation.PSCredential]
    [System.Management.Automation.Credential()]
    $ErcsCredential = (Get-Credential -Message "Enter CloudAdmin Credentials for ERCS"),
    [ValidateNotNull()]
    [System.Management.Automation.PSCredential]
    [System.Management.Automation.Credential()]
    $cloudCredential = (Get-Credential -Message "Enter Azure Stack Tenant Credentials"),
    [ValidateNotNullOrEmpty()]
    [Security.SecureString]$PfxPassword=(Read-Host "Enter PFX Password" -AsSecureString)

)

[bool]$GeneratePFX = $true

function write-log($logentry){
    Write-output "$logentry" | out-file $detailFile -Append
    Write-output "$logentry"

}


# Location to write PFX file and log file
$OutputPath = $OutputPath.Trim('\')
if (!(Test-Path $OutputPath -pathType container)) {
	New-Item $OutputPath -type directory -Force
}


# Creating a PSSession to the ERCS PrivilegedEndpoint
$session = New-PSSession -ComputerName $ERCS -ConfigurationName PrivilegedEndpoint -Credential $ErcsCredential
$AzureStackInfo = Invoke-Command -Session $session -ScriptBlock { get-azurestackstampinformation }


# For Azure Stack development kit, this value is set to https://management.local.azurestack.external. We will read this from the AzureStackStampInformation output of the ERCS VM.
$ArmEndpoint = $AzureStackInfo.TenantExternalEndpoints.TenantResourceManager

# For Azure Stack development kit, this value is set to https://graph.local.azurestack.external/. We will read this from the AzureStackStampInformation output of the ERCS VM.
$GraphAudience = "https://graph." + $AzureStackInfo.ExternalDomainFQDN + "/"
# TenantID for the stamp. We will read this from the AzureStackStampInformation output of the ERCS VM.
$TenantID = $AzureStackInfo.AADTenantID

# Register an AzureRM environment that targets your Azure Stack instance
Add-AzureRMEnvironment ` -Name "azurestacktenant" ` -ArmEndpoint $ArmEndpoint

$location = $AzureStackInfo.RegionName
# Set the GraphEndpointResourceId value
$AzsEnv = Set-AzureRmEnvironment ` -Name "azurestacktenant" -GraphAudience $GraphAudience -EnableAdfsAuthentication:$true
$KeyVaultSuffix = $azsEnv.AzureKeyVaultDnsSuffix
$KeyvaultDnsName = "https://" + $KeyvaultName + "." + $KeyVaultSuffix
$KVSuffix = '/secrets/Secret1?api-version=2016-10-01'
$KVCheckURI = $KeyvaultDnsName + $KVSuffix

# This block of code in untidy, but tests whether the KeyVault namespace exists on the Stamp already (401) or not (404)
try {
    (Invoke-WebRequest -Uri $KVCheckURI -ErrorAction Stop).BaseResponse
} catch [System.Net.WebException] {
    # Messy, but we're not using a token to authenticate, just seeing if the name is already in use
    $Status = $_.Exception.Response.StatusCode.value__
    If ($Status -eq 404) {
       $stat = "does not exist"
    }
    else
    {
        $stat = "exists already"
    }
    Write-Debug ("KeyVault Namespace {0} {1} in Region {2}" -f $KeyvaultDnsName, $stat, $Location)

}

# Only carry on if the KeyVault namespace doesn't exist on the Stamp
If ($Status -eq 404) {
     Write-Debug "Creating Self-signed cert and new Graph APplication..."
     # This produces a self signed cert for testing purposes. It is preferred to use a managed certificate for this.

     if ($GeneratePFX) {
       $cert = New-SelfSignedCertificate -CertStoreLocation "cert:\CurrentUser\My" -Subject "CN=$appNamePrefix" -KeySpec KeyExchange
       $ServicePrincipal = Invoke-Command -Session $session {New-GraphApplication -Name $args[0] -ClientCertificates $args[1]} -ArgumentList $appNamePrefix,$cert
     }
     else {
       $ServicePrincipal = Invoke-Command -Session $session {New-GraphApplication -Name $args[0] -GenerateClientSecret} -ArgumentList $appNamePrefix
     }

    $session|remove-pssession

    $SPNName = $ServicePrincipal.ApplicationName
    $PFXFile    = "$OutputPath\$SPNName.pfx"
    $detailfile = "$OutputPath\$SPNName-details.txt"


    write-Log "Client Id          : $($ServicePrincipal.ClientId)"
    if ($GeneratePFX) { write-output "Cert Thumbprint  : $($ServicePrincipal.Thumbprint)"}
    else              { write-output "Client Secret    : $($ServicePrincipal.ClientSecret)"}
    write-Log "Application Name  : $($ServicePrincipal.ApplicationName)"
    write-Log "TenantID          : $TenantID"
    write-Log "ARM EndPoint      : $ArmEndpoint"
    write-Log "Admin Endpoint    : $AdminEndpoint"
    write-Log "Graph Audience    : $GraphAudience"


    # Now Export the cert to PFX
    if ($GeneratePFX){
       # enter a password for the PFX file...
       $pw = $PfxPassword
       # Store the cert in the designated output directory
       Export-PfxCertificate -cert $cert -FilePath $PFXFile -Password $pw
       write-Log "PFX Certificate   : $PFXFile"

    }

    # Connect to the Stamp
    If ($SubscriptionID) {
        $AzsUser = Login-AzureRmAccount  -Environment azurestacktenant -Credential $Cloudcreds -Subscription $subscriptionId
    }
    else
    {
        $AzsUser = Login-AzureRmAccount  -Environment azurestacktenant -Credential $Cloudcreds
        $Subs = Get-AzureRmSubscription
        # Show a list of subs if more than one is available
        If ($Subs.Count -gt 1) {
            $context = $Subs | Out-GridView -PassThru
            Set-AzureRmContext -Subscription $context

        }
    }

    #Get the SID for the user account you've used to connect to the Subscription
    $adfsuserID = $null

    try {
        # using the get-azurermaduser means the script can be used on non-domain joined systems :)
        $adfsuserID = (get-azurermaduser -UserPrincipalName $azsuser.Context.Account.Id).AdfsID
    }
    catch {

    }
    # This can be used for currently logged in user:
    <#
    if (-not $adfsuserID) {
        $Filter = "name = '" + $env:USERNAME + "' AND domain = '" + $env:USERDOMAIN + "'"
        $adfsuserID = (Get-WmiObject win32_useraccount -Filter "$Filter").SID
    }
    #>

    # Create new Resource group and key vault

    New-AzureRmResourceGroup -Name $ResourceGroup -Location $location -Force

    New-AzureRmKeyVault -VaultName $KeyvaultName -ResourceGroupName $ResourceGroup -Location $location -EnabledForTemplateDeployment

    Set-AzureRmKeyVaultAccessPolicy -VaultName $KeyvaultName -ResourceGroupName $ResourceGroup -ObjectId $adfsuserID -BypassObjectIdValidation -PermissionsToKeys all -PermissionsToSecrets all

    #Convert the secure pw to something that can be used
    $BSTR = [System.Runtime.InteropServices.Marshal]::SecureStringToBSTR($pw)
    $password = [System.Runtime.InteropServices.Marshal]::PtrToStringAuto($BSTR)

    $certContentInBytes = [io.file]::ReadAllBytes($PFXFile)
    $pfxAsBase64EncodedString = [System.Convert]::ToBase64String($certContentInBytes)
$jsonObject = @"
{
"data": "$pfxAsBase64EncodedString",
"dataType" :"pfx",
"password": "$password"
}
"@
    $jsonObjectBytes = [System.Text.Encoding]::UTF8.GetBytes($jsonObject)
    $jsonEncoded = [System.Convert]::ToBase64String($jsonObjectBytes)
    $secret = ConvertTo-SecureString -String $jsonEncoded -AsPlainText -Force
    $keyVaultSecret = Set-AzureKeyVaultSecret -VaultName $KeyvaultName -Name $keyVaultSecretName -SecretValue $secret

    #Give the new Service Principal Contributor rights to the Subscription
    New-AzureRmRoleAssignment -ApplicationID ($ServicePrincipal.ClientId) -RoleDefinitionName "Contributor" -Scope "/subscriptions/$($context.Id)"

    Write-Log ('')
    Write-Log "Service principal clientId     : $($ServicePrincipal.ClientId)"
    Write-Log "Key vault resource group       : $ResourceGroup "
    Write-Log "Key vault name                 : $KeyvaultName"
    Write-Log "Key vault secret               : $keyVaultSecretName"


    $detailfile
}
else {
    write-Error "Certificate and Keyvault processing halted as KeyVault namespace already exists in this region. Please try another name"
}
When you run the script, you should hopefully see output resembling this:

I’ve formatted it so that you can copy paste it into the template. I could have created a parameter file, but for my purposes this was fine.

For a deeper understanding of whats happening when deploying the template, take a look at Ned Bellavance’s great post here: https://nedinthecloud.com/2019/02/19/azure-stack-kubernetes-cluster-is-not-aks/ .

Azure Stack 1901 Update to VM Scale Limits
Azure Stack regularly releases updates, typically monthly. Sometimes in those updates we find good feature additions, bug fixes, and other items. Sometimes we see a bit of the ugly of cloud in known issues or workaround…
Azure Stack regularly releases updates, typically monthly. Sometimes in those updates we find good feature additions, bug fixes, and other items. Sometimes we see a bit of the ugly of cloud in known issues or workaround. In this particular update there is one point that stands out above the rest as being a little odd:
“There is a new consideration for accurately planning Azure Stack capacity. With the 1901 update, there is now a limit on the total number of Virtual Machines that can be created. This limit is intended to be temporary to avoid solution instability. The source of the stability issue at higher numbers of VMs is being addressed but a specific timeline for remediation has not yet been determined. With the 1901 update, there is now a per server limit of 60 VMs with a total solution limit of 700. For example, an 8 server Azure Stack VM limit would be 480 (8 * 60). For a 12 to 16 server Azure Stack solution the limit would be 700. This limit has been created keeping all the compute capacity considerations in mind such as the resiliency reserve and the CPU virtual to physical ratio that an operator would like to maintain on the stamp. For more information, see the new release of the capacity planner.
In the event that the VM scale limit has been reached, the following error codes would be returned as a result: VMsPerScaleUnitLimitExceeded, VMsPerScaleUnitNodeLimitExceeded.”
This is one of those ugly ones, and is caused by stability issues at high VM counts we’re told. So basically they’ve added a new limit on the number of VMs per node (60) and the number of VMs per solution (700, or 11.6 nodes at 60 per node). Now whats weird about this is its a VM limit. Not a vCPU, not a RAM, not a disk or other hard resource limit, but rather a VM. This means any calculations you do for capacity on Azure Stack need to take this new limit into consideration. Don’t simply assume that adding nodes will allow you to add more VM capacity if your already at these limits, even if your not at the 16 node limit yet.
I can certainly attest to some stability issues with high numbers of VMs accross large numbers of nodes, so it makes sense, but it bears repeating: Always read the release notes!

Azure Stack User Defined Routing Problem
I'm writing this post to highlight a problem I've encountered with User Defined Routes/Route Tables, and their implementation on Azure Stack. I'll not go into detail on when to use UDR's; the official documentation does a great job of that: https://docs.microsoft.com/en-us/azure/virtual-network/virtual-networks-udr-overview#custom-routes
Typically you would use a UDR within an Azure Stack tenant's VNet when you want to direct internet bound traffic via a third party network virtualized appliance (e.g. Firewall).
I'll qualify what I mean by 'Internet'. For Public Azure, Microsoft refer to any network within a virtual network as 'internet' that doesn't have a route entry as defined within the SDN (typically route entries will exist for the virtual network/subnets and BGP advertised routes such as peered VNets, ExpressRoute networks, etc). For unknown/external networks, it will forward the request on to the default gateway and via the Azure fabric to pop out onto the internet. If an Azure Stack based VNet encounters an unknown/external network, it will forward the traffic via the SDN to the upstream border switch, which in turn is connected to the corporate network. For disconnected deployments, there may not be a route out to the internet, but there will to the customer network.
Here's a couple of comments I have about this
Microsoft appear to use the same code base for Azure / Azure Stack for UDR's. There is no differentiation between the two platforms, which can cause a problem, as will be highlighted shortly.
For Azure Stack, the term 'Internet' is incorrect in my opinion. Think of 'internet' within Azure Stack as any network external to the appliance.
Now I've described that, here's a scenario and an issue I have encountered.
An Azure tenant deploys a virtual network and they want to control outbound access from the VM's via a firewall appliance. They want to be able to perform remote admin for VM's via a jump server from a secure admin workstation (SAW). They connect to the jump server via a Public IP associated with the jump server NIC. Nothing exotic is being suggested here and is a perfectly normal deployment scenario.
In theory, a UDR is associated to the subnet where the VM's are connected to (10.0.0.128/25) for address prefix 0.0.0.0/0 with next hop as the firewall IP address (10.0.0.4). In order not to cause an issue with routing or spoofing protection within the firewall, another route is added, with the address prefix being 172.16.100.24/32 and the next hop being 'Internet' (remember, Internet should be thought of as external network to the Azure Stack appliance!). Due to longest prefix matching rules being applied, the more specific /32 route will take preference over the /0 route, allowing for the firewall to be bypassed and allowing the SAW to connect via the Public IP.
That's the theory, but here's the problem:
The Corporate network is using an address space that's in the IANA Private use IP range ( https://www.iana.org/assignments/iana-ipv4-special-registry/iana-ipv4-special-registry.xhtml ) which is fairly common practice for the majority of enterprise networks. The problem is that I am unable to assign a UDR using an address prefix in any of these private ranges with the next hop as 'internet', as the validation for the route is expecting it to be in Public Address Space.
Exhibit a:
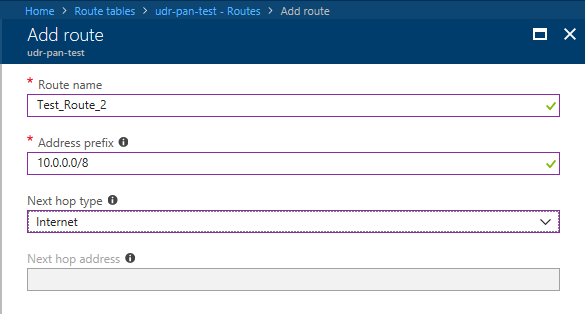


I have tested for the other Private ranges too and get the same outcome.
Obviously for Public Azure, this is not an issue and the validation will do it's job, but that's the problem in using sharing the code with Azure Stack, you don't know what state the customer network is in and what address space they have in use.
I've raised a support case as it will clearly be a problem for some customers, but at this time, I don't have any workaround. This is the case for all Azure Stack versions as of writing (1901).
Now, I'm guessing that by removing the validation step, it would fix the problem. It would be nice to rename the next hop type to 'External Network', or something more appropriate whilst they're at it :)

Adding Public IP Pools to Azure Stack
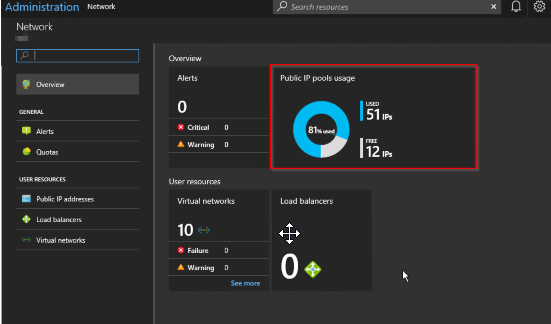
Azure Stack offers the ability to add Public IP Pools should the one you provided when the installation took place not be sufficient for your needs going forward. Typically this will be the case when an operator starts to receive alerts in the Admin portal like this:
OK, so this may be an intermittent warning, happening once every so often. If so, I suggest there's no need to take any action. However, if you get an alert warning of 90% utilization across all pools, it's time to take action, and that is to look into adding an extra pool.

Azure Stack offers the ability to add Public IP Pools should the one you provided when the installation took place not be sufficient for your needs going forward. Typically this will be the case when an operator starts to receive alerts in the Admin portal like this:

OK, so this may be an intermittent warning, happening once every so often. If so, I suggest there's no need to take any action. However, if you get an alert warning of 90% utilization across all pools, it's time to take action, and that is to look into adding an extra pool.
Reading the remediation steps make it sound straightforward, and the parts it lists are, but in reality it takes a deal of planning and configuration to implement.
The instructions listed here allude to the fact that the Azure Stack OEM is required to carry out some configuration on the Top of Rack switches. Why?
Well, as part of the initial installation of Azure Stack, all the configuration of the switches is automated and is then locked down so to prevent tampering and compromising the platform. This is achieved at the switch level by applying ACL's, controlling what traffic is allowed to ingress/egress from specific address ranges. The OEM has to add additional ACL's for the new Public IP range to ensure the veracity of the configuration and that your appliance acts as you would expect; e.g. external traffic trying to access services that have Public IP address in the new pool is allowed, not dropped at the switch.
Something else to be considered is whether your network service provider uses static routing, rather than BGP to advertise routing changes. If they use static routing, then they must add in the specific routes to forward traffic to the Top of Rack Switch transit networks. They will have had to do some similar configuration when Azure Stack was deployed, so they should already have the pertinent details.
Here are my more comprehensive steps that need to be carried out
1. Acquire another block of IP addresses from your network services provider. They need to make sure that they will be routable and do not overlap with existing addresses within the WAN.
2. Contact the Azure Stack OEM and arrange with them to configure the Top Of Rack Switches to add the new Public IP address range(s).
3. (Optional) If your network service provider uses static routing, rather than BGP to advertise routing changes, they must add in the specific routes to forward traffic to the Top of Rack Switch transit networks.
4. An Azure Stack Operator should sign into the admin portal

5. Open the Network Resource Provider blade and select Public IP pool usage
6.Click Add IP Pool and add the new Public Address range in CIDR format

7.Make sure the details look correct and click OK to apply *.

A word of warning - make sure you enter the details correctly as adding a new address pool via the portal is not reversible! If you do make a mistake, a call to Microsoft Support would be needed.
In the future, this process might be automated, but my advice is that at the planning stage, you supply a /22 address range (1022 IP addresses) to save yourself (and your tenants) the hassle
Topic Search
Posts by Date
- August 2025 1
- March 2025 1
- February 2025 1
- October 2024 1
- August 2024 1
- July 2024 1
- October 2023 1
- September 2023 1
- August 2023 3
- July 2023 1
- June 2023 2
- May 2023 1
- February 2023 3
- January 2023 1
- December 2022 1
- November 2022 3
- October 2022 7
- September 2022 2
- August 2022 4
- July 2022 1
- February 2022 2
- January 2022 1
- October 2021 1
- June 2021 2
- February 2021 1
- December 2020 2
- November 2020 2
- October 2020 1
- September 2020 1
- August 2020 1
- June 2020 1
- May 2020 2
- March 2020 1
- January 2020 2
- December 2019 2
- November 2019 1
- October 2019 7
- June 2019 2
- March 2019 2
- February 2019 1
- December 2018 3
- November 2018 1
- October 2018 4
- September 2018 6
- August 2018 1
- June 2018 1
- April 2018 2
- March 2018 1
- February 2018 3
- January 2018 2
- August 2017 5
- June 2017 2
- May 2017 3
- March 2017 4
- February 2017 4
- December 2016 1
- November 2016 3
- October 2016 3
- September 2016 5
- August 2016 11
- July 2016 13