
Adding Public IP Pools to Azure Stack
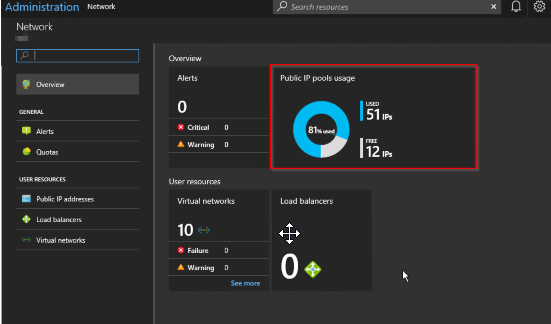
Azure Stack offers the ability to add Public IP Pools should the one you provided when the installation took place not be sufficient for your needs going forward. Typically this will be the case when an operator starts to receive alerts in the Admin portal like this:
OK, so this may be an intermittent warning, happening once every so often. If so, I suggest there's no need to take any action. However, if you get an alert warning of 90% utilization across all pools, it's time to take action, and that is to look into adding an extra pool.

Azure Stack offers the ability to add Public IP Pools should the one you provided when the installation took place not be sufficient for your needs going forward. Typically this will be the case when an operator starts to receive alerts in the Admin portal like this:

OK, so this may be an intermittent warning, happening once every so often. If so, I suggest there's no need to take any action. However, if you get an alert warning of 90% utilization across all pools, it's time to take action, and that is to look into adding an extra pool.
Reading the remediation steps make it sound straightforward, and the parts it lists are, but in reality it takes a deal of planning and configuration to implement.
The instructions listed here allude to the fact that the Azure Stack OEM is required to carry out some configuration on the Top of Rack switches. Why?
Well, as part of the initial installation of Azure Stack, all the configuration of the switches is automated and is then locked down so to prevent tampering and compromising the platform. This is achieved at the switch level by applying ACL's, controlling what traffic is allowed to ingress/egress from specific address ranges. The OEM has to add additional ACL's for the new Public IP range to ensure the veracity of the configuration and that your appliance acts as you would expect; e.g. external traffic trying to access services that have Public IP address in the new pool is allowed, not dropped at the switch.
Something else to be considered is whether your network service provider uses static routing, rather than BGP to advertise routing changes. If they use static routing, then they must add in the specific routes to forward traffic to the Top of Rack Switch transit networks. They will have had to do some similar configuration when Azure Stack was deployed, so they should already have the pertinent details.
Here are my more comprehensive steps that need to be carried out
1. Acquire another block of IP addresses from your network services provider. They need to make sure that they will be routable and do not overlap with existing addresses within the WAN.
2. Contact the Azure Stack OEM and arrange with them to configure the Top Of Rack Switches to add the new Public IP address range(s).
3. (Optional) If your network service provider uses static routing, rather than BGP to advertise routing changes, they must add in the specific routes to forward traffic to the Top of Rack Switch transit networks.
4. An Azure Stack Operator should sign into the admin portal

5. Open the Network Resource Provider blade and select Public IP pool usage
6.Click Add IP Pool and add the new Public Address range in CIDR format

7.Make sure the details look correct and click OK to apply *.

A word of warning - make sure you enter the details correctly as adding a new address pool via the portal is not reversible! If you do make a mistake, a call to Microsoft Support would be needed.
In the future, this process might be automated, but my advice is that at the planning stage, you supply a /22 address range (1022 IP addresses) to save yourself (and your tenants) the hassle

Azure Stack update 1811 - my favorite feature in this release
Microsoft have just released Azure Stack Update 1.1811.0.101, and for me, it is one I am looking forward to implementing now that I have read the release notes on the new capabilities.

Microsoft have just released Azure Stack Update 1.1811.0.101, and for me, it is one I am looking forward to implementing now that I have read the release notes on the new capabilities. For some, the headline feature is the introduction of Extension Host, which simplifies access to the portals and management endpoints over SSL (it acts as a reverse proxy). This has been known about for some months, as Microsoft have been warning operators of additional certificate requirements and to be ready for it: https://docs.microsoft.com/en-us/azure/azure-stack/azure-stack-extension-host-prepare. This is good, as it means less firewall rules are required and I'm all for simplification, but not the most exciting introduction for me - that's the support for service principals using client secrets.
Why's that?
I've been working with Azure Stack with AD FS as the identity provider for many months and previously the only way to provision Service Principals (for use by automation or applications) was to use X509 certs for authentication. Setting up the certs is pretty cumbersome , as they have to be generated, imported to systems that you want to run the automation on, grab the thumbprint, generate PEM files with the private key for use with Azure CLI. For me, too many areas where stuff might not work (e.g., the certificate may not be present in the local computer store where the automation is running and throw an error.)
Using X509 certs to authenticate worked for a some scenarios, but not for others. For instance, a number of third party solutions//tools (and first party!) couldn't be used, as they were written to be compatible with Azure AD Service Principals (which primarily uses secrets). One example is the TerraForm provider; prior to this update, it could only be used for Azure AD implementations, but in theory it's now open to AD FS as well. What this release also opens up is the possibility of deploying the Kubernetes ARM template that is currently in preview. The template requires a Service Principal ClientID and Client Secret, so blocked deployment to disconnected systems previously.
I haven't had the chance to apply the update yet, but I will do it ASAP and look forward to testing whether client secrets for ADFS works as I expect.

Adding Additional Nodes to Azure Stack
Last week, I had the opportunity to add some extra capacity to a four-node appliance that I look after. Luckily, I got to double the capacity, so making it an eight-node scale unit.

Last week, I had the opportunity to add some extra capacity to a four-node appliance that I look after. Luckily, I got to double the capacity, so making it an eight-node scale unit. This post documents my experience and fills in the gaps that the official documentation doesn’t tell you 😊 From a high-level perspective, these are the activities that take place:
Additional nodes/servers are racked and stacked in the same rack as the existing scale unit.
The Node BMC interface is configured with an IP address and Gateway server within the management network, along with the correct username/password (the same as the existing nodes in the cluster).
The Azure Stack OEM configures the BMC and Top of Rack switch configurations to enable the additional switch ports for the additional nodes.
Azure Stack Operator adds each additional node to the Scale Unit (one at a time)
Compute resource becomes available first
S2D re-balances the cluster, once completed, the additional storage is made available
Easy huh?
Here’s a bit more detail into each of the steps:
Each of the additional nodes that are being added to the scale unit must be identical to the existing servers. This includes CPU, memory, storage capacity, hardware versions. The hardware must be installed as prescribed by the OEM and connected to the BMC and TOR switches to the correct ports. It is unclear whose responsibility this is, whether it is the OEM or the operator, so check beforehand when you purchase your additional nodes.
For Azure Stack to be able to add the additional nodes into the scale unit, the BMC interface must be configured so that the IP/subnet/Gateway are correctly configured, as well as the username and password that matches the existing nodes in the scale unit. This is critical as any misconfiguration will stop the node being added. As an example, assume that the management network is set to 10.0.0.0/27 and we have 4 existing nodes in our scale unit. 10.0.0.1 would be our Gateway address, 10.0.0.3 – 10.0.0.6 would be the IP address of nodes 1 – 4, so for our first additional node, we would use 10.0.0.7, incrementing from there up to a maximum of 16 nodes (10.0.0.18)
The network switches must be configured by the OEM. There is currently no provision for the additional configuration to be carried out via automation, and if the network switches were to be opened to an operator, this breaks the principle of Azure Stack being a blackbox appliance. The switches need reconfiguring to enable the additional ports on the BMC and two Top of Rack switches. Unused ports are purposely not enabled to keep the configuration as secure as possible.
Prior to attempting addition of the additional nodes, check in the Administrator Portal whether any existing FRU operations are taking place (e.g. rebuild of an existing node due to a hardware issue).
OK, so all the above has been carried out the Azure Stack operator can start to add in the additional nodes. From the Administrator portal:
Select Dashboard -> Region Management
Select Scale Units to open the blade:
We currently have a nice and healthy four-node cluster 😊. Select Add Node to open the configuration blade.
With the current release, as there is only one region and scale unit, there is only one option that we can select for the first two drop downs.
Enter the BMC IP address of the additional node and select OK
My first attempt didn't work as the BMC was incorrectly configured (The Gateway address for the BMC adapter was not set).
This is the error you will see if there is a problem:
Correcting the gateway address solved the problem. Here is what you’ll see when the scale unit is expanding:
After a few minutes, you will see the additional node being listed as a member of the s-cluster scale unit, albeit listed as Stopped.
Clicking on the new node will show the status as ‘Adding’, if you click on it from the blade.
If you prefer, you can check the status via PowerShell. From a system that has the Azure Stack PowerShell modules installed, connect to the Admin Endpoint environment and run:
#Retrieve Status for the Scale Unit
Get-AzsScaleUnit|select name,state

#Retrieve Status for each Scale Unit Node
Get-AzsScaleUnitNode |Select Name, ScaleUnitNodeStatus, PowerState
Whilst the expansion takes place, a critical alert fired. It's safe to ignore this.
Successfully completed node addition ill show the power status as running, plus the additional cores and memory available to the cluster :
It takes a little shy of 3 hours to complete the addition of a single cluster node:
Note: you can only add one extra node at a time, if you do, an error will be thrown as below:
I found that the first node added without a hitch, but subsequent nodes had some issues. I got error messages stating ‘Device not found’ on a couple of occasions. In hindsight, I guess that in the background, the cluster was performing some S2D operations and it caused some clashes for the newly added node. To fix this, I had to perform a ‘Repair’ on the new node. This invariably fixed the problem on the first attempt. If there was more information into what is actually happening under the hood, I could give a more qualified answer.
Eventually, All nodes were added 😊
Adding those additional nodes does not add additional storage to the Scale Unit until the S2D cluster has rebalanced. The only way you know that a rebalance is taking place is that the status of the scale unit shows as ‘expanding’, and will do for a long time after adding the additional node(s)!
Here’s how the Infrastructure File Shares blade looks like whist expansion is taking place:
Once expansion has completed, then the additional infrastructure file shares are created:
Unfortunately, there is no way to check the progress of the rebalance operation either in the portal or via PowerShell. The Privileged Endpoint does include the Get-StorageJob CMDlet, but this is useless unless the support session is unlocked. If it is unlocked, the following script could be used to check:
$ClusterName="s-cluster"

$jobs=(Get-StorageSubSystem -CimSession $ClusterName -FriendlyName Clus* | Get-StorageJob -CimSession $ClusterName)

if ($jobs){
	do{
		$jobs=(Get-StorageSubSystem -CimSession $ClusterName -FriendlyName Clus* | Get-StorageJob -CimSession $ClusterName)
		$count=($jobs | Measure-Object).count
		$BytesTotal=($jobs | Measure-Object BytesTotal -Sum).Sum
		$BytesProcessed=($jobs | Measure-Object BytesProcessed -Sum).Sum

		$percent=($jobs.PercentComplete)
		Write-output("$count Storage Job(s) Running. GBytes Processed: $($BytesProcessed/1GB) GBytes Total: $($BytesTotal/1GB) Percent: $($percent)% `r")

		Start-Sleep 10
	}until($jobs -eq $null)
}

Azure Stack portal bug
As I’m mainly working with Azure Stack deployments that use AD FS as the identity provider, I’m coming across some differences and bugs compared to where Azure AD is used.

As I’m mainly working with Azure Stack deployments that use AD FS as the identity provider, I’m coming across some differences and bugs compared to where Azure AD is used. One such bug is the following:
A user is a member of a global AD group that is assigned Contributor role to a Tenant Subscription. They aren’t added directly as a user to the subscription.
When that user connects to the portal, they will be presented with the following if they click on the subscription:
If they try and create a resource within the subscription, they get the following:
By connecting as this same user via PowerShell or Azure CLI, they can create a resource group and resources and do everything expected of a Contributor.
I logged a support case with Microsoft and they have confirmed this is a bug in the portal and that it will be fixed in an imminent release (potentially 1811).
In the meantime, the workaround is to assign users directly to the role rather than via a global group or to use the API / PowerShell / Az CLI to manage resources.

Capturing and using API queries from Azure in PowerShell with Fiddler
This is a walkthrough for using Fiddler to capture traffic to Azure from a browser and writing and running that query in PowerShell. I wrote this because I don't like posts that skip over a key step and explain the entire thing with a wave of the hand. Although this article stands on it own, it is a key step in another series.

Similar New Content: Using Developer Tools to get the Payload to Create Azure Budget Alerts for Action Groups (New-AzConsumptionBudget) — Crying Cloud
This is a walkthrough for using Fiddler to capture traffic to Azure from a browser and writing and running that query in PowerShell. I wrote this because I don't like posts that skip over a key step and explain the entire thing with a wave of the hand. Although this article stands on it own, it is a key step in another series.
Install & Configure Fiddler
https://www.telerik.com/fiddler. We need to decrypt traffic from Azure. Basically, you're letting Fiddler get in the middle of the conversation you're having with Azure and take a look at the traffic. After installation select, Tools -> Options, select capture and decrypt HTTPS traffic.

You need to close and reopen Fiddler. From the file menu, you can select start or stop, to capture internet traffic. Ensure capture is on and then refresh Azure page you want to query. In this case, I want to capture data from the cost analysis page for a resource group. This is easier when you close down most browser windows except the one you want to investigate. You can also apply filters and capture limitations, but I'll let you figure that out.

Capture Your Query
I want to capture the cost for a resource group with daily totals so we can capture the cost over the month based on resource group tagging. Browse to a resource group and select cost analysis with capture traffic.

The next part you'll just need to search through the queries and look for what you're after. Select JSON in the response to see the data returned.

In the above results we can see the rows of cost data in the JSON response page, however, the other record in the row is the resource type, not the date.

This looks better, the columns JSON field shows the Cost, Date, and Currency and we can even see some rows with the right data, so we have the query. Now to create this in PowerShell.
Create Query in PowerShell
First, grab the header and then create a few parameters. Note this is a POST command.

Raw Header
POST /subscriptions/11111111-4444-8888-9999-222222222222/YourResourceGroupName/azurestackproduction/providers/Microsoft.CostManagement/query?api-version=2018-08-31&$top=40000 HTTP/1.1
Converted
$SubscriptionGUID = '11111111-4444-8888-9999-222222222222' $ResourceGroupName = 'YourResourceGroupName' $usageUri = "https://management.azure.com/subscriptions/$SubscriptionGUID/resourceGroups/$ResourceGroupName/providers/Microsoft.CostManagement/query?api-version=2018-08-31"

We need to create the JSON object that is passed with the POST. Shown above is what we need to recreate.

Select Raw and capture the text in the brackets. This will take a little bit of effort to convert into a PowerShell JSON object with variables.
commas , become semi colons ;
the { needs a @ in front of it @{
colons : need =
RAW
{"type":"Usage","timeframe":"Custom","timePeriod":{"from":"2018-10-01T00:00:00+00:00","to":"2018-10-31T23:59:59+00:00"},"dataSet":{"granularity":"Daily","aggregation":{"totalCost":{"name":"PreTaxCost","function":"Sum"}},"sorting":[{"direction":"ascending","name":"UsageDate"}]}}
Converted
$year =(get-date).year $month =(get-date).Month $DaysInMonth= [DateTime]::DaysInMonth($year, $month ) $Body = @{"type"="Usage";"timeframe"="Custom";"timePeriod"=@{"from"="$($year)-$($month)-01T00:00:00+00:00";"to"="$($year)-$($month)-$($DaysInMonth)T23:59:59+00:00"};"dataSet"=@{"granularity"="Daily";"aggregation"=@{"totalCost"=@{"name"="PreTaxCost";"function"="Sum"}};"sorting"=@(@{"direction"="ascending";"name"="UsageDate"})}}
BearerToken
To access this data since we aren't logged in with PowerShell you need a bearer token. Luckily someone has written a helpful query to capture the bearer token from your existing session. https://gallery.technet.microsoft.com/scriptcenter/Easily-obtain-AccessToken-3ba6e593.
function Get-AzureRmCachedAccessToken() {   $ErrorActionPreference = 'Stop'

  if(-not (Get-Module AzureRm.Profile)) {     Import-Module AzureRm.Profile   }   $azureRmProfileModuleVersion = (Get-Module AzureRm.Profile).Version   # refactoring performed in AzureRm.Profile v3.0 or later   if($azureRmProfileModuleVersion.Major -ge 3) {     $azureRmProfile = [Microsoft.Azure.Commands.Common.Authentication.Abstractions.AzureRmProfileProvider]::Instance.Profile     if(-not $azureRmProfile.Accounts.Count) {       Write-Error "Ensure you have logged in before calling this function."         }   } else {     # AzureRm.Profile < v3.0     $azureRmProfile = [Microsoft.WindowsAzure.Commands.Common.AzureRmProfileProvider]::Instance.Profile     if(-not $azureRmProfile.Context.Account.Count) {       Write-Error "Ensure you have logged in before calling this function."         }   }

  $currentAzureContext = Get-AzureRmContext   $profileClient = New-Object Microsoft.Azure.Commands.ResourceManager.Common.RMProfileClient($azureRmProfile)   Write-Debug ("Getting access token for tenant" + $currentAzureContext.Subscription.TenantId)   $token = $profileClient.AcquireAccessToken($currentAzureContext.Subscription.TenantId)   $token.AccessToken }
If we include this function in our code and write a few more lines we are ready to start putting it all together. We create the headers sections, we use invoke-restmethod with POST we pass the body which must be converted with depth 100 otherwise data gets chopped out.
$token = Get-AzureRmCachedAccessToken  $headers = @{"authorization"="bearer $token"}

$results = Invoke-RestMethod $usageUri -Headers $headers -ContentType "application/json" -Method Post -Body ($body | ConvertTo-Json -Depth 100)
Final Script
$SubscriptionGUID = '11111111-4444-8888-9999-222222222222'  $ResourceGroupName = 'YourResourceGroupName'

function Get-AzureRmCachedAccessToken() {   $ErrorActionPreference = 'Stop'

  if(-not (Get-Module AzureRm.Profile)) {     Import-Module AzureRm.Profile   }   $azureRmProfileModuleVersion = (Get-Module AzureRm.Profile).Version   # refactoring performed in AzureRm.Profile v3.0 or later   if($azureRmProfileModuleVersion.Major -ge 3) {     $azureRmProfile = [Microsoft.Azure.Commands.Common.Authentication.Abstractions.AzureRmProfileProvider]::Instance.Profile     if(-not $azureRmProfile.Accounts.Count) {       Write-Error "Ensure you have logged in before calling this function."         }   } else {     # AzureRm.Profile < v3.0     $azureRmProfile = [Microsoft.WindowsAzure.Commands.Common.AzureRmProfileProvider]::Instance.Profile     if(-not $azureRmProfile.Context.Account.Count) {       Write-Error "Ensure you have logged in before calling this function."         }   }

  $currentAzureContext = Get-AzureRmContext   $profileClient = New-Object Microsoft.Azure.Commands.ResourceManager.Common.RMProfileClient($azureRmProfile)   Write-Debug ("Getting access token for tenant" + $currentAzureContext.Subscription.TenantId)   $token = $profileClient.AcquireAccessToken($currentAzureContext.Subscription.TenantId)   $token.AccessToken }

$year =(get-date).year $month =(get-date).Month $DaysInMonth= [DateTime]::DaysInMonth($year, $month )

$token =  Get-AzureRmCachedAccessToken $headers = @{"authorization"="bearer $token"} $Body =  @{"type"="Usage";"timeframe"="Custom";"timePeriod"=@{"from"="$($year)-$($month)-01T00:00:00+00:00";"to"="$($year)-$($month)-$($DaysInMonth)T23:59:59+00:00"};"dataSet"=@{"granularity"="Daily";"aggregation"=@{"totalCost"=@{"name"="PreTaxCost";"function"="Sum"}};"sorting"=@(@{"direction"="ascending";"name"="UsageDate"})}}

$usageUri = "https://management.azure.com/subscriptions/$SubscriptionGUID/resourceGroups/$ResourceGroupName/providers/Microsoft.CostManagement/query?api-version=2018-08-31"    $results = Invoke-RestMethod $usageUri -Headers $headers -ContentType "application/json" -Method Post -Body ($body | ConvertTo-Json -Depth 100)

$results.properties.columns $results.properties.rows
Results
This shows the two output selected columns and rows

Good luck creating your own queries, I hope you found this helpful.
You can find another similar article by Microsoft here
Topic Search
Posts by Date
- August 2025 1
- March 2025 1
- February 2025 1
- October 2024 1
- August 2024 1
- July 2024 1
- October 2023 1
- September 2023 1
- August 2023 3
- July 2023 1
- June 2023 2
- May 2023 1
- February 2023 3
- January 2023 1
- December 2022 1
- November 2022 3
- October 2022 7
- September 2022 2
- August 2022 4
- July 2022 1
- February 2022 2
- January 2022 1
- October 2021 1
- June 2021 2
- February 2021 1
- December 2020 2
- November 2020 2
- October 2020 1
- September 2020 1
- August 2020 1
- June 2020 1
- May 2020 2
- March 2020 1
- January 2020 2
- December 2019 2
- November 2019 1
- October 2019 7
- June 2019 2
- March 2019 2
- February 2019 1
- December 2018 3
- November 2018 1
- October 2018 4
- September 2018 6
- August 2018 1
- June 2018 1
- April 2018 2
- March 2018 1
- February 2018 3
- January 2018 2
- August 2017 5
- June 2017 2
- May 2017 3
- March 2017 4
- February 2017 4
- December 2016 1
- November 2016 3
- October 2016 3
- September 2016 5
- August 2016 11
- July 2016 13