Azure Stack Marketplace download issue and how to mitigate
I recently deployed new Azure Stack integrated system, and despite a few of the usual issues I was expecting (network integration!!!), everything went well up until the point of me needing to syndicate items in to the Marketplace via the admin portal. https://docs.microsoft.com/en-us/azure-stack/operator/azure-stack-download-azure-marketplace-item?view=azs-1908#connected-scenario
I could download some of the smaller items successfully, such as the VM extensions, but those that were larger, failed.
Initially, I thought it was a transient network issue, so deleted the failed items from the Marketplace and re-attempted the download, but I had the same problem re-occurred.
Because the admin portal only gives 3 states for Marketplace item (Downloading, Downloaded, or Failed), I wanted to try and determine where the problem lay before calling Support.
To do this, I used the Azure Stack Tools, more specifically: Export-AzSOfflineMarketplaceItem CMDLet. https://docs.microsoft.com/en-us/azure-stack/operator/azure-stack-download-azure-marketplace-item?view=azs-1908#disconnected-or-a-partially-connected-scenario. By running in PowerShell, I felt I had more chance in figuring out what was going on by using Verbose logging.
To get more verbose information, I used the azcopy option. When I first started investigating the problem, the version of the tools required AZCopy v7.3/8.1. This required installation via an MSI. However, earlier last week, a new version of the tools was released which uses AZCopy v10 https://docs.microsoft.com/en-us/azure/storage/common/storage-use-azcopy-v10. I much prefer Microsoft’s approach to new releases of this tool as it is a single file, does not require installation, and therefore does not require admin rights.
Here’s a little wrapper script based on that in the documentation to download the Azure Stack tools. It also retrieves azcopy v10 and places it into the tools directory:
# Change directory to the root directory.
cd \

# Download the tools archive.
[Net.ServicePointManager]::SecurityProtocol = [Net.SecurityProtocolType]::Tls12
invoke-webrequest `
  https://github.com/Azure/AzureStack-Tools/archive/master.zip `
  -OutFile master.zip

# Expand the downloaded files.
expand-archive master.zip `
  -DestinationPath . `
  -Force

# Change to the tools directory.
cd AzureStack-Tools-master
# Download azcopy v10
invoke-webrequest `
  https://aka.ms/downloadazcopy-v10-windows `
  -OutFile azcopy.zip

# Expand the downloaded files.
expand-archive azcopy.zip `
  -DestinationPath . `
  -Force
Here’s a script to download marketplace items from Public Azure and then upload it to your stamp:
$Region = "local"   # For ASDK, this is local, change to match your region for integrated deployments
$FQDN = "azurestack.external" # For ASDK, this is azurestack.external
$AzSEnvironmentName = "AzureStackadmin" # Change this if you want more than one Azure Stack registraion on your system

$RegistrationRG = 'AzureStack' # Get this from the AdminPortal / Dashboard / Region / Properties / REGISTRATION RESOURCE GROUP if unsure
$RegistrationUserName = '<user>@<your tenant>.onmicrosoft.com' # User with rights to the Registraion Resource Group

$OperatorUserName = '<operator user name>@<your tenant>' # Username of Operator that is contributor/owner or Default Subscriber Subscription
$OperatorAADTenantName = '<Operator tenant name>' # the AAD tenant Name e.g. <mytenant>.onmicrosoft.com

$mktPlcFolder = "D:\Mkt" # Directory to store downloaded content.  Must exist before running
$azcopypath = "C:\AzureStack-Tools-master\azcopy_windows_amd64_10.2.1\azcopy.exe"

# Register an Azure Resource Manager environment that targets your Azure Stack instance. Get your Azure Resource Manager endpoint value from your service provider.
Add-AzureRMEnvironment -Name "AzureStackAdmin" -ArmEndpoint "https://adminmanagement.$Region.$FQDN" `
    -AzureKeyVaultDnsSuffix adminvault.$Region.$FQDN `
    -AzureKeyVaultServiceEndpointResourceId https://adminvault.$Region.$FQDN

# Set your tenant name
$AuthEndpoint = (Get-AzureRmEnvironment -Name $AzSEnvironmentName).ActiveDirectoryAuthority.TrimEnd('/')
$TenantId = (invoke-restmethod "$($AuthEndpoint)/$($OperatorAADTenantName)/.well-known/openid-configuration").issuer.TrimEnd('/').Split('/')[-1]

#Get the credentials for an identity with permission to the subscription that the stamp is registered to.  sed to download Marketplace item from azure
$RegistrationCreds = get-credential  $RegistrationUserName -Message "Enter Azure Subscription Credentials"
# Get the credentials for an identity that has contributor/owner rights to the Default Provider Subscription.  used to upload Marketplace item to the Stamp
$operatorCreds = Get-Credential -Message "Enter the azure stack operator credential:" -UserName $OperatorUserName

# first, connect to Public Azure...
Add-AzureRmAccount -Credential $RegistrationCreds -Environment AzureCloud
Get-AzureRmSubscription | Select-AzureRmSubscription

cd C:\AzureStack-Tools-master
Import-Module .\Syndication\AzureStack.MarketplaceSyndication.psm1

# Download the item.  You will be prompted to choose from an Out-Grid window...
Export-AzSOfflineMarketplaceItem -Destination $mktPlcFolder -resourceGroup  $RegistrationRG -AzCopyDownloadThreads 16 -azCopyPath $azcopypath

# Once the download has finished, swich to the Stack admin environment and upload the Marketplace item.
Add-AzureRmAccount -EnvironmentName $AzSEnvironmentName -TenantId $TenantId -Credential $operatorCreds
Import-AzSOfflineMarketplaceItem -origin $mktPlcFolder -AzsCredential $operatorCreds
When you run the script, you’ll be prompted for credentials and then which items you want to download. You can choose multiple items (CTRL and select), but I advise selecting 1 item at a time, as you will be prompted to accept the legal terms and conditions, as well as selecting the download method (azcopy) per choice. You may miss the prompts for subsequent items if the first download takes a while.
Once the selection has been made, you’ll see the following:
Select ‘y’ for both questions, and the download should start.
For the environment I was operating in, downloading via the internet took a while, as there were QoS rules applied.
After a while, I saw the following error:
OK, so I seemed to have the same problem via the portal and with the PowerShell tools. As I was using AZCopy for the download, there are logs, so that was the first port of call for me. The logs are stored in the following directory:
%USERPROFILE%\.azcopy
So I navigated there and opened the latest log file. I found the following towards the end:
I’ve highlighted the key entry that pointed me towards the problem:
‘…the MD5 hash of the data, as we received it, did not match the expected value, as found in the Blob/File Service. This means there is a data integrity error OR another tool has failed to keep the stored hash up to date.’
OK, so I thought this could have been a problem with some inline firewall or web proxy, but then I could open the smaller items, such as the icons associated with the marketplace item, or the manifest json files.
To prove if it was an issue with the environment I was operating in or not, I decided to spin up a Windows Server 2016 VM in Azure and attach a 200GB data disk and run through the same process as above. Thankfully, the downloads were a lot quicker, as would be expected given I was using the Azure Network fabric, but I found that the download failed again, and I saw the same error regarding the MD5 hash. Weird!
I decided to see if there was a way I could circumvent the MD5 hash check to see if I could at least complete the download and get something into the Marketplace so I could test if the item worked or not. This capability is not native within the Export-AzSOfflineMarketplaceItem, but there is a parameter within azcopy to do this: https://docs.microsoft.com/en-us/azure/storage/common/storage-use-azcopy-files#download-files. If I could add --check-md5=NoCheck or --check-md5=LogOnly to the azcopy command within Export-AzSOfflineMarketplaceItem, I could at least test it.
This is actually quite simple to do. by editing C:\AzureStack-Tools-master\Syndication\AzureStack.MarketplaceSyndication.psm1 (replace C:\AzureStack-Tools-master to match path where you have the tools), modify lines 591 & 593 (as of the current version at time of writing) to read:
& $azCopyPath copy $Source $tmpDestination --recursive --check-md5=LogOnly
It should look like this:
If you already had the AzureStack.MarketplaceSyndication.psm1 loaded, simply close your PowerShell session.
Once I made the changes, I retried the process again, and this time, SUCCESS!
The Marketplace images downloaded and I was able to import them to my stamp, with no issue. I was able to deploy VM’s using these images with no problem.
I’m not sure if there’s an underlying problem with azcopy and the Marketplace content, but at least I managed to figure out a workaround that doesn’t appear to have any detrimental effects, so hopefully it can help out someone else who might have a similar problem.
Azure Stack Update 1905 - Additional Resource Requirements
As I’ve been away on holiday (vacation) I missed out on a fairly crucial piece of information from the release notes for Integrated systems.
From https://docs.microsoft.com/en-us/azure-stack/operator/azure-stack-release-notes-1905:

How many people picked up on this?
So, be prepared after you’ve run the update to lose some of the capacity that was previously available to tenants.
I confess to not having any insight into how the Infrastructure Ring will work, and was at first dubious to the claim of reducing overall consumption at first, but my guess is that on each hardware node there will be a VM which will be running Service Fabric, and from within there, they will run containerized versions of the XRP, ACS (Azure Consistent Storage), WAS (Admin management endpoint & portal), WASP (User management endpoint & portal). I’m not sure if the Network Controllers, Gateway or SLB’s could move to the containerized platform.
Doing some rough calculations by looking at the Infrastructure Roles Blade in the Admin Portal, I calculated that currently the VM’s hosting the roles I guessed would be moving currently consume 102 GB and 36 vCPU.
Example of where to find out the VM sizes of infra roles in the Admin Portal:

So, in reality it looks like vCPU consumption will in fact increase, but Memory decrease, and you know what, I’m OK with that. Memory is the most precious resource in my opinion, as it is not over-committed. You’re likely to run out of that before Compute.
Hopefully we can see the benefits of the new architecture soon.
ARM Template deployment bug in Azure Stack
I came across an interesting situation at a client when trying to deploy an ARM template that I have deployed a few times in the past successfully on both Azure and Azure Stack. What the template deploys does'nt matter, but I came across a problem that you might encounter when deploying a Template with parameters, more specifically, how they're named.
I tried to deploy a template I modified back in January to a customer's Azure Stack stamp that was at the latest update version (1905) at the time of writing.
The parameters looked like this:
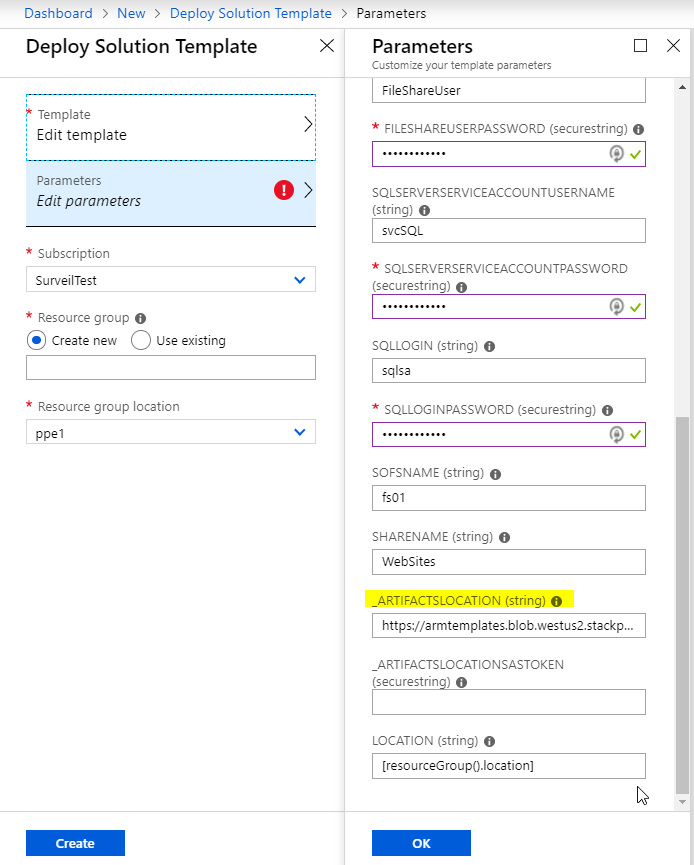
When I tried to do a custom deployment, I got the following:


I tried to deploy the same template to Azure and it worked, so I knew the template was OK. I also tried on a 1902 system and it worked. Testing on a 1903 system and I got the error above again, so whatever change is causing the problem was introduced with that update and continues onwards.
After some trial and error, doing a find/replace renaming the parameter to remove the '_' before the _artifactslocation & _artifactsLocationSasToken in my templates. It wasn’t so obvious from the error message what the issue was, one of the joys of working with ARM!
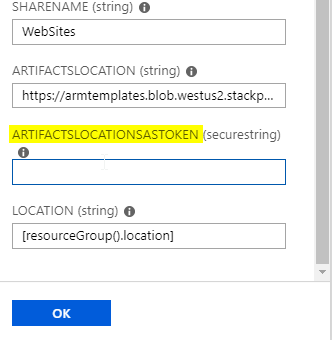
Hopefully this issue gets fixed as _artifactsLocation and _artifactsLocationSasToken are classed as standard parameters per https://github.com/Azure/azure-quickstart-templates/blob/master/1-CONTRIBUTION-GUIDE/best-practices.md

Simplifying Kubernetes deployments on ADFS Azure Stack systems
he public preview template for Kubernetes on Azure Stack has been out for a few months now, but the ability/guidance has only been available for a short while to deploy on systems using ADFS as the identity provider. That guidance is here: https://docs.microsoft.com/en-us/azure/azure-stack/user/azure-stack-solution-template-kubernetes-adfs
Feel free to follow the instructions provided, as they do work, but they are fiddly.
Before you start, you have to ensure the following pre-reqs are met before running the template (taken from the doc, but with further comments from me) :
The public preview template for Kubernetes on Azure Stack has been out for a few months now, but the ability/guidance has only been available for a short while to deploy on systems using ADFS as the identity provider. That guidance is here: https://docs.microsoft.com/en-us/azure/azure-stack/user/azure-stack-solution-template-kubernetes-adfs
Feel free to follow the instructions provided, as they do work, but they are fiddly.
Before you start, you have to ensure the following pre-reqs are met before running the template (taken from the doc, but with further comments from me) :
Generate a SSH public and private key pair for the Linux VM’s the template creates. I use PuTTyGen. (Instructions here on generating a key: https://www.ssh.com/ssh/putty/windows/puttygen )
Have a valid tenant subscription where you are at least a contributor. The subscription/region should have enough public IP addresses (at least 2 for core deployment, you’ll need more for services you run on K8s)
Your tenant subscription will need the Key Vault service assigned within the the plan/offer
You’ll need the Kubernetes Cluster marketplace item, or you can just use the ARM template from here: https://github.com/msazurestackworkloads/azurestack-gallery/blob/master/kubernetes/template/DeploymentTemplates/azuredeploy.json
The next part of the doc talks about creating a service principal. This has to be done by an Azure Stack Operator. Currently, the Kubernetes template only supports service principals with certificates for ADFS systems, despite the fact that client secrets was introduced in 1811. Hopefully this will be addressed and supported in a future version, as it will remove the requirement for the certificate and KeyVault.
Once you’ve got the certificate, it needs to be uploaded to a KeyVault within your tenant subscription. The script provided in the doc does this for you, but you need to plug in quite a bit of information and there is the prospect of getting it wrong.
I’ve simplified the process of creating the cert, service principal, creating a key vault and uploading the cert as a secret by producing a script to do the hard work for you. To run it, you need to be an Azure Stack Operator (ability to connect to the ERCS) as well as having access to tenant subscription on the stamp of which you are a contributor.
The script does the following:
Checks if a KeyVault exists on the Azure Stack region with the name you have specified (if it does, it quits)
Creates a self-signed cert on the system you’re running the script on
Connects to the ERCS and creates a service principal using the cert
Exports the cert to a PFX file, with password of your choosing
Connects to Tenant subscription (If you have more than one subscription within the region, it will let you choose which one to deploy to)
Creates a Resource Group, a KeyVault within it and sets access policy to your user account
Uploads the certificate to the KeyVault as a secret
Dumps all the information you need for the template to screen and file
Param (
    $ERCS = (Read-Host -Prompt "ERCS"),
    $OutputPath = $ENV:Temp,
    $SubscriptionID,
    [ValidateNotNullOrEmpty()]
    $appNamePrefix = "appSPN",
    [ValidateNotNullOrEmpty()]
    $ResourceGroup = "K8sDemoAdFsRG",
    [ValidateNotNullOrEmpty()]
    $KeyvaultName = "K8sDemoAdFsKV51",
    [ValidateNotNullOrEmpty()]
    $keyVaultSecretName = "K8sSecret",
    [ValidateNotNull()]
    [System.Management.Automation.PSCredential]
    [System.Management.Automation.Credential()]
    $ErcsCredential = (Get-Credential -Message "Enter CloudAdmin Credentials for ERCS"),
    [ValidateNotNull()]
    [System.Management.Automation.PSCredential]
    [System.Management.Automation.Credential()]
    $cloudCredential = (Get-Credential -Message "Enter Azure Stack Tenant Credentials"),
    [ValidateNotNullOrEmpty()]
    [Security.SecureString]$PfxPassword=(Read-Host "Enter PFX Password" -AsSecureString)

)

[bool]$GeneratePFX = $true

function write-log($logentry){
    Write-output "$logentry" | out-file $detailFile -Append
    Write-output "$logentry"

}


# Location to write PFX file and log file
$OutputPath = $OutputPath.Trim('\')
if (!(Test-Path $OutputPath -pathType container)) {
	New-Item $OutputPath -type directory -Force
}


# Creating a PSSession to the ERCS PrivilegedEndpoint
$session = New-PSSession -ComputerName $ERCS -ConfigurationName PrivilegedEndpoint -Credential $ErcsCredential
$AzureStackInfo = Invoke-Command -Session $session -ScriptBlock { get-azurestackstampinformation }


# For Azure Stack development kit, this value is set to https://management.local.azurestack.external. We will read this from the AzureStackStampInformation output of the ERCS VM.
$ArmEndpoint = $AzureStackInfo.TenantExternalEndpoints.TenantResourceManager

# For Azure Stack development kit, this value is set to https://graph.local.azurestack.external/. We will read this from the AzureStackStampInformation output of the ERCS VM.
$GraphAudience = "https://graph." + $AzureStackInfo.ExternalDomainFQDN + "/"
# TenantID for the stamp. We will read this from the AzureStackStampInformation output of the ERCS VM.
$TenantID = $AzureStackInfo.AADTenantID

# Register an AzureRM environment that targets your Azure Stack instance
Add-AzureRMEnvironment ` -Name "azurestacktenant" ` -ArmEndpoint $ArmEndpoint

$location = $AzureStackInfo.RegionName
# Set the GraphEndpointResourceId value
$AzsEnv = Set-AzureRmEnvironment ` -Name "azurestacktenant" -GraphAudience $GraphAudience -EnableAdfsAuthentication:$true
$KeyVaultSuffix = $azsEnv.AzureKeyVaultDnsSuffix
$KeyvaultDnsName = "https://" + $KeyvaultName + "." + $KeyVaultSuffix
$KVSuffix = '/secrets/Secret1?api-version=2016-10-01'
$KVCheckURI = $KeyvaultDnsName + $KVSuffix

# This block of code in untidy, but tests whether the KeyVault namespace exists on the Stamp already (401) or not (404)
try {
    (Invoke-WebRequest -Uri $KVCheckURI -ErrorAction Stop).BaseResponse
} catch [System.Net.WebException] {
    # Messy, but we're not using a token to authenticate, just seeing if the name is already in use
    $Status = $_.Exception.Response.StatusCode.value__
    If ($Status -eq 404) {
       $stat = "does not exist"
    }
    else
    {
        $stat = "exists already"
    }
    Write-Debug ("KeyVault Namespace {0} {1} in Region {2}" -f $KeyvaultDnsName, $stat, $Location)

}

# Only carry on if the KeyVault namespace doesn't exist on the Stamp
If ($Status -eq 404) {
     Write-Debug "Creating Self-signed cert and new Graph APplication..."
     # This produces a self signed cert for testing purposes. It is preferred to use a managed certificate for this.

     if ($GeneratePFX) {
       $cert = New-SelfSignedCertificate -CertStoreLocation "cert:\CurrentUser\My" -Subject "CN=$appNamePrefix" -KeySpec KeyExchange
       $ServicePrincipal = Invoke-Command -Session $session {New-GraphApplication -Name $args[0] -ClientCertificates $args[1]} -ArgumentList $appNamePrefix,$cert
     }
     else {
       $ServicePrincipal = Invoke-Command -Session $session {New-GraphApplication -Name $args[0] -GenerateClientSecret} -ArgumentList $appNamePrefix
     }

    $session|remove-pssession

    $SPNName = $ServicePrincipal.ApplicationName
    $PFXFile    = "$OutputPath\$SPNName.pfx"
    $detailfile = "$OutputPath\$SPNName-details.txt"


    write-Log "Client Id          : $($ServicePrincipal.ClientId)"
    if ($GeneratePFX) { write-output "Cert Thumbprint  : $($ServicePrincipal.Thumbprint)"}
    else              { write-output "Client Secret    : $($ServicePrincipal.ClientSecret)"}
    write-Log "Application Name  : $($ServicePrincipal.ApplicationName)"
    write-Log "TenantID          : $TenantID"
    write-Log "ARM EndPoint      : $ArmEndpoint"
    write-Log "Admin Endpoint    : $AdminEndpoint"
    write-Log "Graph Audience    : $GraphAudience"


    # Now Export the cert to PFX
    if ($GeneratePFX){
       # enter a password for the PFX file...
       $pw = $PfxPassword
       # Store the cert in the designated output directory
       Export-PfxCertificate -cert $cert -FilePath $PFXFile -Password $pw
       write-Log "PFX Certificate   : $PFXFile"

    }

    # Connect to the Stamp
    If ($SubscriptionID) {
        $AzsUser = Login-AzureRmAccount  -Environment azurestacktenant -Credential $Cloudcreds -Subscription $subscriptionId
    }
    else
    {
        $AzsUser = Login-AzureRmAccount  -Environment azurestacktenant -Credential $Cloudcreds
        $Subs = Get-AzureRmSubscription
        # Show a list of subs if more than one is available
        If ($Subs.Count -gt 1) {
            $context = $Subs | Out-GridView -PassThru
            Set-AzureRmContext -Subscription $context

        }
    }

    #Get the SID for the user account you've used to connect to the Subscription
    $adfsuserID = $null

    try {
        # using the get-azurermaduser means the script can be used on non-domain joined systems :)
        $adfsuserID = (get-azurermaduser -UserPrincipalName $azsuser.Context.Account.Id).AdfsID
    }
    catch {

    }
    # This can be used for currently logged in user:
    <#
    if (-not $adfsuserID) {
        $Filter = "name = '" + $env:USERNAME + "' AND domain = '" + $env:USERDOMAIN + "'"
        $adfsuserID = (Get-WmiObject win32_useraccount -Filter "$Filter").SID
    }
    #>

    # Create new Resource group and key vault

    New-AzureRmResourceGroup -Name $ResourceGroup -Location $location -Force

    New-AzureRmKeyVault -VaultName $KeyvaultName -ResourceGroupName $ResourceGroup -Location $location -EnabledForTemplateDeployment

    Set-AzureRmKeyVaultAccessPolicy -VaultName $KeyvaultName -ResourceGroupName $ResourceGroup -ObjectId $adfsuserID -BypassObjectIdValidation -PermissionsToKeys all -PermissionsToSecrets all

    #Convert the secure pw to something that can be used
    $BSTR = [System.Runtime.InteropServices.Marshal]::SecureStringToBSTR($pw)
    $password = [System.Runtime.InteropServices.Marshal]::PtrToStringAuto($BSTR)

    $certContentInBytes = [io.file]::ReadAllBytes($PFXFile)
    $pfxAsBase64EncodedString = [System.Convert]::ToBase64String($certContentInBytes)
$jsonObject = @"
{
"data": "$pfxAsBase64EncodedString",
"dataType" :"pfx",
"password": "$password"
}
"@
    $jsonObjectBytes = [System.Text.Encoding]::UTF8.GetBytes($jsonObject)
    $jsonEncoded = [System.Convert]::ToBase64String($jsonObjectBytes)
    $secret = ConvertTo-SecureString -String $jsonEncoded -AsPlainText -Force
    $keyVaultSecret = Set-AzureKeyVaultSecret -VaultName $KeyvaultName -Name $keyVaultSecretName -SecretValue $secret

    #Give the new Service Principal Contributor rights to the Subscription
    New-AzureRmRoleAssignment -ApplicationID ($ServicePrincipal.ClientId) -RoleDefinitionName "Contributor" -Scope "/subscriptions/$($context.Id)"

    Write-Log ('')
    Write-Log "Service principal clientId     : $($ServicePrincipal.ClientId)"
    Write-Log "Key vault resource group       : $ResourceGroup "
    Write-Log "Key vault name                 : $KeyvaultName"
    Write-Log "Key vault secret               : $keyVaultSecretName"


    $detailfile
}
else {
    write-Error "Certificate and Keyvault processing halted as KeyVault namespace already exists in this region. Please try another name"
}
When you run the script, you should hopefully see output resembling this:

I’ve formatted it so that you can copy paste it into the template. I could have created a parameter file, but for my purposes this was fine.

For a deeper understanding of whats happening when deploying the template, take a look at Ned Bellavance’s great post here: https://nedinthecloud.com/2019/02/19/azure-stack-kubernetes-cluster-is-not-aks/ .

Azure Stack 1901 Update to VM Scale Limits
Azure Stack regularly releases updates, typically monthly. Sometimes in those updates we find good feature additions, bug fixes, and other items. Sometimes we see a bit of the ugly of cloud in known issues or workaround…
Azure Stack regularly releases updates, typically monthly. Sometimes in those updates we find good feature additions, bug fixes, and other items. Sometimes we see a bit of the ugly of cloud in known issues or workaround. In this particular update there is one point that stands out above the rest as being a little odd:
“There is a new consideration for accurately planning Azure Stack capacity. With the 1901 update, there is now a limit on the total number of Virtual Machines that can be created. This limit is intended to be temporary to avoid solution instability. The source of the stability issue at higher numbers of VMs is being addressed but a specific timeline for remediation has not yet been determined. With the 1901 update, there is now a per server limit of 60 VMs with a total solution limit of 700. For example, an 8 server Azure Stack VM limit would be 480 (8 * 60). For a 12 to 16 server Azure Stack solution the limit would be 700. This limit has been created keeping all the compute capacity considerations in mind such as the resiliency reserve and the CPU virtual to physical ratio that an operator would like to maintain on the stamp. For more information, see the new release of the capacity planner.
In the event that the VM scale limit has been reached, the following error codes would be returned as a result: VMsPerScaleUnitLimitExceeded, VMsPerScaleUnitNodeLimitExceeded.”
This is one of those ugly ones, and is caused by stability issues at high VM counts we’re told. So basically they’ve added a new limit on the number of VMs per node (60) and the number of VMs per solution (700, or 11.6 nodes at 60 per node). Now whats weird about this is its a VM limit. Not a vCPU, not a RAM, not a disk or other hard resource limit, but rather a VM. This means any calculations you do for capacity on Azure Stack need to take this new limit into consideration. Don’t simply assume that adding nodes will allow you to add more VM capacity if your already at these limits, even if your not at the 16 node limit yet.
I can certainly attest to some stability issues with high numbers of VMs accross large numbers of nodes, so it makes sense, but it bears repeating: Always read the release notes!
Topic Search
Posts by Date
- August 2025 1
- March 2025 1
- February 2025 1
- October 2024 1
- August 2024 1
- July 2024 1
- October 2023 1
- September 2023 1
- August 2023 3
- July 2023 1
- June 2023 2
- May 2023 1
- February 2023 3
- January 2023 1
- December 2022 1
- November 2022 3
- October 2022 7
- September 2022 2
- August 2022 4
- July 2022 1
- February 2022 2
- January 2022 1
- October 2021 1
- June 2021 2
- February 2021 1
- December 2020 2
- November 2020 2
- October 2020 1
- September 2020 1
- August 2020 1
- June 2020 1
- May 2020 2
- March 2020 1
- January 2020 2
- December 2019 2
- November 2019 1
- October 2019 7
- June 2019 2
- March 2019 2
- February 2019 1
- December 2018 3
- November 2018 1
- October 2018 4
- September 2018 6
- August 2018 1
- June 2018 1
- April 2018 2
- March 2018 1
- February 2018 3
- January 2018 2
- August 2017 5
- June 2017 2
- May 2017 3
- March 2017 4
- February 2017 4
- December 2016 1
- November 2016 3
- October 2016 3
- September 2016 5
- August 2016 11
- July 2016 13