
Rotating App Service Certificates on Azure Stack Hub
If anyone has seen my previous post about using Lets Encrypt open source certificates with Azure Stack Hub may remember that those certs have a 90 day lifetime. This means that if you do use them, you’ll need to rotate your certificates on a more regular cadence than the normal 1 year with paid for third party cert authorities. For me, this isn’t a problem as it adds only a small amount of overhead to managing my stamps, assisted by helper scripts to generate the certs and some clear documentation on the process for rotating the core infra SSL Certs (found here).
What isn’t so clear is how to rotate the certs for your App Service PaaS infrastructure. I haven’t found any easily findable (is that a word?) reference to it in the online documentation. Not to worry, it’s actually a fairly simple process and I’ve recorded step-by-step how to perform it.
One thing I’ll point out first - you won’t find any alerts regarding impending App Service certificates expiration like you do with the core infrastructure, so you’ll have to make a note in your calendar for a suitable date to renew your certs, or just periodically check the admin portal.
From the Admin Portal, open up the App Service blade
Open the Secrets blade
From here you can check how many days you have left until your certs expire. As you can see in my case I have 11 days, so time to rotate!
Selecting the Rotate button brings up a new blade. From here you provide the locations of the Default App Service pfx cert, API pfx, FTP (or publishing) pfx and the SSO (or Identity Application) pfx, along with the corresponding passwords for these files.
Once you have entered these details and clicked OK, the Certificate Rotation status window will show you the progress of the task
You can navigate from this screen and do other tasks if you want. You can click on the Status button to check on the progress.
What you should see if the details you entered were validated.
Success!
The whole process took between 15-20 minutes. I wasn’t sure as I went and got a coffee!
Just to check that the certificates have actually been updated, I refreshed the Secrets blade and saw that the expiry was now 90 days, per the new Lets Encrypt certs I created.
Hopefully this is of some use to fellow Azure Stack Hub operators who haven’t had to update their App Service Certs yet, and remember, you won’t be alerted if they do expire!

Azure Stack Hub 1910 new private IP address range requirement
Anyone who follows Azure Stack Hub may well remember that back in update 1905, there were a couple of new infrastructure roles created (Infrastructure ring and Support Ring), in preparation for running containerized version of the infrastructure roles that run the AzsHub core. Here’s a screen grab of the release note for that release that I provide for convenience as the original article has been archived:
With update 1910, there is a new requirement before deploying the next update that an additional private /20 address is required for the containerized workloads. The release notes for the update gives some good detail on this requirement and why it is needed:
Once the 1910 update has been applied, you will soon see the following alert in the Admin portal:
The instructions link takes you to the release note link I posted above.
So, what do you have to plan for to implement this change? In reality, not much. The only requirements are to use a range in the IANA private IP Address ranges and that what you choose is not already in use within your network.
Private ranges you can use:
10.0.0.0/8
172.16.0.0/12
192.168.0.0/16
With regards to checking whether the address range is already in use, you’ll have to check with your network team or consult your IPAM system.
With regards to actually adding the addresses, it is very straightforward.
Per the instructions in the release notes, you need to open a PEP session and run a simple PowerShell command.
For my environment, I chose 172.16.0.0/20 as the address range.
$creds = Get-Credential -Message "Enter cloud admin credentials" -UserName "mystamp\cloudadmin"
$pepIP = "mypepip"

$session = New-PSSession -ComputerName $pepIP -ConfigurationName PrivilegedEndpoint -Credential $creds

Invoke-Command -Session $Session -ScriptBlock {
    Set-AzsPrivateNetwork -UserSubnet 172.16.0.0/20
Here’s what you will see if the command has run successfully:
If you are lucky enough to have multiple stamps in your network, you can reuse the same address range for all installations. as it is only used internally by Azure Stack Hub.
Add a Service Connection to Azure Stack Hub in Azure DevOps
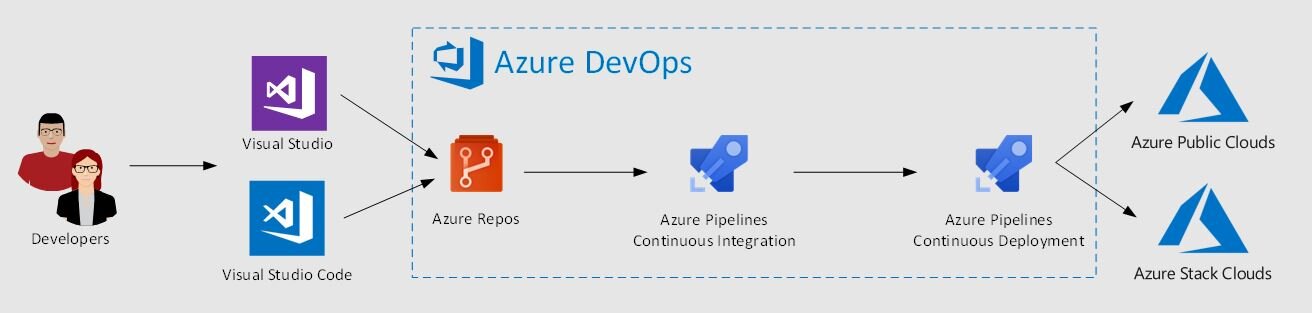
One of the key aspects of the system formally known as Azure Stack, now to be called Azure Stack Hub (ASH) is, that it is a target for automation. The chances are if you are considering running this at scale and you are deploying content through the portal UI, you’re probably doing it wrong.
ASH makes a great target for among other things a DevOps toolchain. I’m not sure if you have tried connecting from Azure DevOps portal but Azure DevOps has undergone a lot of changes and a lot of the documentation looks different.
I wanted to share the steps to create a ‘Service Connection’ from Azure DevOps. This is assuming you are using an Azure AD connected ASH Installation.
First, you’ll need to create a Service Principal in Azure AD.
The steps are shown here briefly below. Here are some detailed instructions if needed.
https://docs.microsoft.com/en-us/azure/active-directory/develop/howto-create-service-principal-portal
Navigate to your Azure AD and register a new application

Make sure to copy the Application ID or Client ID, the Directory ID or Tenant ID into some temporarily like notepad

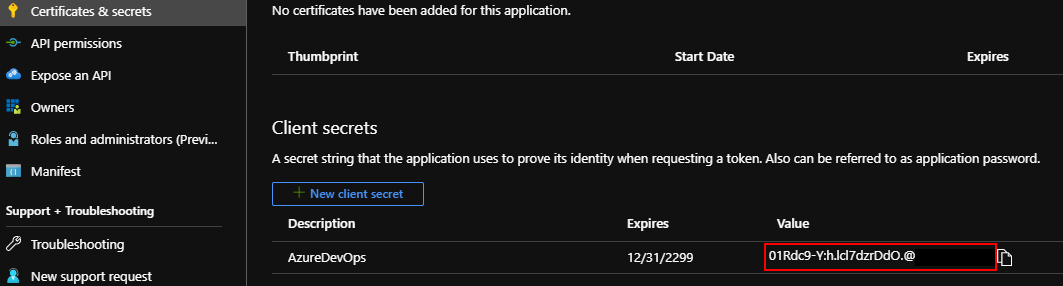
Next click ‘Certificates & Secrets’
Select ‘+ New Client Secret’
Enter a description and key expiry length
Make sure to copy the secret
You need to add this SPN you have just created to your Azure Stack Subscription through the Access Control (IAM). At this stage you might want to capture the Azure Stack Subscription ID and name for later.

Regarding Azure DevOps I am going to assume you already have an organization and project configured.
If you go to the Project Settings page, under the Pipelines section,
then select 'Service Connections’
click ‘New service connection’

Finally we can create the ‘Service Connection’ using ‘Service Principal Authentication’

You need to click the hyperlink ‘Use the full version of the service connection dialog’

Select ‘Azure Stack’ from the drop down list (obviously Azure DevOps hasn’t been told about the name change just yet)
Complete the form and select ‘Verify Connection’
And you’re done | Good luck on your Pipeline
Extending Storage into Azure Stack with iSCSI
If you understand Azure Stack and its storage you may know, Azure Stack storage is highly redundant. Meaning, if you are using NVMe or other flash style storage you can end up consuming very expensive storage with content that may not need that level of redundancy or quality of speed.
Working with Microsoft we have created a pattern to help explore some options for using the iSCSI protocol to mount iSCSI disks into your Azure Stack environment. A simple start is to set up a server that can present iSCSI targets to your IaaS systems and mount iSCSI disk inside your VMs. This means you can use the storage without dealing with share permissions or complex authentication as the storage is secured by IP and Chap authentication. This allows it to be used inside the Azure Stack environment as you see fit. This does open up options for large storage scenarios where you can serve storage up from your existing infrastructure, perhaps being able to leverage your existing investments with SAN or NAS infrastructure.
Below is a high-level overview of how this is implemented.

You can find more details and deployment scripts to help deploy and integrate into your own deployments and environments. There are of course many ways to serve up iSCSI storage this is meant as a stepping stone for you to explore what solutions are right for you and your business.
https://github.com/Azure-Samples/azure-intelligent-edge-patterns/tree/master/storage-iSCSI
We hope this unlocks some value or creates some scenarios to expand the possibilities Azure Stack can offer.
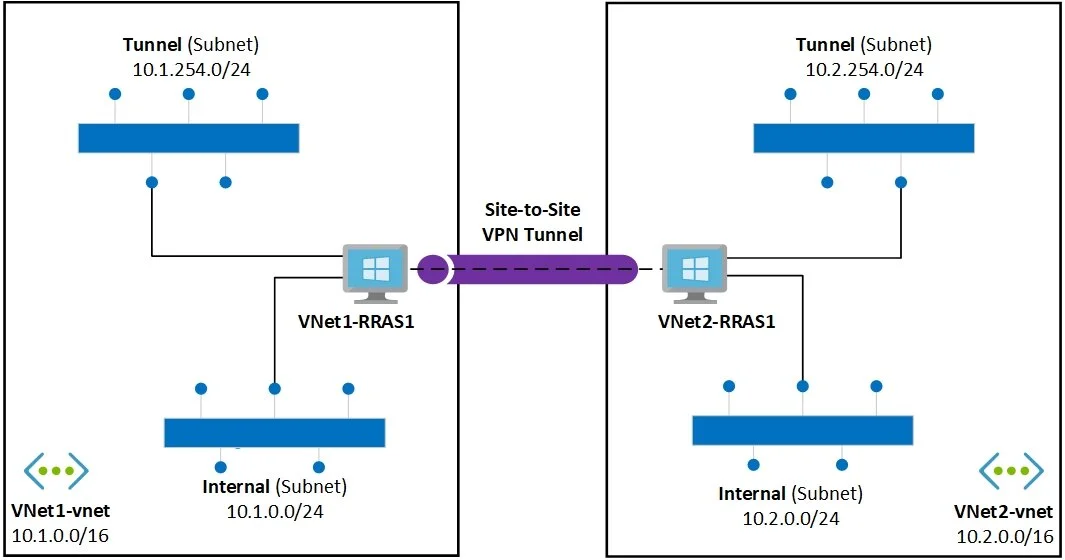
Connecting Azure Stack Tenant Networks to …
If you have been working with Azure Stack and trying to connect networks together or connect to existing services within your own data center you may have come up against some hurdles. I was lucky enough to be able to help develop some patterns for Microsoft to expand the capability of Azure Stack. Using RRAS as the backbone of the solution enables multiple scenarios of connectivity. Below are some of the solutions that can be unlocked.

Here is a high-level overview of how the solution connects two different networks. An example is if you have a patching system that requires direct access to your systems to validate and orchestrate patching. By deploying one side of the tunnel to Azure Stack and one side into your on-prem systems, you would need to add a route within your networking infrastructure but once the solution is deployed and connected the systems would practically be considered adjacent and able to talk directly to each other.
Below are two single quick deployment templates. These are primarily designed for you to stand up the solutions and have a look at how it works. One solution uses IKE and the other uses GRE for the tunnels. While you can use these deployed templates and connect your systems to these VNets there is a modular version which is more flexible in term of deployment patterns and options.
https://github.com/Azure-Samples/azure-intelligent-edge-patterns/tree/master/rras-gre-vnet-vnet
https://github.com/Azure-Samples/azure-intelligent-edge-patterns/tree/master/rras-ike-vnet-vnet
This template is a modular version of the above solution. It requires you to deploy the RRAS server on each side of the tunnel and then configure the tunnel. There are slightly different parameters required for the IKE and GRE tunnels but you can configure both.
https://github.com/Azure-Samples/azure-intelligent-edge-patterns/tree/master/rras-vnet-vpntunnel
You can find all the appropriate details for deployment in the above links.
Hopefully, this helps unlock some value.
Topic Search
Posts by Date
- August 2025 1
- March 2025 1
- February 2025 1
- October 2024 1
- August 2024 1
- July 2024 1
- October 2023 1
- September 2023 1
- August 2023 3
- July 2023 1
- June 2023 2
- May 2023 1
- February 2023 3
- January 2023 1
- December 2022 1
- November 2022 3
- October 2022 7
- September 2022 2
- August 2022 4
- July 2022 1
- February 2022 2
- January 2022 1
- October 2021 1
- June 2021 2
- February 2021 1
- December 2020 2
- November 2020 2
- October 2020 1
- September 2020 1
- August 2020 1
- June 2020 1
- May 2020 2
- March 2020 1
- January 2020 2
- December 2019 2
- November 2019 1
- October 2019 7
- June 2019 2
- March 2019 2
- February 2019 1
- December 2018 3
- November 2018 1
- October 2018 4
- September 2018 6
- August 2018 1
- June 2018 1
- April 2018 2
- March 2018 1
- February 2018 3
- January 2018 2
- August 2017 5
- June 2017 2
- May 2017 3
- March 2017 4
- February 2017 4
- December 2016 1
- November 2016 3
- October 2016 3
- September 2016 5
- August 2016 11
- July 2016 13