First Impressions; Flying with Copilot in VSCode
I have a few deployment activities on my plate for Azure Stack HCI and AKS using PowerShell. I have been interested in GitHub Copilot, and what little I have seen is interesting but just haven’t had time to “dig in”. Figuring this was as good a time as any to try copilot in VS code to assist me in writing some PowerShell deployment scripts, I decided to jump in.
With no time to learn or research anything, I decided the best approach rather than do nothing, was to sign-up, read zero documentation and see how intuitive copilot actually is, and share my experience. You only have one opportunity to use something for the first time.
$100 for 1 year, 60-day free trial, enter a credit card, install the extension, authenticate extension, and literally within minutes had my copilot silently standing by.
Here are some impressions captured during the first 6 days of my experience.
The first thing I had to get used to, was the tab to complete the suggestions. I really just wanted to tab and suddenly I have code.

Next, I began to notice that my copilot was starting to become aware of context with variables in the page and understanding what I was trying to do. Completing repeatable patterns and adding valuable comments.

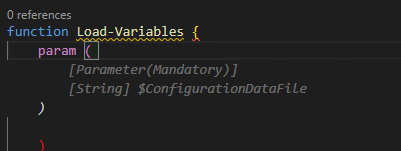
Below this case, the variable $configrationDataFile was in another open file and was actually the thing I wanted to load. Additionally, this created the Mandatory parameter correctly. I'll be honest I probably wouldn’t have added mandatory code.
Here, I had written a for each loop to invoke some commands, then realized I needed to create the PS session first. I moved the cursor up and created a new line and my copilot knew what I needed. Tab Cheers
I manually created the HCIAdminGroup variable and parameters and went to the next line, and my copilot suggested HCIClusterAdminGroup. I wondered how many more credentials it would create. All those shown in the square, I didn’t need or perhaps better said at this stage I don’t think I need them, but all good suggestions.

I was adding comments as headers to a function and discovered this is how you created a complete function. Which I then remembered was the demo I had seen. Not a bad start, Tab

tab

I spent some time on this function as it was. I didn’t capture the error from this code above but got one related. This was tough, it was trying to get a secure string from a keyvault and create a credential. I did spend more time messing with it than probably writing it.

I deleted it and thought I would try a more comprehensive comment and after knowing the issue and writing a better description, my copilot provided a better path.
There were more examples but hopefully, this gives you an impression of what the beginner, with no research experience, looked like, over my first 6 days.
Overall, I am very impressed with my complete lack of knowledge of how to use it, and how well it did “just work”. I did spend some time wrestling with the code created, perhaps I trusted it as if I had written it myself. After a few hiccups, I started taking the approach of verification and validation as the first step and simply reading it, before executing it and even deleting complete functions and trying to describe what I need more comprehensively.
I can see value in that you could create a full skeleton of a module or script just from comments and work through flow or logic issues before committing time to writing code.
This hands-on experience has motivated me to go learn about shortcut keys, settings, and other options. I might even make time to read some documentation; What I can turn on or off? what else it can actually do? I am beginning to feel a need to name my copilot.
If you have a coding project and haven’t tried GitHub Copilot, I strongly suggest signing up for 1 year and giving it a shot, no learning is required. Put a reminder in your calendar for 58 days later and decide if you want to continue coding with copilot.
On day 6, I can say for $8.30 a month, I’m pretty confident I won’t be coding solo again.
Probably spending 5 minutes to browse and read the documentation would have been helpful, though that wasn’t the point of my experiment. Getting started with GitHub Copilot in Visual Studio Code - GitHub Docs. I wonder if Copilot for PowerPoint is on the road map… “Tell ‘em he’s dreaming” ;)
Quick start shortcut keys
Trigger suggestions Atl + \
Complete suggestion TAB
Seeing alternative suggestions
OS See next suggestion See previous suggestion
macOS Option (⌥) or Alt+] Option (⌥) or Alt+[
Windows Alt+] Alt+[
Linux Alt+] Alt+[
Getting started with GitHub Copilot in Visual Studio Code - GitHub Docs
MAAS Image Builder Exclude Update by KB#
This briefly shows how to alter the image builder scripts to exclude broken KBs for specific OS versions. This example shows excluding Cumulative Update for Windows 11 Insider Preview (KB5019765) on an HCI image.
Trying to build a newer HCI Maas image and receive an error trying to download an update via release channel. Specifically, Windows 11 insider preview KB5019765
If you edit the Logon.ps1 found in the UnattendedResource folder from cloudbase/windows-imaging-tools: Tools to automate the creation of a Windows image for OpenStack, supporting KVM, Hyper-V, ESXi and more. (github.com) you can see there is a section that allows you to create a blacklist of KBs for different OS version.
Using PowerShell [System.Environment]::OSVersion.Version you can find the OS version
Finally add a record for the OS version and KB you want to exclude

Which is displayed via verbose output during build


Ensure your AAD Users can't create AD Tenants!!

I do understand distributed management and delegation, but this seems like a step too far. There is a new setting that allows users to be able to create their own Azure AD tenants. While it is a great privilege and setting to have, why ‘Yes’ would be the default choice is an interesting default and I would like to understand the rationale behind that.

Save your future self from a number of headaches, just select no.


Using Developer Tools to get the Payload to Create Azure Budget Alerts for Action Groups (New-AzConsumptionBudget)
Are you trying to create a budget with PowerShell using New-AzConsumptionBudget on a resource group? You might have tried the code reference on this page New-AzConsumptionBudget (Az.Billing) | Microsoft Learn.
# If you update the sample command and try to execute
New-AzConsumptionBudget -ResourceGroupName budgetThis -Amount 60 -Name PSBudgetRG -Category Cost -StartDate 2022-11-01 -EndDate 2024-11-01 -TimeGrain Monthly
If you’re not using a subscription in an EA, you’ll get this error New-AzConsumptionBudget: Operation returned an invalid status code 'BadRequest'

Running get-error doesn’t provide much in the way of help to resolve. After further digging you’ll find the PowerShell reference page, you’ll probably find that Microsoft docs states you have to be an “EA customer, you can create and edit budgets programmatically using the Azure PowerShell module. However, we recommend that you use REST APIs to create and edit budgets because CLI commands might not support the latest version of the APIs."
If you are using EA subscription it still doesn’t create the alerts and the PowerShell doco doesn’t seem easy to use to create these notifications either.
Hopefully, you found this script SetConsumptionBudget.ps1 Create a Consumption Budget for ResourceGroups in Azure (github.com). It is a complete script and is helpful. This is a good implementation of the content documented here. Budgets - Create Or Update - REST API (Azure Consumption) | Microsoft Learn.
What if you couldn’t find a pre-created script what would you do? Or if you wanted a simplified call rather than the long doc example, in this case, I wanted to leverage using an Action Group.
Let’s create a budget through the Azure portal called “CreatedWithUI” and use the browser developer tools (F12) to capture the traffic requests to the Azure API.
After you click “Create” you’ll see traffic and see the request payload
You can copy the properties section, you just need to add the properties name back in.

With some changes to the syntax object, we can create a script to create the budget alerting an Action Group.
# Converted Syntax for use in script
$bodyObject = @{
    "properties"= @{
        "timePeriod" = @{
            "startDate"= "2022-10-01T00:00:00Z"
            "endDate"= "2024-09-30T00:00:00Z"
        }
        "timeGrain" = "Monthly"
        "amount"= 62
        "category"= "Cost"
        "notifications" =@{
            "forecasted_GreaterThan_90_Percent"= @{
                "enabled" = $true
                "operator"= "GreaterThan"
                "threshold"= 90
                "contactGroups"= @("/subscriptions/00000000-1111-2222-3333-444444444444/resourceGroups/cloudmodernization-rg/providers/microsoft.insights/actionGroups/BudgetAlerts")
                "thresholdType"= "Forecasted"
            }
        }
    }
}
The last piece of data we need is the Action Group, which still works in PowerShell
# Parameters
$ActionGroupRGName = "cloudmodernization-rg"
$ActionGroupEmails = @("admin@yourorg.com")
$ActionGroupName = "BudgetAlerts"

# Get existing action Group ID
$ActionGroupId = (Get-AzActionGroup -resourcegroup  cloudmodernization-rg  -Name BudgetAlerts).id

# Create New Action Group
$AlertEmail = New-AzActionGroupReceiver -EmailAddress $ActionGroupEmail -Name ForcastBudgetAlert
$ActionGroupId = (Set-AzActionGroup -ResourceGroupName ($cb.ResourceGroup) -Name $ActionGroupName -ShortName $ActionGroupName -Receiver $AlertEmail).Id
Finally, if you pull all this together calling Invoke-RestMethod it would like something like
# Parameters
$subscriptionId = "00000000-1111-2222-3333-444444444444"
$resourceGroupName = "cloudmodernization-rg"
$ActionGroupName = "BudgetAlerts"
$budgetName = "$resourceGroupName-cb"

# Get existing action Group ID
$ActionGroupId = (Get-AzActionGroup -resourcegroup  $resourceGroupName -Name $ActionGroupName ).id

$bodyObject = @{
    "properties"= @{
        "timePeriod" = @{
            "startDate"= "2022-10-01T00:00:00Z"
            "endDate"= "2024-09-30T00:00:00Z"
        }
        "timeGrain" = "Monthly"
        "amount"= 62
        "category"= "Cost"
        "notifications" = @{
            "forecasted_GreaterThan_90_Percent"= @{
                "enabled" = $true
                "operator"= "GreaterThan"
                "threshold"= 90
                "contactGroups"= @($ActionGroupId)
                "thresholdType"= "Forecasted"
            }
        }
    }
    "filter" =@{}
}

$bearerToken=(Get-AzAccessToken).token
$headers = @{'Authorization' = "Bearer $bearerToken"}
$RequestBody = $bodyObject | convertto-json -Depth 15

$URI = "https://management.azure.com/subscriptions/$subscriptionId/resourceGroups/$resourceGroupName/providers/Microsoft.Consumption/budgets/$budgetName"+"?api-version=2021-10-01"
Invoke-RestMethod -Method Put -ContentType "application/json; charset=utf-8" -Uri $URI -Headers $headers -Body $RequestBodyHere are the three budgets $60, $61, and $62 created through this article.
This was aimed at showing you how to get to the payload submitted to the Azure Portal to solve a problem using PowerShell and how to revert to using a direct Azure API call.

Azure Arc Connected vSphere (Preview)
This isn’t a groundbreaking demo in terms of the end result; we deploy some VMs, however, the interesting conversation is about how we got there and what we can do with these VMs. With Azure Arc, we can now connect vSphere to the Azure platform, meaning using Azure we can use cloud methods to deploy servers such as Azure templates. This is a step towards creating an environment with a single-pane-of-glass, at least to view and query your IT estate.
The features today are simple, but Azure is a constantly evolving platform and when you are connected, as new features and services are developed and released, and the ecosystem evolves, you can grow with it.
The goal of this article is to give you some ideas about why connecting your vSphere cluster to Azure via Azure Arc and how having VMWare-connected VMs can start providing a path to a consistent cloud experience. This allows administrators to develop management processes in the cloud without requiring a complete lift and shift of all existing servers. As of this writing, this feature is still in preview.
This is assuming you have deployed the Azure Arc bridge to connect your on-premises resources. This process is evolving and is not meant to be the focus of this article.
Once connected using the Azure portal, you can do a simple VM deployment.
Click, click, VM name, deploy-demo-01 next, next, finish.
We can save this as an ARM template, I created a template spec and saved it to Azure, which I am using through the portal to deploy VM deploy-demo-02 but you could use pipeline tools such as Azure DevOps or other CI/CD tooling or templates from PowerShell command line.
You could use PowerShell to deploy that ARM Template to deploy deploy-demo-03
you could convert this into a Bicep template if that’s your standard.
What I do have now is 3 new vSphere hosted VMs all deployed via Azure ARM
however, I never touched the VMware console, and I now have an Azure Resource object.

You have access to basic controls. You could assign this via Azure RBAC rather than having administrators and users needing to access the vSphere console. There are options for resizing, adding disks, and managing networking, standardizing the experience.
In addition, you can also onboard existing deployed vSphere VMs and enable guest management to help manage things like VMware tools versions from Azure.

While the monitoring agent options are changing, I’ll keep this simple. You could also include VM extension such as the monitoring agent in your template.

which in term allows us to query these servers via Log analytics. This means it can be connected to alerts like low disk space and other services like Azure Policy.
This space is changing, there are a lot of new features coming to Azure Arc which we see as a gateway to connecting your existing IT servers to Azure allowing companies to gain the benefits of Azure without having to execute migrations for every server.
Hopefully, you found this insightful or informative
Topic Search
Posts by Date
- August 2025 1
- March 2025 1
- February 2025 1
- October 2024 1
- August 2024 1
- July 2024 1
- October 2023 1
- September 2023 1
- August 2023 3
- July 2023 1
- June 2023 2
- May 2023 1
- February 2023 3
- January 2023 1
- December 2022 1
- November 2022 3
- October 2022 7
- September 2022 2
- August 2022 4
- July 2022 1
- February 2022 2
- January 2022 1
- October 2021 1
- June 2021 2
- February 2021 1
- December 2020 2
- November 2020 2
- October 2020 1
- September 2020 1
- August 2020 1
- June 2020 1
- May 2020 2
- March 2020 1
- January 2020 2
- December 2019 2
- November 2019 1
- October 2019 7
- June 2019 2
- March 2019 2
- February 2019 1
- December 2018 3
- November 2018 1
- October 2018 4
- September 2018 6
- August 2018 1
- June 2018 1
- April 2018 2
- March 2018 1
- February 2018 3
- January 2018 2
- August 2017 5
- June 2017 2
- May 2017 3
- March 2017 4
- February 2017 4
- December 2016 1
- November 2016 3
- October 2016 3
- September 2016 5
- August 2016 11
- July 2016 13