
Terraform with Azure Stack Hub - Creating a VM with multiple data disks
I've recently been working with Azure Stack Hub (ASH) and needed to create some VM's with a variable number of managed data disks. It's not actually as straightforward as it should be, so here's how I achieved it.
azurerm vs. azurestack Providers
Due to differences with the ARM management endpoints for Azure and Azure Stack Hub, Hashicorp provide separate providers for each system. If anyone has used ASH, they will know that the resource providers available are a subset of Azure and are typically an older version, hence the need for different providers.
An interesting thing to check out is how often the providers are updated.
| azurerm | azurestack |
|---|---|
 |
 |
As you can see, the azurerm provider is regularly maintained, whereas azurestack is not. Why's this relevant? Well, if we want to use Terraform as our infra-as-code tool, then we have to work within the limitations.
Deploying a VM with a variable number of managed data disks
With the azurerm provider, this is quite straightforward:
- Create Network interface
- Create Managed Disk(s)
- Create VM
- Attach Managed data disks to VM
- (Optional) Run Customscript extension on the VM to configure the running VM
locals {
  data_disk_count = 4
}
resource "azurerm_resource_group" "example" {
  name     = "example-resources"
  location = "West Europe"
}

resource "azurerm_virtual_network" "example" {
  name                = "example-network"
  address_space       = ["10.0.0.0/16"]
  location            = azurerm_resource_group.example.location
  resource_group_name = azurerm_resource_group.example.name
}

resource "azurerm_subnet" "example" {
  name                 = "internal"
  resource_group_name  = azurerm_resource_group.example.name
  virtual_network_name = azurerm_virtual_network.example.name
  address_prefixes     = ["10.0.2.0/24"]
}

resource "azurerm_network_interface" "example" {
  name                = "example-nic"
  location            = azurerm_resource_group.example.location
  resource_group_name = azurerm_resource_group.example.name

  ip_configuration {
    name                          = "internal"
    subnet_id                     = azurerm_subnet.example.id
    private_ip_address_allocation = "Dynamic"
  }
}

resource "tls_private_key" "ssh_key" {
  algorithm = "RSA"
  rsa_bits  = 4096
}

resource "azurerm_linux_virtual_machine" "example" {
  name                = "example-machine"
  resource_group_name = azurerm_resource_group.example.name
  location            = azurerm_resource_group.example.location
  size                = "Standard_F2"
  admin_username      = "adminuser"
  network_interface_ids = [
    azurerm_network_interface.example.id,
  ]

  admin_ssh_key {
    username   = "adminuser"
    public_key = tls_private_key.ssh_key.public_key_openssh
  }

  os_disk {
    caching              = "ReadWrite"
    storage_account_type = "Standard_LRS"
  }

  source_image_reference {
    publisher = "Canonical"
    offer     = "0001-com-ubuntu-server-jammy"
    sku       = "22_04-lts"
    version   = "latest"
  }
}

resource "azurerm_managed_disk" "example" {
  count                = local.data_disk_count
  name                 = "${azurerm_linux_virtual_machine.example.name}-data-${count.index}"
  resource_group_name  = azurerm_resource_group.example.name
  location             = azurerm_resource_group.example.location
  storage_account_type = "Premium_LRS"
  create_option        = "Empty"
  disk_size_gb         = 256
}
resource "azurerm_virtual_machine_data_disk_attachment" "example" {
  depends_on = [
    azurerm_managed_disk.example,
    azurerm_linux_virtual_machine.example
  ]
  count              = local.data_disk_count
  managed_disk_id    = azurerm_managed_disk.example[count.index].id
  virtual_machine_id = azurerm_linux_virtual_machine.example.id
  lun                = count.index
  caching            = "ReadWrite"
}


resource "null_resource" "output_ssh_key" {
  triggers = {
    always_run = "${timestamp()}"
  }
   provisioner "local-exec" {
    command = "echo '${tls_private_key.ssh_key.private_key_pem}' > ./${azurerm_linux_virtual_machine.example.name}.pem"
  }
}
The code above uses the azurerm_virtual_machine_data_disk_attachment resource. When using the azurerm_linux_virtual_machine, this is the only option available to us. Reading the documentation notes:
⚠️ NOTE:
Data Disks can be attached either directly on the
azurerm_virtual_machine resource, or using theazurerm_virtual_machine_data_disk_attachmentresource - but the two cannot be used together. If both are used against the same Virtual Machine, spurious changes will occur.
There's no method to attach directly using the azurerm_virtual_machine_data_disk_attachment resource.
If we check the resources available with the azurestack provider, we'll see that we can't use the above technique as azurerm_virtual_machine_data_disk_attachment does not exist.

That means the only option is to use azurestack_virtual_machine resource and attach the disks directly when the VM is created.
Implemetation for Azure Stack Hub
We could just create multiple storage_data_disk blocks within the azurestack_virtual_machine resource, but we want to account for variable number of disks.
To do this we need to use the dynamic blocks capability to generate nested blocks, as the count meta-argument does not work in this instance.
I first setup a map object with the name of each data disk and lun, as can be seen in the locals block in the code below.
This map of objects can then be iterated through to generate the nested block using the for_each meta-argument
The code block in question:
dynamic "storage_data_disk" {
    for_each = {for count, value in local.disk_map :   count => value}
    content {
      name              = storage_data_disk.value.disk_name
      managed_disk_type = "Standard_LRS"
      create_option     = "Empty"
      disk_size_gb      = 256
      lun               = storage_data_disk.value.lun
    }
  }
Example
locals {
  data_disk_count = 4
  vm_name         = "example-machine"
  disk_map = [
    for i in range(local.data_disk_count) :  {
      disk_name = format("%s_disk_%02d", local.vm_name, i+1)
      lun  = i
    }
  ]
}
resource "azurestack_resource_group" "example" {
  name     = "example-resources"
  location = "West Europe"
}

resource "azurestack_virtual_network" "example" {
  name                = "example-network"
  address_space       = ["10.0.0.0/16"]
  location            = azurestack_resource_group.example.location
  resource_group_name = azurestack_resource_group.example.name
}

resource "azurestack_subnet" "example" {
  name                 = "internal"
  resource_group_name  = azurestack_resource_group.example.name
  virtual_network_name = azurestack_virtual_network.example.name
  address_prefix       = ["10.0.2.0/24"]
}

resource "azurestack_network_interface" "example" {
  name                = "example-nic"
  location            = azurestack_resource_group.example.location
  resource_group_name = azurestack_resource_group.example.name

  ip_configuration {
    name                          = "internal"
    subnet_id                     = azurestack_subnet.example.id
    private_ip_address_allocation = "Dynamic"
  }
}

resource "tls_private_key" "ssh_key" {
  algorithm = "RSA"
  rsa_bits  = 4096
}

resource "azurestack_virtual_machine" "example" {
  name                  = "example-machine"
  resource_group_name   = azurestack_resource_group.example.name
  location              = azurestack_resource_group.example.location
  vm_size               = "Standard_F2"
  network_interface_ids = [
    azurestack_network_interface.example.id,
  ]

  os_profile {
    computer_name  = local.vm_name
    admin_username = "adminuser"
  }

  os_profile_linux_config {
    disable_password_authentication = true
    ssh_keys {
      path     = "/home/adminuser/.ssh/authorized_keys"
      key_data = tls_private_key.pk.public_key_openssh
    }
  }

  storage_image_reference {
    publisher         = "Canonical"
    offer             = "0001-com-ubuntu-server-jammy"
    sku               = "22_04-lts"
    version           = "latest"
  }
  storage_os_disk {
    name              = "${local.vm_name}-osdisk"
    create_option     = "FromImage"
    caching           = "ReadWrite"
    managed_disk_type = "Standard_LRS"
    os_type           = "Linux"
    disk_size_gb      = 60
  }

  dynamic "storage_data_disk" {
    for_each = {for count, value in local.disk_map :   count => value}
    content {
      name              = storage_data_disk.value.disk_name
      managed_disk_type = "Standard_LRS"
      create_option     = "Empty"
      disk_size_gb      = 256
      lun               = storage_data_disk.value.lun
    }
  }


resource "null_resource" "output_ssh_key" {
  triggers = {
    always_run = "${timestamp()}"
  }
   provisioner "local-exec" {
    command = "echo '${tls_private_key.ssh_key.private_key_pem}' > ./${azurestack_linux_virtual_machine.example.name}.pem"
  }
}AKS Edge Essentials options for persistent storage
Out of the box, AKS Edge Essentials does not have the capability to host persistent storage. Thats OK if you're running stateless apps, but more often than not, you'll need to run stateful apps. There are a couple of options you can use to enable this:
- Create a manual storage class for local storage on the node
- Create a StorageClass to provision the persisent storage
First, I'm checking no existing storage classes exist. This is on a newly deployed AKS-EE, so I'm just double checking
kubectl get storageclasses --all-namespaces
Next, check no existing persistent volumes exist
kubectl get pv --all-namespaces
Manual storage class method
create a local manual persistent volume
Create a YAML file with the following config: (local-host-pv.yaml)
apiVersion: v1
kind: PersistentVolume
metadata:
  name: task-pv-volume
  labels:
    type: local
spec:
  storageClassName: manual
  capacity:
    storage: 1Gi
  accessModes:
    - ReadWriteOnce
  hostPath:
    path: "/mnt/data"
Now deploy it:
kubectl apply -f .\local-host-pv.yaml
kubectl get pv --all-namespaces
Create persistent volume claim
Create a YAML file with the following code: (pv-claim.yml)
apiVersion: v1
kind: PersistentVolumeClaim
metadata:
  name: task-pv-claim
spec:
  storageClassName: manual
  accessModes:
    - ReadWriteOnce
  resources:
    requests:
      storage: 100Mi
Now deploy it:
kubectl apply -f .\pv-claim.yaml
kubectl get pvc --all-namespaces
The problem with the above approach!
The issue with the first method is that the persistent volume has to be created manually each time. If using Helm charts or deployment YAML files, they expect a default Storage Class to handle the provisoning so that you don't have to refactor the config each time and make the code portable.
As an example to show the problem, I've tried to deploy Keycloak using a Helm chart; it uses PostgreSQL DB which needs a pvc:
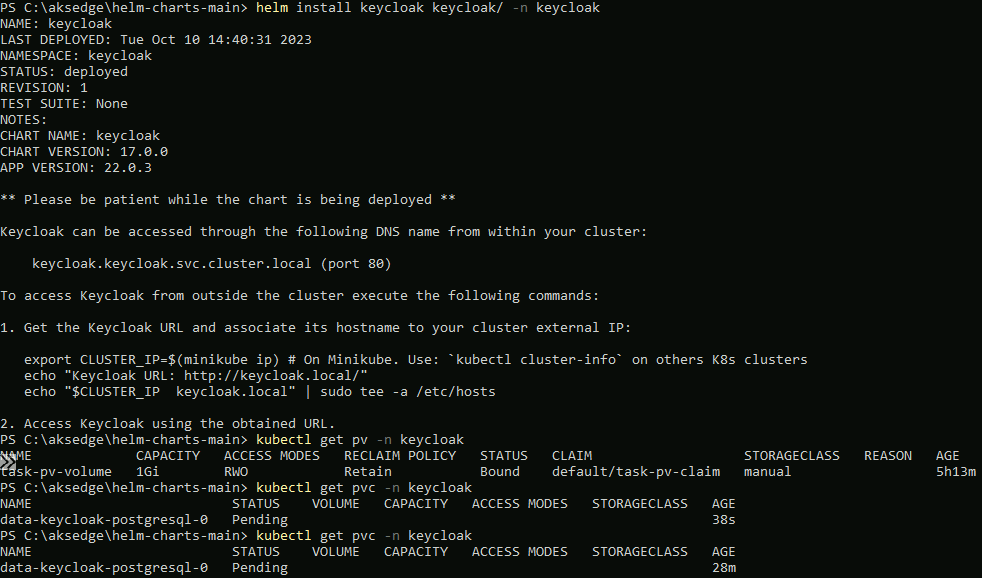
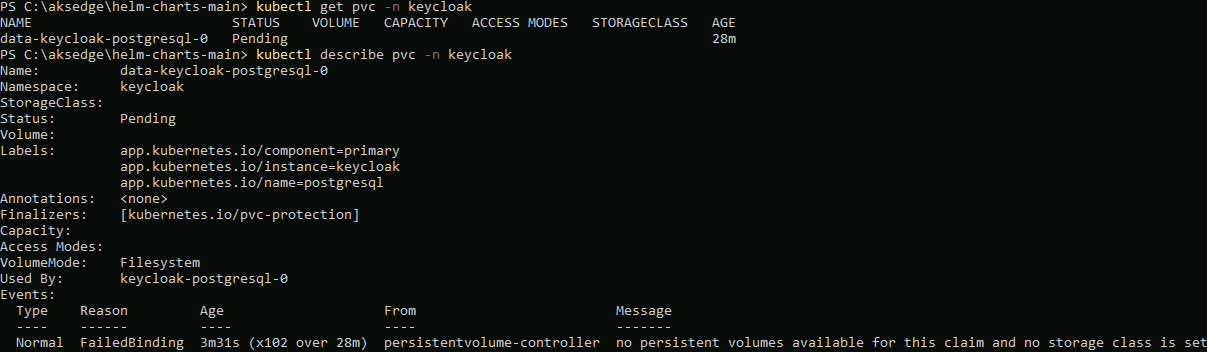
Using kubectl describe pvc -n keycloak, I can see the underlying problem; the persistent volume claim stays in pending because there are no available persistent volumes or Storage Classes available:
Create a Local Path provisioner StorageClass
So, to fix this, we need to deploy a storage class for our cluster. For this example, I'm using the Local Path provisioner example.
kubectl apply -f https://raw.githubusercontent.com/Azure/AKS-Edge/main/samples/storage/local-path-provisioner/local-path-storage.yamlOnce deployed, you can check that is exists as StorageClass:
kubectl get sc
Once the storage class is available, when I deploy the helm chart again, the persistent volume and claim are created successfully:
kubectl get pv
kubectl get pvc --all-namespaces
Conclusion
My advice is as part of the AKS Edge Essentials installation is to deploy a StorageClass to deal with provisioning volumes and claims to handle persistent data. As well as the Local Path provisioner, there is an example to use NFS storge binding

Interesting changes to Arc Agent 1.34 with expanded detected properties
Microsoft just pushed out a change in Azure Arc Connected Agent 1.34 and with this comes some enrichment of Hybrid Servers detected properties.
This is what the properties looked like prior to the update.
Agent 1.33 and earlier
Okay… so what’s new and different?

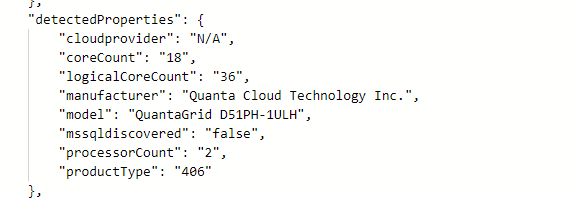
New detected properties for Azure Arc Connected Agent 1.34
serialNumber, ProcessNames and totalPhysicalMemory
resources
| where ['type'] == "microsoft.hybridcompute/machines"
| extend processorCount = properties.detectedProperties.processorCount,
    serialNumber = properties.detectedProperties.serialNumber,
    manufacturer= properties.detectedProperties.manufacturer,
    processorNames= properties.detectedProperties.processorNames,
    logicalCoreCount = properties.detectedProperties.logicalCoreCount,
    smbiosAssetTag = properties.detectedProperties.smbiosAssetTag,
    totalPhysicalMemoryInBytes = properties.detectedProperties.totalPhysicalMemoryInBytes,
    totalPhysicalMemoryInGigabytes = properties.detectedProperties.totalPhysicalMemoryInGigabytes
| project name,serialNumber,logicalCoreCount,manufacturer,processorCount,processorNames,totalPhysicalMemoryInBytes,totalPhysicalMemoryInGigabytes
This unlocks organizations to collect processor, serial number and memory information in a simple fashion via Azure Arc infrastructure. This can be used to look at things like consolidation and migration planning, perhaps decommissioning aging hardware even warranty lookup if you don’t have current hardware CMDB.

VS Code: one liner to install on a Windows system
This is just a quick post on how to quickly download and install VS Code for an x64 Windows system.
# One liner to install VS Code to Windows System
$ProgressPreference = 'SilentlyContinue'; $Path = $env:TEMP; $Installer = "vscode_installer.exe"; $installerArgs = "/silent /mergetasks=!runcode,addcontextmenufiles,addcontextmenufolders,associatewithfiles,addtopath"; Invoke-WebRequest "https://code.visualstudio.com/sha/download?build=stable&os=win32-x64" -OutFile "$Path\$Installer"; Start-Process -FilePath "$Path\$Installer" -Args $installerArgs -Verb RunAs -Wait; Remove-Item "$Path\$Installer"
Here’s some background on how I obtained the URL, which was hidden away, somewhat.
Using the official page to download VS Code, it provides links to the various installers, but it doesn’t allow you use the links directly from the page to use in a script.
In order to get it, I used the dev tools from within Edge (works the same in Chrome). I pressed F12 from within the browser session, and moved to the Network tab. I clicked on the link and it allowed me to inspect what was going on with the network.
With a little trial and error, I could determine which URL would work. Check out the animation below to see the flow.
* Updated so that VS Code does not auto open. Ref: https://gist.github.com/EmmanuelTsouris/00bcaa9a3787a6451af5567f74b4e1c6
Azure CLI: Determining location of CA certs to work with Azure Stack Hub/ASDK
I’ve been doing some work on Azure Stack HUB (ASH) and ASDK recently, and the perennial problem with certificates has raised it’s head again. This is a quick blog post for anyone using Linux and Azure CLI to administer to figure out where you should store the CA root certificates, as the documentation is somewhat vague.
First, make sure you install the latest version of Az cli and not version 2.29, as that version has CVE’s (versions prior to 2.40.0 are affected)
Once installed, check the version and what Python version is used (We need to make sure that any Python commands we are running uses this version. )
az --versionNext, install pip for the python version the az cli is using (in this case it’s Python 3.9. but future versions could change)
curl https://bootstrap.pypa.io/get-pip.py -o get-pip.py
python3.9 get-pip.py
Install the Certifi module:
pip install certifiNow you can determine where the cacert.pem file is located as used by az cli:
python3.9 -c "import certifi; print(certifi.where())"
Now you can add the ASH or ASDK CA certs to the store for use by Azure CLI:
cat <CA Cert>.pem >> ~/.local/lib/python3.9/site-packages/certifi/cacert.pemYou can use the docs here to obtain the CA root certificate, or if you’re running a Linux VM from within ASH/ASDK, simply run:
sudo cat /var/lib/waagent/Certificates.pem >> ~/.local/lib/python3.9/site-packages/certifi/cacert.pem- If you were to follow the Microsoft docs, I found az cli would still not be able to communicate successfully.

It is necessary to run the following:
export REQUESTS_CA_BUNDLE=~/.local/lib/python3.9/site-packages/certifi/cacert.pem
# RECOMMENDED: set the env var automatically for your subsequent sessions
echo 'export REQUESTS_CA_BUNDLE=~/.local/lib/python3.9/site-packages/certifi/cacert.pem' >> ~/.bash_profile
As you can see above, I have been able to run az cli targeting ASDK, whereas before, it would throw the SSL error.
Tested on CentOS 8 and Rocky Linux 8.5
Topic Search
Posts by Date
- August 2025 1
- March 2025 1
- February 2025 1
- October 2024 1
- August 2024 1
- July 2024 1
- October 2023 1
- September 2023 1
- August 2023 3
- July 2023 1
- June 2023 2
- May 2023 1
- February 2023 3
- January 2023 1
- December 2022 1
- November 2022 3
- October 2022 7
- September 2022 2
- August 2022 4
- July 2022 1
- February 2022 2
- January 2022 1
- October 2021 1
- June 2021 2
- February 2021 1
- December 2020 2
- November 2020 2
- October 2020 1
- September 2020 1
- August 2020 1
- June 2020 1
- May 2020 2
- March 2020 1
- January 2020 2
- December 2019 2
- November 2019 1
- October 2019 7
- June 2019 2
- March 2019 2
- February 2019 1
- December 2018 3
- November 2018 1
- October 2018 4
- September 2018 6
- August 2018 1
- June 2018 1
- April 2018 2
- March 2018 1
- February 2018 3
- January 2018 2
- August 2017 5
- June 2017 2
- May 2017 3
- March 2017 4
- February 2017 4
- December 2016 1
- November 2016 3
- October 2016 3
- September 2016 5
- August 2016 11
- July 2016 13