
Installing AKS Edge Essentials public preview
UPDATE: Check out this later post for lessons learnt and some configuration information that you will want to use https://www.cryingcloud.com/blog/2023/2/3/aks-edge-essentials-diving-deeper
Microsoft announced the Public preview of AKS Edge Essentials (I’m going to abbreviate to AKE-EE!) a few months ago and I wanted to try it out. I think it's a great idea to be able to run and manage containerized workloads hosted on smaller, but capable compute systems such as Intel NUC's, a Windows desktop/laptop etc. By using Azure Arc to manage this ecosystem is quite a compelling prospect.
https://learn.microsoft.com/en-gb/azure/aks/hybrid/aks-edge-overview
To try it out, I looked through the public preview documentation, using my Windows 11 laptop to run AKS-EE. The doc's are pretty good, but make some assumptions, or miss some steps, especially if you're coming to this cold. I decided to use K8s, rather than K3s, so this blog is geared towards that.
There is a recently published Azure Arc jumpstart scenario which creates a VM in Azure and does the same (but automated!).
Prep your machine
https://learn.microsoft.com/en-gb/azure/aks/hybrid/aks-edge-howto-setup-machine
First of all, you need a system running Windows 10/11 or Windows Server 2019/2022 I chose my laptop as it is capable, but you could use an Azure VM running Windows server 2019/2022.
I'm using VS Code, so I'd recommend installing that if you haven't already done so. You will also need your own GitHub account, as you will need to clone the AKS Edge project into your own repo.v
If Hyper-V isn't already enabled, you can either do this manually, or let the AKS Edge setup script do this for you. Check it's enabled (from an elevated PowerShell prompt):
Get-WindowsOptionalFeature -Online -FeatureName *hyper*If you need to install it (from an elevated PowerShell prompt):
Enable-WindowsOptionalFeature -Online -FeatureName Microsoft-Hyper-V -All

The docs say to disable power standby settings. If you’re deploying AKS-EE in a remote location, you’ll want to keep the system running 24/7, so this makes sense. For a kick the tires scenario, you probably don’t need to do this.
To check the current power settings of your system, run:
powercfg /a
You can see above, that I’ve already disabled the power standby settings. If any of them are enabled, run the following commands:
powercfg /x -standby-timeout-ac 0
powercfg /x -standby-timeout-dc 0
powercfg /hibernate off

reg add HKLM\System\CurrentControlSet\Control\Power /v PlatformAoAcOverride /t REG_DWORD /d 0
If power standby settings were enabled, reboot your system and check they’ve been disabled.
Installing AKS-Edge Essentials tools
Once the machine prep is complete, go ahead and download the AKS-Edge K8s tool from https://aka.ms/aks-edge/k8s-msi
It’s an MSI file, so go ahead and install on your system however you prefer (next, next, next… ;) ).
Once that’s done, we need to clone the AKS-EE repo to the local system. I’ve done this via VS Code.
Open the Source Control blade
Click on Clone Repository
Paste the url https://github.com/Azure/AKS-Edge.git
Click on the Clone from URL option

Select a folder from window that pops up of where you want to store the repo on your local system.
In my example, I cloned to a directory called C:\repos
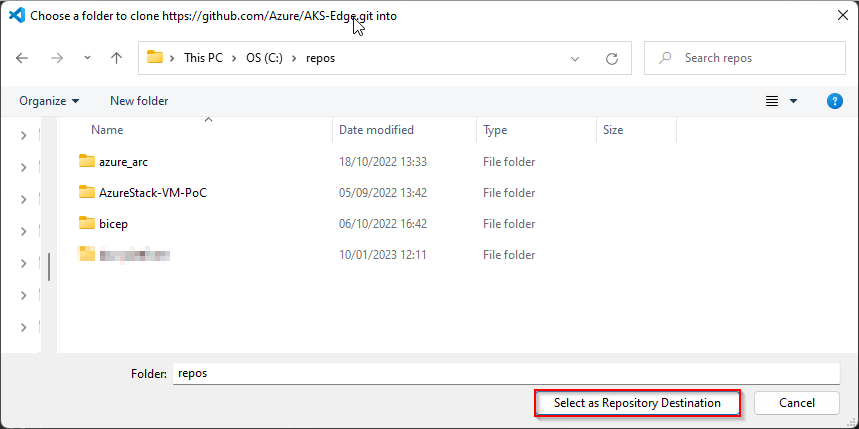
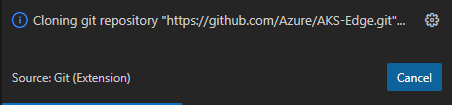
A message will pop up in VS Code stating that the repo is cloning.

Click Open to display folder in VS Code
Open a PowerShell terminal within VS Code, and navigate to the tools directory from the repo you’ve just cloned.

from the PowerShell terminal window, run the following command:
.\AKSEdgePrompt.cmd
It will open a new PowerShell window as Admin, check Hyper-V is enabled and AKS Edge Essentials for K8s is installed. Remember to run further commands in this newly instantiated PowerShell window.
Within this window, you can check that the AKSEdge module has been imported.
Get-Command -Module AKSEdge | Format-Table Name, Version
Deploying the cluster
I use the term cluster loosely, as I’m running this from my laptop, but you get my meaning.
Given this, I need to edit the config to reflect a single machine scenario.
From VS Code:
Open the aksedge-config.json file in the tools directory.
As I'm using K8s, edit the NetworkPlugin parameter to use calico
"NetworkPlugin": "calico",You need to select a spare IP on your local network for the VM that’s provisioned. My home router uses 192.168.1.0/24, so I selected a free address not in the DHCP lease range.
Select another free IP on your network for the API end point
…and now enter the start and end range for the kubernetes services

If you’re interested, you can check out the config options here and further descriptionm on what each setting does here: https://learn.microsoft.com/en-us/azure/aks/hybrid/aks-edge-deployment-config-json
Once you’ve saved the config file, go ahead to the PowerShell window that you opened via the AKSEdgePrompt.cmd and run the following to start the deployment (assuming you are still in the tools directory in the repo):
New-AksEdgeDeployment -JsonConfigFilePath .\aksedge-config.jsonIf everything is in place, that should start the deployment

When prompted, choose whether you want to send optional or only required diagnostics data.
.. eventually it will complete…

Let’s prove we can use kubectl to talk to the API and get some info
kubectl get nodes -o wide
kubectl get pods -A -o wide

Cool, the base cluster is deployed :)
Something to be aware of:
In the repo’s tools directory, a file will be created called
servicetoken.txt.Take care of this file as it is a highly-privileged token used to admin the K8s cluster. Make sure not to commit the file into your repo. You will need this token for certain activities later on.
Connecting AKS Edge Essentials to Azure Arc
The provided repo has some nice tools to help you get connected to Azure Arc, but we need to get some configuration information prior to running the scripts. To make it easy, here are some of the az cli commands to get what you need.
az login
#optional - run if you have multiple subscriptions and want to select which one to use
az account set --subscription '<name of the subscription>'

#SubscriptionId
az account show --query id -o tsv

#TenantId
az account show --query tenantId -o tsv
edit the aide-userconfig.json file from the tools directory
Change the following parameters using the values captured
"SubscriptionName": "<Azure Subscription Name>"
"SubscriptionId": "<SubscriptionId>",
"TenantId": "<TenantId>",
There’s no indication inn the docs whether to change the AKSEdgeProduct from K3s to K8s. I did - ‘just in case’
"AksEdgeProduct": "AKS Edge Essentials - K8s (Public Preview)"
Go ahead and name your resource group, service principal and region to deploy to. If the resource group and service principal do not exist, the deployment routine will create them for you. In the case of the service principal, it will assign contributor rights to the resource group scope.
Once the config file is saved, we’re ready to setup Arc.
From the PowerShell window, I decided to move to the root of the repo (not tools as previous), and ran the following command to setup the resource group, service principal permissions and role assignment:
.\tools\scripts\AksEdgeAzureSetup\AksEdgeAzureSetup.ps1 .\tools\aide-userconfig.json -spContributorRole
A warning is shown that the output includes credentials that you must protect. If you open the
aide-userconfig.jsonyou’ll notice it is populated with a service principal id and corresponding password created when the script was run.
If you want to test the credentials, run the following:
.\tools\scripts\AksEdgeAzureSetup\AksEdgeAzureSetup-Test.ps1 .\tools\aide-userconfig.json
To test the user config prior to initialization:
Read-AideUserConfig

Get-AideUserConfig
Time to initialize…
Initialize-AideArc
…and now to connect…
Connect-AideArc
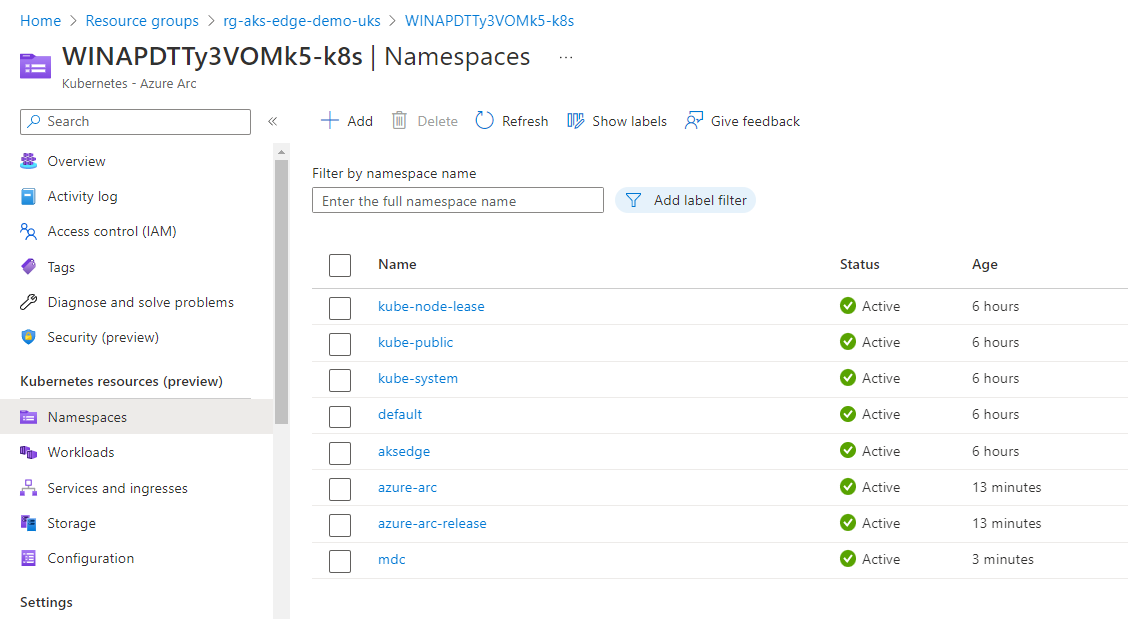
Once complete, we can check the Azure portal to see that that the Arc resources are present in the resource group I specified in the config file. There will be one entry for ‘Server’ (my laptop) and another for Kubernetes

Select the Kubernetes - Azure Arc resource and then select ‘Namespaces’.

We need to paste the service token that is created when Connect-AideArc is run. This is located in .\tools\servicetoken.txt
Paste it in the Service account bearer token field.

You’ll now be able to query resources in your cluster.
All in all, the tools and scripts developed for AKS Edge Essentials work really well and I didn’t come across any issues. It bodes well for when it moves to GA.
Next steps for me are to investigate further scenarios and see what I can do on the platform.

Securing TLS in WAC (Windows Admin Center)
We had a need to publish WAC directly onto the web with a public IP address. We have internal security scanning tools that identified security threats according to Qualys scan. For reference, WAC will start out by attempting to communicate on TLS 1.3 and downgrade to TLS 1.2 and then TLS 1.1. These threats are part of the Windows operating system rather than the WAC services itself. We can remediate these threats by altering some registry settings for how the operating system handles these protocols by disabling them. These actions would be considered hardening the operating system.
Issues
Secure Sockets Layer/Transport Layer Security (SSL/TLS) Server supports Transport Layer Security (TLSv1.0)
Secure Sockets Layer/Transport Layer Security (SSL/TLS) Server Supports Transport Layer Security (TLSv1.1)
Birthday attacks against TLS ciphers with 64bit block size vulnerability (Sweet32)
WAC itself is built to attempt TLS 1.2 and downgrades to TLS 1.1. However, judging by the Qualys scan TLS 1.0 still responds also.
TLS 1.0 & TLS 1.1
Microsoft offers some guidance here Transport Layer Security (TLS) registry settings | Microsoft Learn. If you’re doing this one off, open up regedit and head to HKEY_LOCAL_MACHINE\SYSTEM\CurrentControlSet\Control\SecurityProviders\SCHANNEL\Protocols and add create the keys TLS 1.0 and TLS 1.1, and Client and Server keys. Then add the following DWORD (32-bit) DisabledByDefault = 1 and Enabled = 0.

If you want to automate or run across more system you can user PowerShell
# TLS 1.0
New-Item 'HKLM:\SYSTEM\CurrentControlSet\Control\SecurityProviders\SCHANNEL\Protocols\TLS 1.0\Server' -Force
New-ItemProperty -Path 'HKLM:\SYSTEM\CurrentControlSet\Control\SecurityProviders\SCHANNEL\Protocols\TLS 1.0\Server' -PropertyType 'DWORD' -Name 'Enabled' -Value '0'
New-ItemProperty -Path 'HKLM:\SYSTEM\CurrentControlSet\Control\SecurityProviders\SCHANNEL\Protocols\TLS 1.0\Server' -PropertyType 'DWORD' -Name 'DisabledByDefault' -Value '1'
New-Item 'HKLM:\SYSTEM\CurrentControlSet\Control\SecurityProviders\SCHANNEL\Protocols\TLS 1.0\Client' -Force
New-ItemProperty -Path 'HKLM:\SYSTEM\CurrentControlSet\Control\SecurityProviders\SCHANNEL\Protocols\TLS 1.0\Client' -PropertyType 'DWORD' -Name 'Enabled' -Value '0'
New-ItemProperty -Path 'HKLM:\SYSTEM\CurrentControlSet\Control\SecurityProviders\SCHANNEL\Protocols\TLS 1.0\Client' -PropertyType 'DWORD' -Name 'DisabledByDefault' -Value '1'

# TLS 1.1
New-Item 'HKLM:\SYSTEM\CurrentControlSet\Control\SecurityProviders\SCHANNEL\Protocols\TLS 1.1\Server' -Force
New-ItemProperty -Path 'HKLM:\SYSTEM\CurrentControlSet\Control\SecurityProviders\SCHANNEL\Protocols\TLS 1.1\Server' -PropertyType 'DWORD' -Name 'Enabled' -Value '0'
New-ItemProperty -Path 'HKLM:\SYSTEM\CurrentControlSet\Control\SecurityProviders\SCHANNEL\Protocols\TLS 1.1\Server' -PropertyType 'DWORD' -Name 'DisabledByDefault' -Value '1'
New-Item 'HKLM:\SYSTEM\CurrentControlSet\Control\SecurityProviders\SCHANNEL\Protocols\TLS 1.1\Client' -Force
New-ItemProperty -Path 'HKLM:\SYSTEM\CurrentControlSet\Control\SecurityProviders\SCHANNEL\Protocols\TLS 1.1\Client' -PropertyType 'DWORD' -Name 'Enabled' -Value '0'
New-ItemProperty -Path 'HKLM:\SYSTEM\CurrentControlSet\Control\SecurityProviders\SCHANNEL\Protocols\TLS 1.1\Client' -PropertyType 'DWORD' -Name 'DisabledByDefault' -Value '1'
Sweet32
Reference: How to disable 3DES and RC4 on Windows Server 2019? - Microsoft Q&A
will show what cihpers
regedit, I deleted these and rebooted
TLS_RSA_WITH_3DES_EDE_CBC_SHA
TLS_DHE_DSS_WITH_3DES_EDE_CBC_SHA
TLS_RSA_WITH_RC4_128_SHA
TLS_RSA_WITH_RC4_128_MD5
These steps provide a level-up in WAC front-end security.
Azure Arc delivers SQL Databases as Resources in Azure
The SQL extension for Arc-connected servers itself isn’t new, however, it has had a new feature added that is currently in preview; which is the ability to create Azure resources that represent your SQL Database through the Arc-connected Servers.
You can see this will detect objects for SQL instances, named SQL instances, and the databases themselves become objects in Azure

If you already have this installed this is one configuration setting you may want to check and that is “Has NT AUTHORITY\SYSTEM in the sysadmin role.” This is listed in the prerequisites of the install instructions that can be found here View SQL Server databases - SQL Server | Microsoft Learn
It is worth noting this currently works only for the Microsoft.HybridCompute type and not for example the VMware connected Arc systems Microsoft.ConnectedVMwarevSphere.

There are some properties here listed as unknown however, this is a bug that has already been fixed.
This is the next step to bringing SQL databases into the Azure control plane, creating alerts on recovery models, encryption state, or perhaps statistic creation. Enabling more visibility and control into the Hybrid Cloud journey.
This is the first public preview of this feature and I’ll definitely be keeping an eye out for future revisions and enhancements.
First Impressions; Flying with Copilot in VSCode
I have a few deployment activities on my plate for Azure Stack HCI and AKS using PowerShell. I have been interested in GitHub Copilot, and what little I have seen is interesting but just haven’t had time to “dig in”. Figuring this was as good a time as any to try copilot in VS code to assist me in writing some PowerShell deployment scripts, I decided to jump in.
With no time to learn or research anything, I decided the best approach rather than do nothing, was to sign-up, read zero documentation and see how intuitive copilot actually is, and share my experience. You only have one opportunity to use something for the first time.
$100 for 1 year, 60-day free trial, enter a credit card, install the extension, authenticate extension, and literally within minutes had my copilot silently standing by.
Here are some impressions captured during the first 6 days of my experience.
The first thing I had to get used to, was the tab to complete the suggestions. I really just wanted to tab and suddenly I have code.

Next, I began to notice that my copilot was starting to become aware of context with variables in the page and understanding what I was trying to do. Completing repeatable patterns and adding valuable comments.

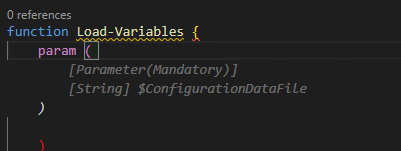
Below this case, the variable $configrationDataFile was in another open file and was actually the thing I wanted to load. Additionally, this created the Mandatory parameter correctly. I'll be honest I probably wouldn’t have added mandatory code.
Here, I had written a for each loop to invoke some commands, then realized I needed to create the PS session first. I moved the cursor up and created a new line and my copilot knew what I needed. Tab Cheers
I manually created the HCIAdminGroup variable and parameters and went to the next line, and my copilot suggested HCIClusterAdminGroup. I wondered how many more credentials it would create. All those shown in the square, I didn’t need or perhaps better said at this stage I don’t think I need them, but all good suggestions.

I was adding comments as headers to a function and discovered this is how you created a complete function. Which I then remembered was the demo I had seen. Not a bad start, Tab

tab

I spent some time on this function as it was. I didn’t capture the error from this code above but got one related. This was tough, it was trying to get a secure string from a keyvault and create a credential. I did spend more time messing with it than probably writing it.

I deleted it and thought I would try a more comprehensive comment and after knowing the issue and writing a better description, my copilot provided a better path.
There were more examples but hopefully, this gives you an impression of what the beginner, with no research experience, looked like, over my first 6 days.
Overall, I am very impressed with my complete lack of knowledge of how to use it, and how well it did “just work”. I did spend some time wrestling with the code created, perhaps I trusted it as if I had written it myself. After a few hiccups, I started taking the approach of verification and validation as the first step and simply reading it, before executing it and even deleting complete functions and trying to describe what I need more comprehensively.
I can see value in that you could create a full skeleton of a module or script just from comments and work through flow or logic issues before committing time to writing code.
This hands-on experience has motivated me to go learn about shortcut keys, settings, and other options. I might even make time to read some documentation; What I can turn on or off? what else it can actually do? I am beginning to feel a need to name my copilot.
If you have a coding project and haven’t tried GitHub Copilot, I strongly suggest signing up for 1 year and giving it a shot, no learning is required. Put a reminder in your calendar for 58 days later and decide if you want to continue coding with copilot.
On day 6, I can say for $8.30 a month, I’m pretty confident I won’t be coding solo again.
Probably spending 5 minutes to browse and read the documentation would have been helpful, though that wasn’t the point of my experiment. Getting started with GitHub Copilot in Visual Studio Code - GitHub Docs. I wonder if Copilot for PowerPoint is on the road map… “Tell ‘em he’s dreaming” ;)
Quick start shortcut keys
Trigger suggestions Atl + \
Complete suggestion TAB
Seeing alternative suggestions
OS See next suggestion See previous suggestion
macOS Option (⌥) or Alt+] Option (⌥) or Alt+[
Windows Alt+] Alt+[
Linux Alt+] Alt+[
Getting started with GitHub Copilot in Visual Studio Code - GitHub Docs
MAAS Image Builder Exclude Update by KB#
This briefly shows how to alter the image builder scripts to exclude broken KBs for specific OS versions. This example shows excluding Cumulative Update for Windows 11 Insider Preview (KB5019765) on an HCI image.
Trying to build a newer HCI Maas image and receive an error trying to download an update via release channel. Specifically, Windows 11 insider preview KB5019765
If you edit the Logon.ps1 found in the UnattendedResource folder from cloudbase/windows-imaging-tools: Tools to automate the creation of a Windows image for OpenStack, supporting KVM, Hyper-V, ESXi and more. (github.com) you can see there is a section that allows you to create a blacklist of KBs for different OS version.
Using PowerShell [System.Environment]::OSVersion.Version you can find the OS version
Finally add a record for the OS version and KB you want to exclude

Which is displayed via verbose output during build

Topic Search
Posts by Date
- August 2025 1
- March 2025 1
- February 2025 1
- October 2024 1
- August 2024 1
- July 2024 1
- October 2023 1
- September 2023 1
- August 2023 3
- July 2023 1
- June 2023 2
- May 2023 1
- February 2023 3
- January 2023 1
- December 2022 1
- November 2022 3
- October 2022 7
- September 2022 2
- August 2022 4
- July 2022 1
- February 2022 2
- January 2022 1
- October 2021 1
- June 2021 2
- February 2021 1
- December 2020 2
- November 2020 2
- October 2020 1
- September 2020 1
- August 2020 1
- June 2020 1
- May 2020 2
- March 2020 1
- January 2020 2
- December 2019 2
- November 2019 1
- October 2019 7
- June 2019 2
- March 2019 2
- February 2019 1
- December 2018 3
- November 2018 1
- October 2018 4
- September 2018 6
- August 2018 1
- June 2018 1
- April 2018 2
- March 2018 1
- February 2018 3
- January 2018 2
- August 2017 5
- June 2017 2
- May 2017 3
- March 2017 4
- February 2017 4
- December 2016 1
- November 2016 3
- October 2016 3
- September 2016 5
- August 2016 11
- July 2016 13