I‘ve had the chance to use AKS Edge Essentials (AKS-EE) some more and I got to figure some more things out since my earlier article.
Whilst I ‘successfully’ deployed the cluster, it turn out that the configuration I had used meant that whilst I could deploy apps to the cluster, they couldn’t be accessed - therefore pretty pointless.
Looking further into this, the reason was I was using the aksedge-config.json file provided with the AKS Edge repo. That config file is geared towards multi-machine clusters, not single machines.
I managed to figure out two ways to fix the issue.
I had to uninstall and redeploy the cluster for both methods.
This a straightforward task, based on the official docs.
From the AKS Edge prompt PowerShell window:
# Disconnect cluster from Azure Arc
Disconnect-AideArcKubernetes

# Remove the cluster
Remove-AksEdgeDeployment -Force
There’s no need to uninstall the AKS Edge runtime.
Method 1
The most straightforward method is to create a config file with the minimum parameter set.
This will create a single machine cluster, using an internal vSwitch network, only accessible from the system you deploy it on..
Save the content below into a file in the tools directory. I called it
aksedge-singlemachine.json
{
  "SchemaVersion": "1.1",
  "Version": "1.0",
  "DeployOptions": {
      "ControlPlane": false,
      "Headless": false,
      "JoinCluster": false,
      "NetworkPlugin": "calico",
      "SingleMachineCluster": true,
      "TimeoutSeconds": 900,
      "NodeType": "Linux",
      "ServerTLSBootstrap": true
  },
  "EndUser": {
      "AcceptEula": false,
      "AcceptOptionalTelemetry": false
  },
  "LinuxVm": {
      "CpuCount": 4,
      "MemoryInMB": 4096,
      "DataSizeinGB": 30
  },
  "Network": {
      "ServiceIPRangeSize": 10
  }
}
2. Install the cluster per the instructions here (changing the -jsonconfigfilepath parameter)
New-AksEdgeDeployment -JsonConfigFilePath .\aksedge-singlemachine.jsonMethod 2
With this method, we aren’t deploying using the single machine config parameter. It will still be a single machine ‘cluster’, but will use an external vSwitch, so any app that is deployed can be access on the network, published from your machine.
First, we need to get some details of the network interface that will be used to create the external vSwitch. From the official documentation:
Run the following command to find the network adapters that are connected:
Get-NetAdapter -Physical | Where-Object { $_.Status -eq 'Up' }Make a note of the name of either the Ethernet or WiFi adapter.
Next up, edit the aksedge-config.json file.
Edit ”SingleMachineCluster”: false, and populate the vSwitch parameters
Make sure the IP addresses, gateways and DNS servers match your network.
{
    "SchemaVersion": "1.1",
    "Version": "1.0",
    "DeployOptions": {
        "ControlPlane": false,
        "Headless": false,
        "JoinCluster": false,
        "NetworkPlugin": "calico",
        "SingleMachineCluster": false,
        "TimeoutSeconds": 900,
        "NodeType": "Linux",
        "ServerTLSBootstrap": true
    },
    "EndUser": {
        "AcceptEula": false,
        "AcceptOptionalTelemetry": false
    },
    "LinuxVm": {
        "CpuCount": 4,
        "MemoryInMB": 4096,
        "DataSizeinGB": 30,
        "Ip4Address": "<free ip on your network>"
    },
    "Network": {
        "VSwitch": {
            "Name": "aksee-ext",
            "Type": "External",
            "AdapterName": "<Ethernet Adapter Name>"
        },
        "ControlPlaneEndpointIp": "<free ip on your network>",
        "Ip4GatewayAddress": "<Gateway address>",
        "Ip4PrefixLength": 24,
        "ServiceIPRangeSize": 10,
        "ServiceIPRangeStart": "<start free ip on your network>",
        "ServiceIPRangeEnd": "<end free ip on your network>",
        "DnsServers": [
            "<DNS Server on your network>"
        ],
        "InternetDisabled": false,
        "Proxy": {
            "Http": "",
            "Https": "",
            "No": ""
        }
    }
}
With those changes in place, go ahead and deploy the cluster per the instructions here.
Once the cluster is deployed, continue to follow the instructions to connect the cluster to Azure Arc.
Deploying a test app
Now that I have a working cluster, I tested deploying the ‘Hello Arc’ app via GitOps.
Following the instructions for Remote deployment and CI with GitOps and Flux:
Fork the Azure Arc Apps repo:
(If you don’t want to fork your own repo, you can use mine: https://github.com/dmc-tech/azure-arc-jumpstart-apps)
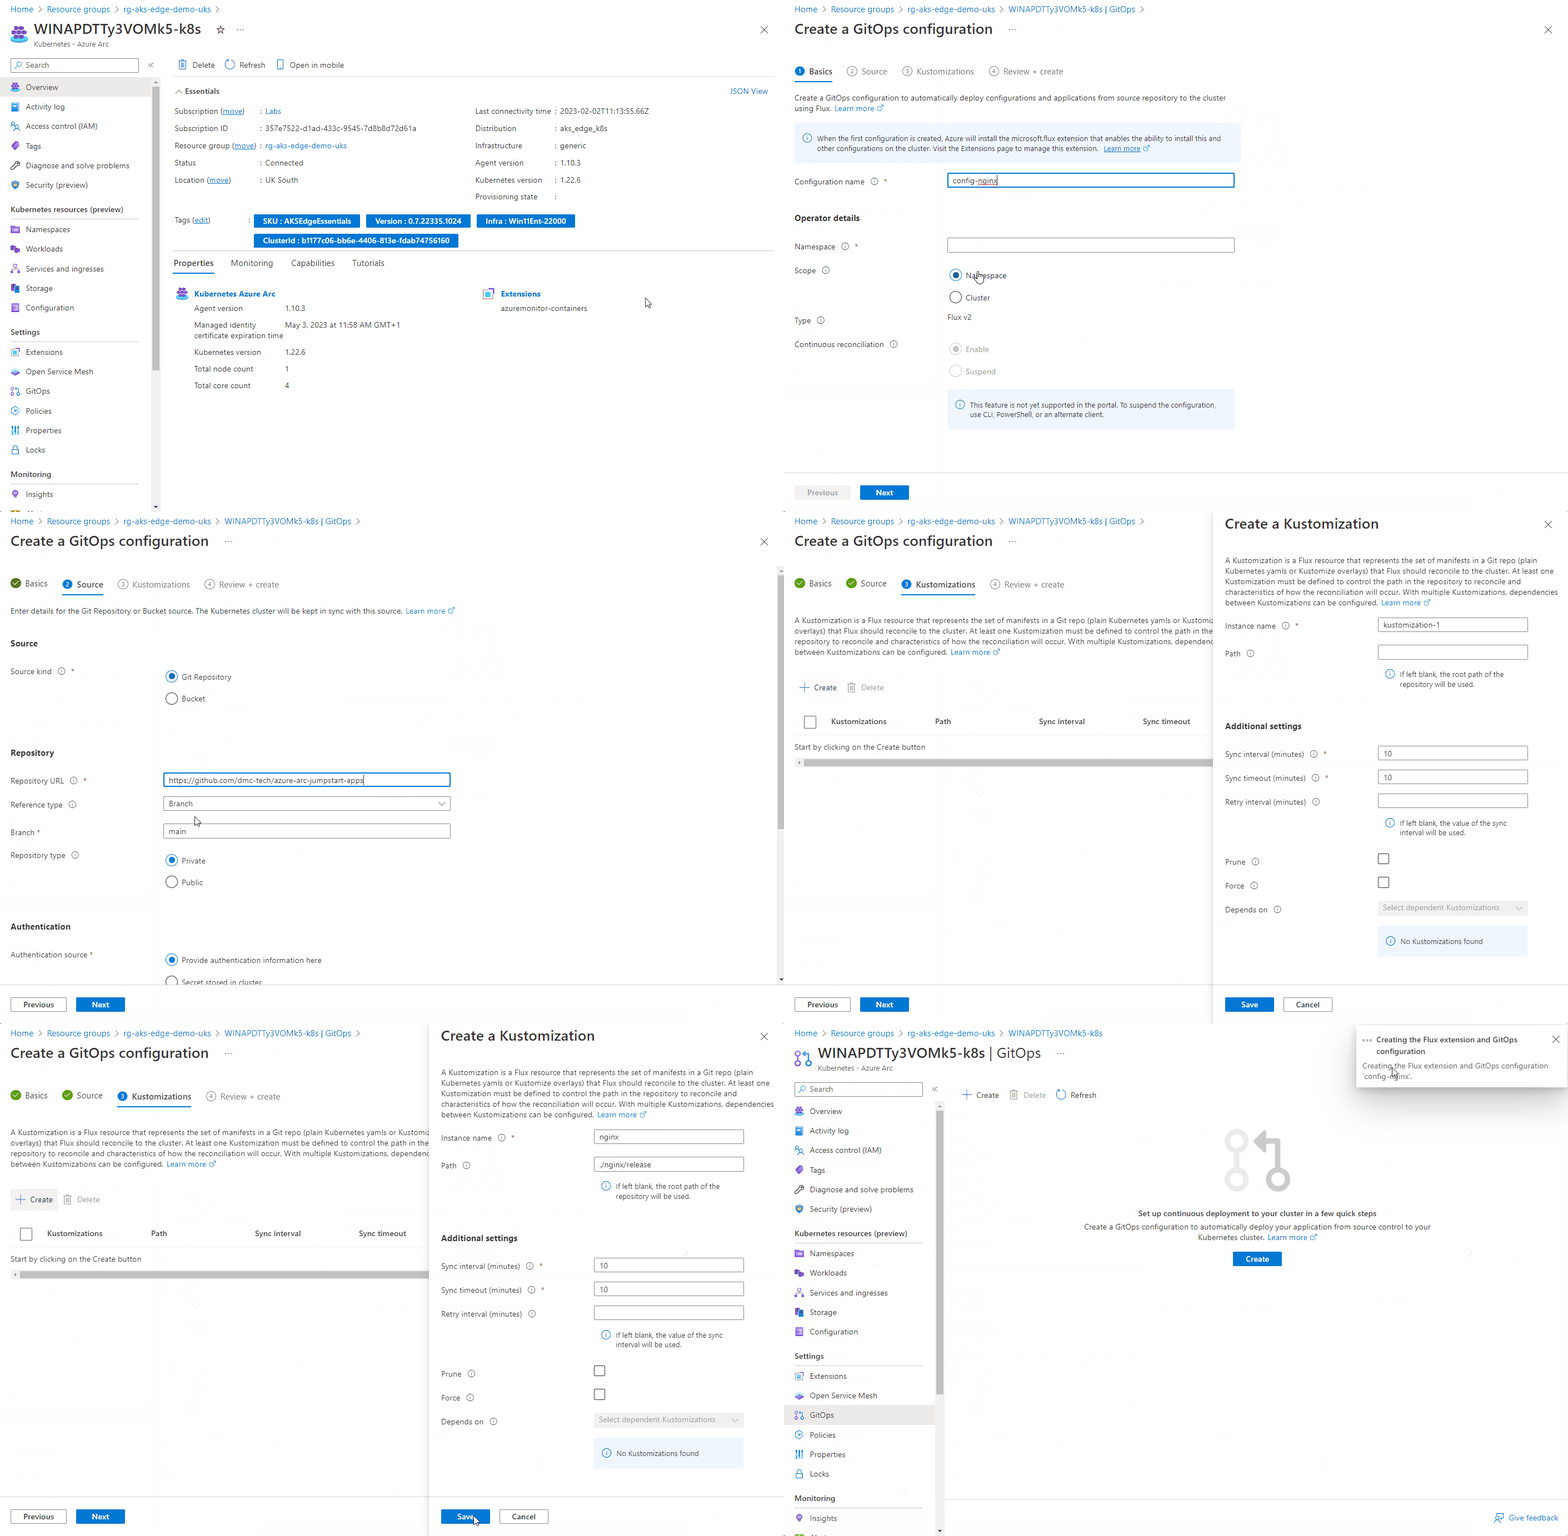
From the Azure portal, locate the resource group that the Azure Arc enabled Kubernetes cluster resource is located and open the GitOps blade.
First, create the nginx configuration.
You can follow the steps below:
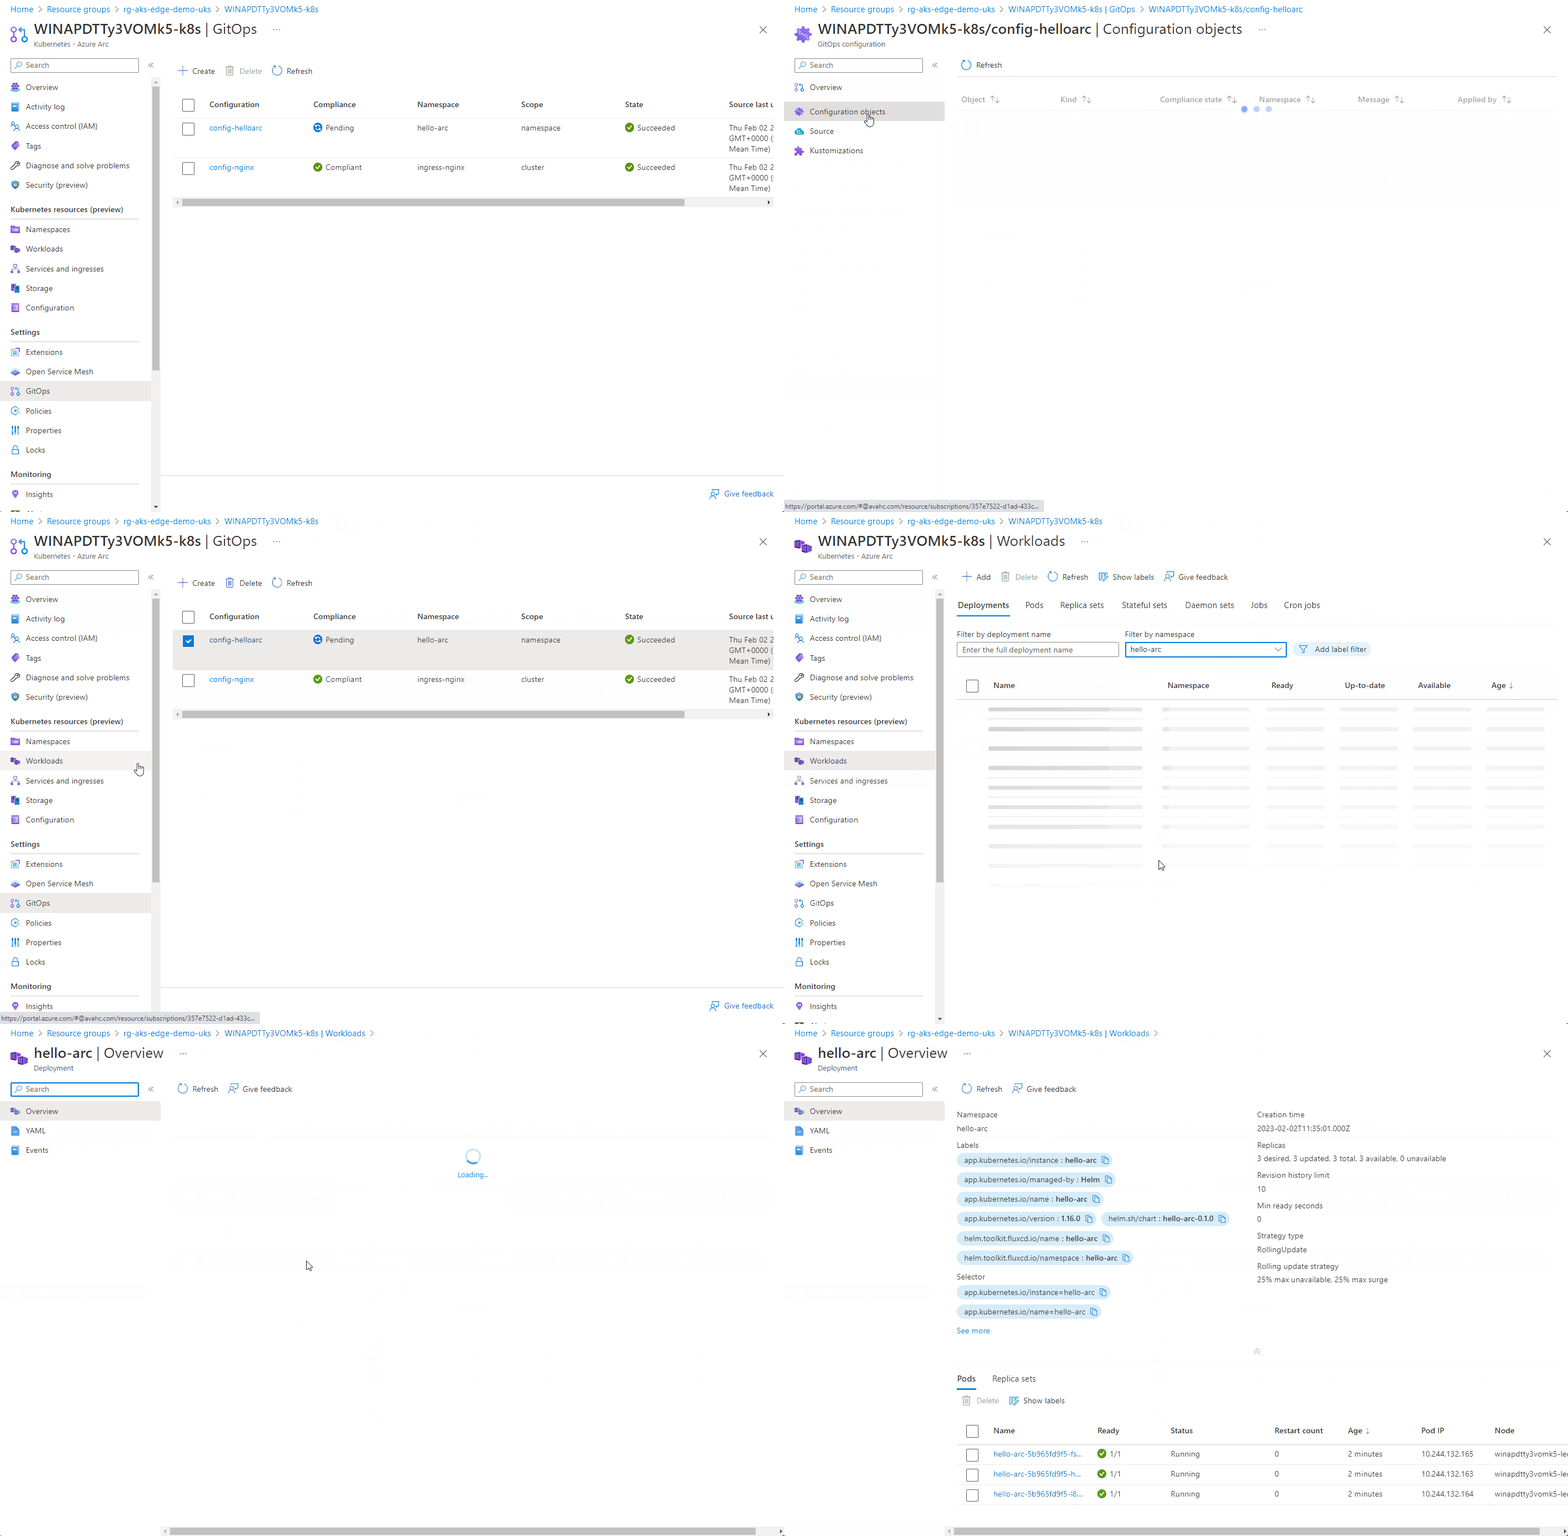
Here you can see the configuration objects progress…
Once the config-nginx config has successfully deployed (it can take a few minutes), you can deploy the actual app.
The progress of the configuration objects and the pod creation can be seen below via the Azure portal. Hopefully you can see the potential of the single pane of glass to manage multiple clusters from diverse locations.
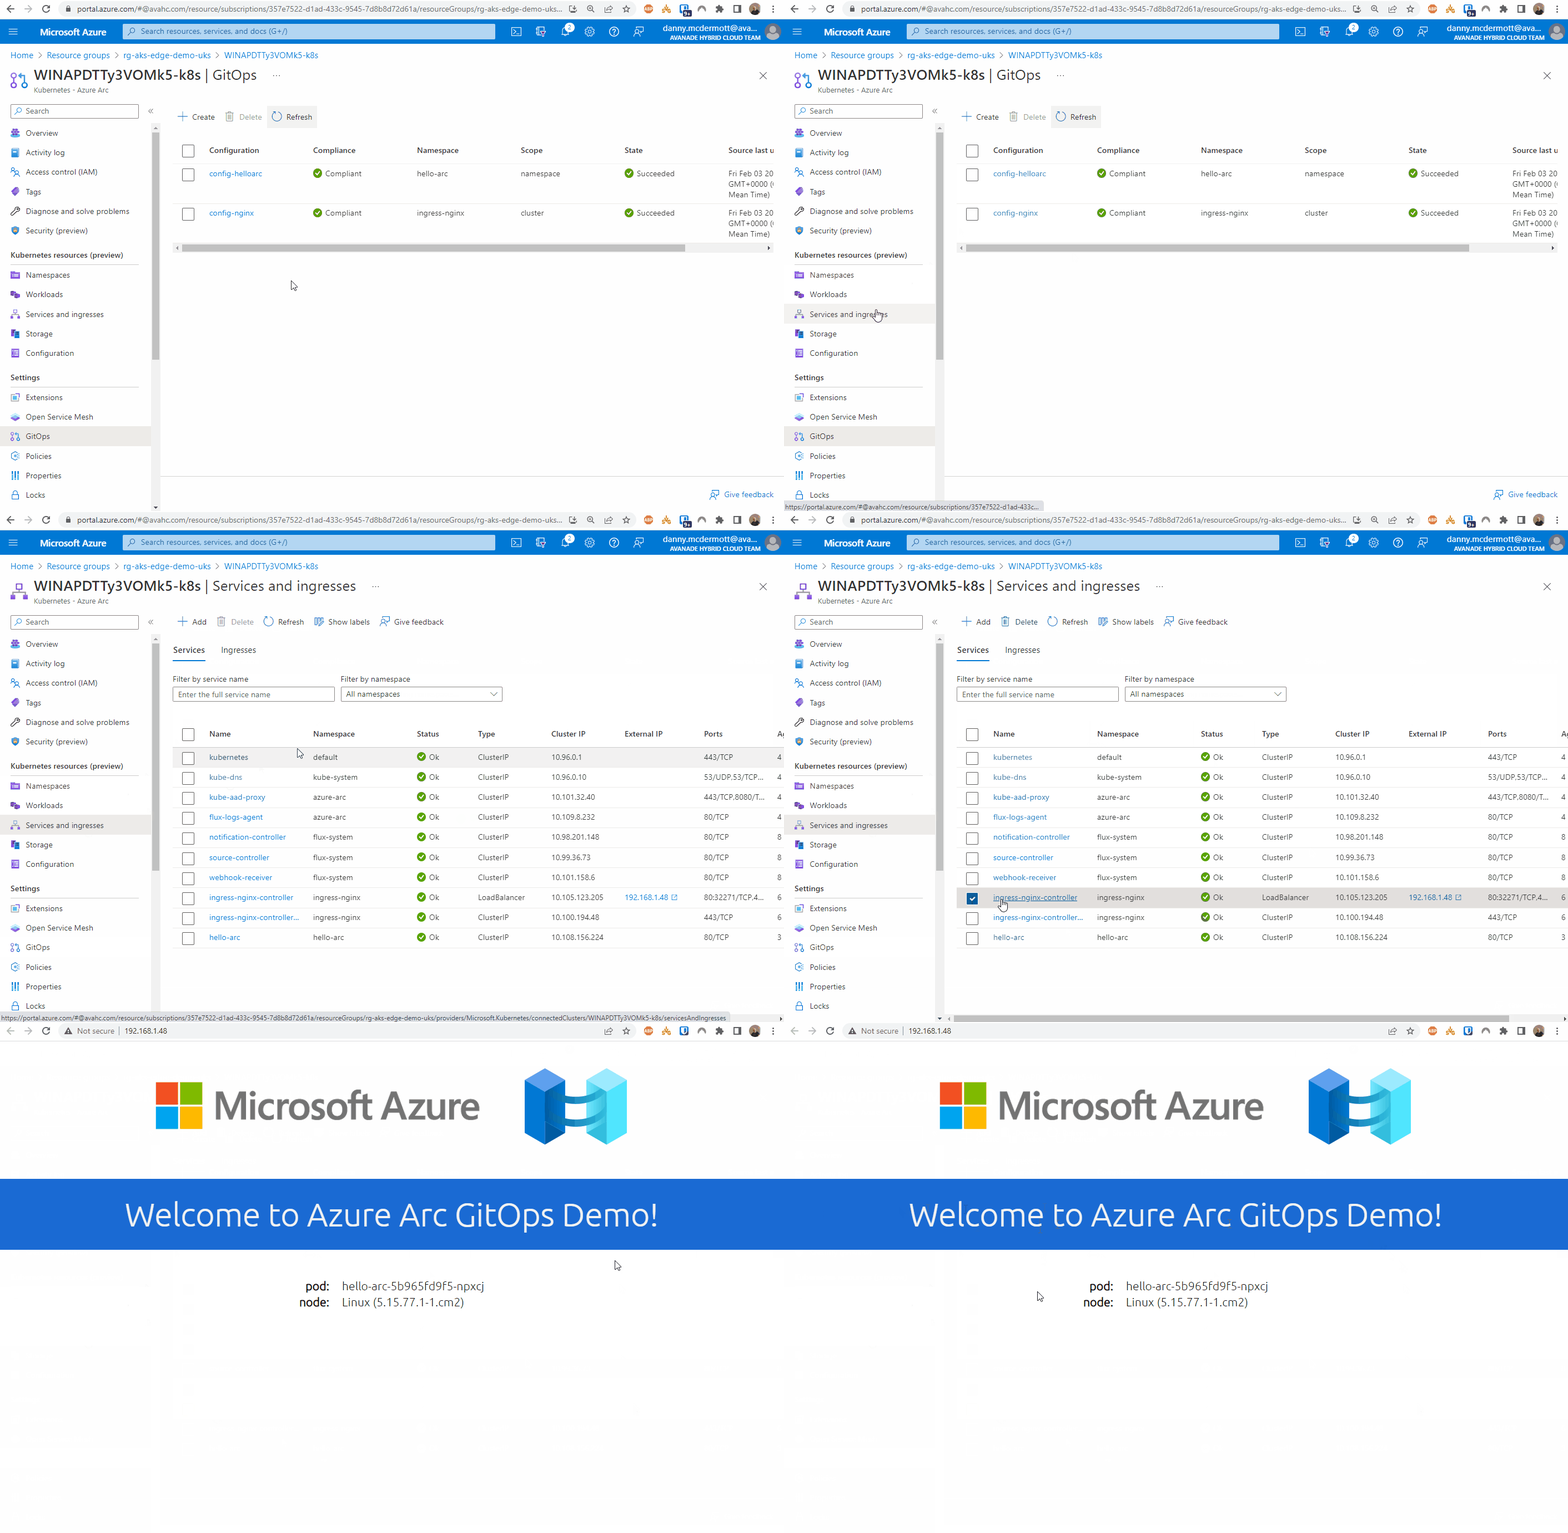
Once the app has been deployed, it can be tested. I found the external IP address of the nginx instance by looking at the Services and ingresses of the cluster.
And there we have it.
I’m glad things didn’t work perfectly the first time as it allowed me to try some different things and understand what’s happening with the tool some more.
I would feel confident rolling this out to production scenarios since I’ve tried these different options.


