Azure Stack

Add a Service Connection to Azure Stack Hub in Azure DevOps

Pipelines.JPG

One of the key aspects of the system formally known as Azure Stack, now to be called Azure Stack Hub (ASH) is, that it is a target for automation. The chances are if you are considering running this at scale and you are deploying content through the portal UI, you’re probably doing it wrong.

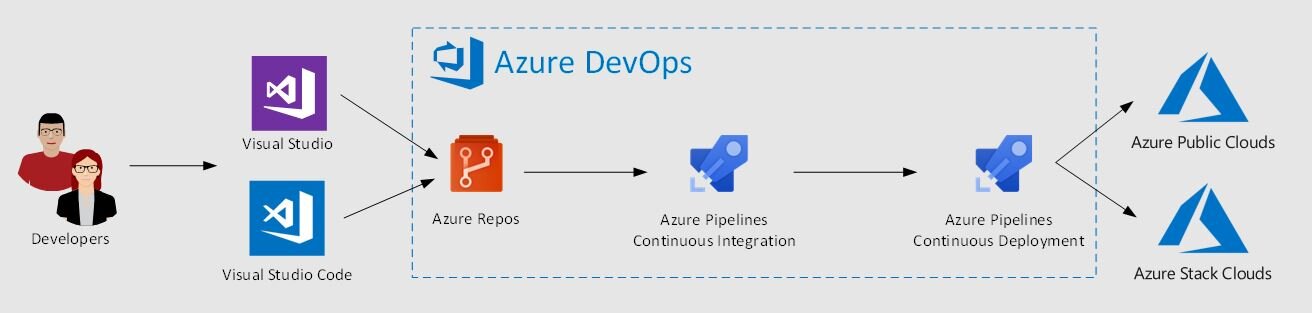
ASH makes a great target for among other things a DevOps toolchain. I’m not sure if you have tried connecting from Azure DevOps portal but Azure DevOps has undergone a lot of changes and a lot of the documentation looks different.

I wanted to share the steps to create a ‘Service Connection’ from Azure DevOps. This is assuming you are using an Azure AD connected ASH Installation.

First, you’ll need to create a Service Principal in Azure AD.

The steps are shown here briefly below. Here are some detailed instructions if needed.
https://docs.microsoft.com/en-us/azure/active-directory/develop/howto-create-service-principal-portal


Navigate to your Azure AD and register a new application

Register an application - Microsoft Azure.png

Make sure to copy the Application ID or Client ID, the Directory ID or Tenant ID into some temporarily like notepad

PPE1DatacenterA.png

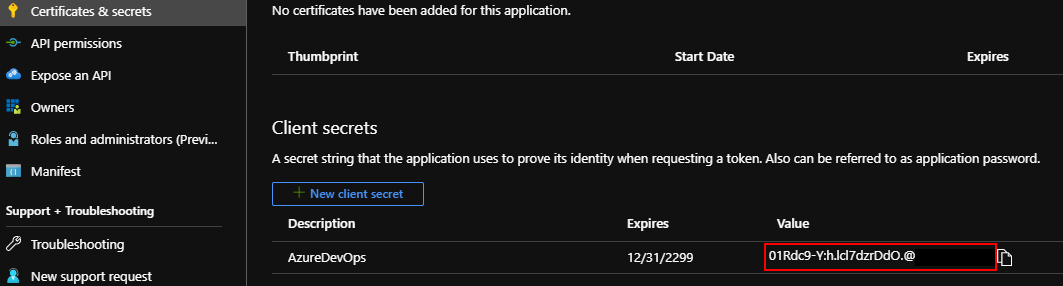
Next click ‘Certificates & Secrets’
Select ‘+ New Client Secret’
Enter a description and key expiry length
Make sure to copy the secret

CertificatesSecrets.png

You need to add this SPN you have just created to your Azure Stack Subscription through the Access Control (IAM). At this stage you might want to capture the Azure Stack Subscription ID and name for later.

2019-11-06 18_48_12-Users - Microsoft Azure Stack.png

Regarding Azure DevOps I am going to assume you already have an organization and project configured.

If you go to the Project Settings page, under the Pipelines section,
then select 'Service Connections’
click ‘New service connection’

ServiceConnection.png

Finally we can create the ‘Service Connection’ using ‘Service Principal Authentication’

You need to click the hyperlink ‘Use the full version of the service connection dialog’

You need to click the hyperlink ‘Use the full version of the service connection dialog’

Select ‘Azure Stack’ from the drop down list (obviously Azure DevOps hasn’t been told about the name change just yet)Complete the form and select ‘Verify Connection’And you’re done | Good luck on your Pipeline

Select ‘Azure Stack’ from the drop down list (obviously Azure DevOps hasn’t been told about the name change just yet)

Complete the form and select ‘Verify Connection’

And you’re done | Good luck on your Pipeline

Issue adding additional workers using the administrator portal

I have recently deployed the App Service Update 7 resource provider to an Azure Stack 1908 region and came across a problem when trying to add instances to the web worker tiers via the admin portal, per the instructions here: https://docs.microsoft.com/en-us/azure-stack/operator/azure-stack-app-service-add-worker-roles?view=azs-1908#add-additional-workers-using-the-administrator-portal

The problem I came across was when I opened the Roles blade from within the App Service resource provider, trying to select the ScaleSet option for the worker tier was not possible.

I could select the Virtual Machine option if I selected the Controller role:

I checked the release notes for App Service Update 7 and couldn’t find anything that referenced the problem I have: https://docs.microsoft.com/en-us/azure-stack/operator/azure-stack-app-service-release-notes-update-seven?view=azs-1908

OK, so I can’t follow the documentation verbatim, but, the workaround is very straightforward. The worker tiers use VM scale sets, so from the admin portal, open up the Virtual machine scale sets admin blade:

Then select the worker tier you wan to modify:

Select the Scaling option and modify the instance count using the slider, or manually enter the number you want. Click Save to start the provisioning process.

Open the App Service / Worker Tiers blade; it will show the instance count has now increased:

It will take a while for the available instances to increment, so be patient.

You can, however, see that the instance count has increased if you select the Roles blade

Selecting a Worker instance will show you a little more detail. The example below, shows that 2 instances are installing:

Eventually, you should hopefully see something like the following:

Of course, you can use the PowerShell method, and that works out of the box, but I’ve modified the script in the document to be more Integrated system friendly :)

##### Scale out the AppService Role instances ######

 # Set context to AzureStack admin.
 Login-AzureRmAccount -EnvironmentName AzureStackAdmin

 $RegionName = 'local' # Change this to reflect the region.   ASDK is 'local'

 ## Name of the Resource group where AppService is deployed.
 $AppServiceResourceGroupName = "AppService.$RegionName"

 ## Name of the ScaleSet : e.g. FrontEndsScaleSet, ManagementServersScaleSet, PublishersScaleSet , LargeWorkerTierScaleSet,      MediumWorkerTierScaleSet, SmallWorkerTierScaleSet, SharedWorkerTierScaleSet
 $ScaleSetName = "SmallWorkerTierScaleSet"

 ## TotalCapacity is sum of the instances needed at the end of operation. 
 ## e.g. if your VMSS has 1 instance(s) currently and you need 1 more the TotalCapacity should be set to 2
 $TotalCapacity = 2  

 # Get current scale set
 $vmss = Get-AzureRmVmss -ResourceGroupName $AppServiceResourceGroupName -VMScaleSetName $ScaleSetName

 # Set and update the capacity
 $vmss.sku.capacity = $TotalCapacity
 Update-AzureRmVmss -ResourceGroupName $AppServiceResourceGroupName -Name $ScaleSetName -VirtualMachineScaleSet $vmss

Deploying the SQL RP with the latest Azure Stack PowerShell module

This is a quick post about how you can use the latest Azure Stack PowerShell module to deploy the SQL resource provider to Azure Stack (1908) , rather than having to use an older version that the RP documentation says you must do (which can be messy, having to remove / install various modules).

If you follow the pre-requisites, you require PowerShell for Azure Stack. Following the link in the pre-reqs gives you the instructions to install the latest version (1.7.2 at time of writing). I followed the instructions for version 1904 and later and that was great.

Further into the SQL RP document, there is a helper script to help you with the deployment. The script states that the modules required are for specific versions, which are outdated for 1908. This actually conflicts with the pre-requirement, as the link is to install version 1.7.2 of the AzureStack Module. I don’t particularly want o remove/install different version of Modules to my system as it is time consuming and unnecessary, IMO. Anyway, I decided to carry on as it may have been an oversight.

Next, I had download version 1.1.33.0 of the SQL RP

I ran the self-extracting exe file and from the extracted directory, I ran from and elevated PowerShell session the DeploySQLProvider.ps1 script

Even though I had followed all the pre-reqs in the article, an exception was thrown as seen below:

As you can see, it is complaining about the Azure Stack PowerShell module. I know that version 2.5.0 and ArmProfile 2019-03-01-hybrid is supported with Azure Stack 1908, so I took a look at the script to find out what was throwing this error.

I did a search for ‘Checking for Azure Stack Powershell Module …’ and it took me to the following :

It looked like the Test-AzureStackPowershell function was the candidate. The function wasn’t defined within the script, so it must have come from some other module. I ran the following commands to get the information I needed:

get-command Test-AzureStackPowerShell

get-module Common | ft Path

You can see the output here; the source of the function was the key to find where it resided:

Now I went and took a look at the Common.psm1 module.

I did a search for a distinct part of the error message that’s thrown - ‘Use ArmProfile 2018-03-01-hybrid’ and it took me to this:

I could see in the elseif statement that it was looking for a minor version equal to 3. Given that I’m running 2.5.0, that was never going to work. So to try and resolve the error, I changed the ‘-eq’ to ‘-ge’, so that it would work for any minor version greater or equal to 3 and above.

I removed the currently loaded Common module:

Remove-Module Common

Then I ran the DeploySQLProvider.ps1 script again:

Bingo! Fixed it. As you can see, it evaluates version 2.5.0 as supported and carries on until the deployment completes successfully…

sqlrp-10.png

So it turns out a simple change in the Common module has made life a lot more straightforward.


Using Lets Encrypt certificates with Azure Stack

Anyone who has deployed an Azure Stack integrated system will know that one of the crucial items to get right from the outset are the PKI certificates that will be used for external services, such as the portal, blob storage, ARM API’s. For production environments, Microsoft recommend having separate certificates for each of the endpoints, some of which require wildcard SSL certs. These tend to be more expensive if purchasing from a third party.

Of course, you could use an Enterprise CA based within your environment, but I’ve seen too many issues where intermediate CA’s are used to sign the SSL certificates, due to the public key not existing in the Microsoft or various Linux distro’s Trusted CA publishers store.

Side note: When A VM is provisioned on Azure Stack, only the root CA is imported by the WA agent. The intermediate CA public cert needs to be manually imported.

With all that in mind, I was lucky enough to work with a client who had the idea to cut costs, but to use a CA that is trusted universally; that being Lets Encrypt. As the strapline states on their website, ‘Lets Encrypt is a free, automated and open Certificate Authority’ .

Free? I like how much that costs, there must be a catch? Well, yes and no. The certs have a 90 day lifespan, so you’ll have to ensure you rotate the certificates before they expire, but this can be automated, so not a big deal. The documentation for expiration alerts say that you’ll be alerted when they’re within 30 days, but I’ve found you get warnings within 90 days, so be aware that you don’t just ignore them and they do eventually expire - make a note in your calendar!


So what do we need for this to implement this solution?

Here are the pre-reqs:

  • An Azure subscription

  • An Azure DNS Zone for your domain

  • A Service Principal within your Azure AD tenant

  • Azure PowerShell modules. If using the AZ modules, the Enable-AzureRmAlias should be set. N.B. This does not work with the Azure Stack PowerShell modules, as the AzureRM.Dns modules currently included do not support the creation of CAA records - we need this capability!

  • Azure Stack Readiness checker PowerShell Module.

  • Posh-ACME PowerShell module https://github.com/rmbolger/Posh-ACME

  • Oh, and my Azure Stack Lets Encrypt PoSh module :)

For anyone wondering how to setup Azure DNS zones for use with Azure Stack, please see my blog post here.

Assuming you’ve installed / imported / configured / downloaded all of the pre-reqs, extract the contents of the zip file downloaded for the Azure Stack Lets Encrypt Module and then:

1. Run the new-DNSTxtRole.ps1 script that is included within the Azure Stack Lets Encrypt zip file. It will prompt you for your credentials to connect to your Azure Subscription and then create a new called ‘DNS Zone Contributor’ within your subscription that you can use to assign least privileges to the Service Principal on your Resource Group that contains your DNS Zone. It restricts rights to creating TXT records so that Lets Encrypt can use them to verify that you are in fact the owner of the domain.

Here’s what the script contains:

# Use this to create a role to assign to service principal used by Posh-Acme

$profile = Connect-AzureRMAccount

$roleDef = Get-AzureRmRoleDefinition -Name "DNS Zone Contributor"
$roleDef.Id = $null
$roleDef.Name = "DNS TXT Contributor"
$roleDef.Description = "Manage DNS TXT records only."
$roleDef.Actions.RemoveRange(0,$roleDef.Actions.Count)
$roleDef.Actions.Add("Microsoft.Network/dnsZones/TXT/*")
$roleDef.Actions.Add("Microsoft.Network/dnsZones/read")
$roleDef.Actions.Add("Microsoft.Authorization/*/read")
$roleDef.Actions.Add("Microsoft.Insights/alertRules/*")
$roleDef.Actions.Add("Microsoft.ResourceHealth/availabilityStatuses/read")
$roleDef.Actions.Add("Microsoft.Resources/deployments/read")
$roleDef.Actions.Add("Microsoft.Resources/subscriptions/resourceGroups/read")
$roleDef.AssignableScopes.Clear()
$roleDef.AssignableScopes.Add("/subscriptions/$($profile.Context.Subscription.Id)")

$role = New-AzureRmRoleDefinition $roleDef
$role

2. Add your Service Principal to your DNS Zone as a ‘DNS Zone Contributor’. I named my Service Principal LetsEncryptAzureStack in this example.

From the portal, find your DNS Zone resource, and select Access Control (IAM). From the blade that opens, select +Add.

  1. Select the DNS Zone Contributor as for the Role

  2. In the Select field, type in the name of your Service Principal. Select it, then press Save

3 Now we need to create some CAA records within the domain. This is required by Lets Encrypt in order to create the certificates. I created a function within the module to handle this. From an elevated PowerShell session navigate to the folder you extracted the module to and run:

Import-Module .\AzSLetsEncrypt.psm1

Once imported, ensure you’ve connected to your Azure Subscription within PowerShell and run the following:

#Connect to Azure
Connect-AzureRmAccount
New-AzsDnsCaaRecords -ResourceGroup <ResourceGroup> -Region <Azure Stack Region Name> -FQDN <FQDN for the DNZ Zone> -PaaS

Enter the Resource Group that hosts your DNS Zone, The name of your Azure Stack region and the FQDN for the domain. Optionally, if you specify the PaaS switch, it will create the CAA records for the PaaS endpoints too. If everything is in place, you should hopefully see something that looks like this in your Azure DNS Zone: This step only has to be run once, unless you delete the CAA records.

4 Now we’ve got all of that in place, we can create our certificates! Assuming you’ve still got the module imported, you can use the New-AzsPkiLECertificates function to create your certs. Rather than explain all the options, I’ve created a wrapper script :

$DebugPreference = 'continue'

$Region = '<Azure Stack Region Name>'
$FQDN = '<FQDN>'
$DNSResourceGroup = '<DNS Zone Resource Group>'

$Params = @{
 RegionName = $Region
 FQDN = $FQDN
 ServicePrincipal = '<Service Principal GUID>'
 ServicePrincipalSecret = '<Service Principal Secret>'
 pfxPass = 'P@ssword!'
 SubscriptionId = '<Subscription ID>'
 TenantId = '<Tenant ID>'
 CertPath = 'c:\azsCerts'
}

$scriptpath = $PSScriptRoot
cd $scriptpath
import-module .\AzSLetsEncrypt.psm1


#New-AzsDnsCaaRecords -ResourceGroup $DNSResourceGroup -Region $Region -FQDN $FQDN -PaaS
New-AzsPkiLECertificates @Params -Force -paas

The function will create the core certificates and if you select the PaaS switch, the optional App service and SQL RP certs. It will take a while to run as, as there is an element of waiting for the TXT records that are created for validation to replicate.


Once all the certificates have been created, they are validated to ensure they are compatible for use with Azure Stack using the Microsoft.AzureStack.ReadinessChecker module.:

Once the script has completed, you should have a folder structure that looks like this:

I’ve used these certificates in two installations now and they’ve worked with no problems.

As the Posh-Acme module is used to generate the certs, the data is stored here:

%userprofile%\AppData\Local\Posh-ACME

 If you need to recreate the certs before the allowed renewal period within the Posh-ACME module, or have some issues, you can delete the sub folders in this location and re-run the script.

The folder structure that’s generated should match the requirements for the Azure Stack install routine / certificate rotation. Check out the documentation here on how to rotate the certificates if they’re coming towards their expiration date.

I hope this is of some use and allows you to save some money!

Azure Stack Marketplace download issue and how to mitigate

I recently deployed new Azure Stack integrated system, and despite a few of the usual issues I was expecting (network integration!!!), everything went well up until the point of me needing to syndicate items in to the Marketplace via the admin portal. https://docs.microsoft.com/en-us/azure-stack/operator/azure-stack-download-azure-marketplace-item?view=azs-1908#connected-scenario


I could download some of the smaller items successfully, such as the VM extensions, but those that were larger, failed.

Initially, I thought it was a transient network issue, so deleted the failed items from the Marketplace and re-attempted the download, but I had the same problem re-occurred.


Because the admin portal only gives 3 states for Marketplace item (Downloading, Downloaded, or Failed), I wanted to try and determine where the problem lay before calling Support.

To do this, I used the Azure Stack Tools, more specifically: Export-AzSOfflineMarketplaceItem CMDLet. https://docs.microsoft.com/en-us/azure-stack/operator/azure-stack-download-azure-marketplace-item?view=azs-1908#disconnected-or-a-partially-connected-scenario. By running in PowerShell, I felt I had more chance in figuring out what was going on by using Verbose logging.

 To get more verbose information, I used the azcopy option. When I first started investigating the problem, the version of the tools required AZCopy v7.3/8.1. This required installation via an MSI. However, earlier last week, a new version of the tools was released which uses AZCopy v10 https://docs.microsoft.com/en-us/azure/storage/common/storage-use-azcopy-v10. I much prefer Microsoft’s approach to new releases of this tool as it is a single file, does not require installation, and therefore does not require admin rights.  

 Here’s a little wrapper script based on that in the documentation to download the Azure Stack tools. It also retrieves azcopy v10 and places it into the tools directory:

# Change directory to the root directory. 
cd \

# Download the tools archive.
[Net.ServicePointManager]::SecurityProtocol = [Net.SecurityProtocolType]::Tls12 
invoke-webrequest `
  https://github.com/Azure/AzureStack-Tools/archive/master.zip `
  -OutFile master.zip

# Expand the downloaded files.
expand-archive master.zip `
  -DestinationPath . `
  -Force

# Change to the tools directory.
cd AzureStack-Tools-master
# Download azcopy v10
invoke-webrequest `
  https://aka.ms/downloadazcopy-v10-windows `
  -OutFile azcopy.zip

# Expand the downloaded files.
expand-archive azcopy.zip `
  -DestinationPath . `
  -Force

Here’s a script to download marketplace items from Public Azure and then upload it to your stamp:

$Region = "local"   # For ASDK, this is local, change to match your region for integrated deployments
$FQDN = "azurestack.external" # For ASDK, this is azurestack.external
$AzSEnvironmentName = "AzureStackadmin" # Change this if you want more than one Azure Stack registraion on your system

$RegistrationRG = 'AzureStack' # Get this from the AdminPortal / Dashboard / Region / Properties / REGISTRATION RESOURCE GROUP if unsure
$RegistrationUserName = '<user>@<your tenant>.onmicrosoft.com' # User with rights to the Registraion Resource Group

$OperatorUserName = '<operator user name>@<your tenant>' # Username of Operator that is contributor/owner or Default Subscriber Subscription
$OperatorAADTenantName = '<Operator tenant name>' # the AAD tenant Name e.g. <mytenant>.onmicrosoft.com

$mktPlcFolder = "D:\Mkt" # Directory to store downloaded content.  Must exist before running
$azcopypath = "C:\AzureStack-Tools-master\azcopy_windows_amd64_10.2.1\azcopy.exe" 

# Register an Azure Resource Manager environment that targets your Azure Stack instance. Get your Azure Resource Manager endpoint value from your service provider.
Add-AzureRMEnvironment -Name "AzureStackAdmin" -ArmEndpoint "https://adminmanagement.$Region.$FQDN" `
    -AzureKeyVaultDnsSuffix adminvault.$Region.$FQDN `
    -AzureKeyVaultServiceEndpointResourceId https://adminvault.$Region.$FQDN

# Set your tenant name
$AuthEndpoint = (Get-AzureRmEnvironment -Name $AzSEnvironmentName).ActiveDirectoryAuthority.TrimEnd('/')
$TenantId = (invoke-restmethod "$($AuthEndpoint)/$($OperatorAADTenantName)/.well-known/openid-configuration").issuer.TrimEnd('/').Split('/')[-1]

#Get the credentials for an identity with permission to the subscription that the stamp is registered to.  sed to download Marketplace item from azure
$RegistrationCreds = get-credential  $RegistrationUserName -Message "Enter Azure Subscription Credentials"
# Get the credentials for an identity that has contributor/owner rights to the Default Provider Subscription.  used to upload Marketplace item to the Stamp
$operatorCreds = Get-Credential -Message "Enter the azure stack operator credential:" -UserName $OperatorUserName

# first, connect to Public Azure...
Add-AzureRmAccount -Credential $RegistrationCreds -Environment AzureCloud
Get-AzureRmSubscription | Select-AzureRmSubscription 

cd C:\AzureStack-Tools-master
Import-Module .\Syndication\AzureStack.MarketplaceSyndication.psm1

# Download the item.  You will be prompted to choose from an Out-Grid window...
Export-AzSOfflineMarketplaceItem -Destination $mktPlcFolder -resourceGroup  $RegistrationRG -AzCopyDownloadThreads 16 -azCopyPath $azcopypath

# Once the download has finished, swich to the Stack admin environment and upload the Marketplace item.
Add-AzureRmAccount -EnvironmentName $AzSEnvironmentName -TenantId $TenantId -Credential $operatorCreds
Import-AzSOfflineMarketplaceItem -origin $mktPlcFolder -AzsCredential $operatorCreds

When you run the script, you’ll be prompted for credentials and then which items you want to download. You can choose multiple items (CTRL and select), but I advise selecting 1 item at a time, as you will be prompted to accept the legal terms and conditions, as well as selecting the download method (azcopy) per choice. You may miss the prompts for subsequent items if the first download takes a while.

Once the selection has been made, you’ll see the following:

Select ‘y’ for both questions, and the download should start.

For the environment I was operating in, downloading via the internet took a while, as there were QoS rules applied.

After a while, I saw the following error:

OK, so I seemed to have the same problem via the portal and with the PowerShell tools. As I was using AZCopy for the download, there are logs, so that was the first port of call for me. The logs are stored in the following directory:

%USERPROFILE%\.azcopy

So I navigated there and opened the latest log file. I found the following towards the end:

I’ve highlighted the key entry that pointed me towards the problem:

‘…the MD5 hash of the data, as we received it, did not match the expected value, as found in the Blob/File Service. This means there is a data integrity error OR another tool has failed to keep the stored hash up to date.’

OK, so I thought this could have been a problem with some inline firewall or web proxy, but then I could open the smaller items, such as the icons associated with the marketplace item, or the manifest json files.

To prove if it was an issue with the environment I was operating in or not, I decided to spin up a Windows Server 2016 VM in Azure and attach a 200GB data disk and run through the same process as above. Thankfully, the downloads were a lot quicker, as would be expected given I was using the Azure Network fabric, but I found that the download failed again, and I saw the same error regarding the MD5 hash. Weird!

I decided to see if there was a way I could circumvent the MD5 hash check to see if I could at least complete the download and get something into the Marketplace so I could test if the item worked or not. This capability is not native within the Export-AzSOfflineMarketplaceItem, but there is a parameter within azcopy to do this: https://docs.microsoft.com/en-us/azure/storage/common/storage-use-azcopy-files#download-files. If I could add --check-md5=NoCheck or --check-md5=LogOnly to the azcopy command within Export-AzSOfflineMarketplaceItem, I could at least test it.

This is actually quite simple to do. by editing C:\AzureStack-Tools-master\Syndication\AzureStack.MarketplaceSyndication.psm1 (replace C:\AzureStack-Tools-master to match path where you have the tools), modify lines 591 & 593 (as of the current version at time of writing) to read:

 & $azCopyPath copy $Source $tmpDestination --recursive --check-md5=LogOnly

It should look like this:

If you already had the AzureStack.MarketplaceSyndication.psm1 loaded, simply close your PowerShell session.

Once I made the changes, I retried the process again, and this time, SUCCESS!

The Marketplace images downloaded and I was able to import them to my stamp, with no issue. I was able to deploy VM’s using these images with no problem.

I’m not sure if there’s an underlying problem with azcopy and the Marketplace content, but at least I managed to figure out a workaround that doesn’t appear to have any detrimental effects, so hopefully it can help out someone else who might have a similar problem.