#MAAS

MAAS Image Builder Exclude Update by KB#

This briefly shows how to alter the image builder scripts to exclude broken KBs for specific OS versions. This example shows excluding Cumulative Update for Windows 11 Insider Preview (KB5019765) on an HCI image.

Trying to build a newer HCI Maas image and receive an error trying to download an update via release channel. Specifically, Windows 11 insider preview KB5019765

If you edit the Logon.ps1 found in the UnattendedResource folder from cloudbase/windows-imaging-tools: Tools to automate the creation of a Windows image for OpenStack, supporting KVM, Hyper-V, ESXi and more. (github.com) you can see there is a section that allows you to create a blacklist of KBs for different OS version.

Using PowerShell [System.Environment]::OSVersion.Version you can find the OS version

Finally add a record for the OS version and KB you want to exclude

Which is displayed via verbose output during build

Creating an Azure Stack HCI Image for MAAS

This blog is a follow on from Creating a MAAS Image Builder Server (Windows Server 2022 example) — Crying Cloud the goal here is to create a MAAS usable Azure Stack HCI image for deployment with MAAS. This is still using the component from cloudbase/windows-imaging-tools: Tools to automate the creation of a Windows image for OpenStack, supporting KVM, Hyper-V, ESXi and more. (github.com) this repo.

The primary issue is if you try to “generalize” an HCI image, if you attempt to use that prepped image, you get the perpetual error “Windows could not finish configuring the system. To attempt to resume configuration, restart the computer”

However, if you don’t “generalize” the HCI base image, the deployment works. The problem with using the existing tools/repo and scripts is creating a MAAS image with this option not to generalize it.


The following content is assuming the layout as described here Creating a MAAS Image Builder Server (Windows Server 2022 example) — Crying Cloud.

Looking into the file C:\BuilderFiles\windows-openstack-imaging-tools\UnattendResources\Logon.ps1 around line 714 we find the command that is calling sysprep.exe

& "$ENV:SystemRoot\System32\Sysprep\Sysprep.exe" `/generalize `/oobe `/shutdown `/unattend:"$unattendedXmlPath"

Without breaking the ability to build other images or have a complete clone of the repo we need to make a few changes. Being able to have a parameter in the ini file makes sense. Create a copy of the ini file C:\BuilderFiles\Scripts\config-Server-HCI-UEFI.ini. I have added a parameter to the [sysprep] section run_sysprep_generalize=False. The differences between the 2022 file and HCI are as follows.

# config-Server-HCI-UEFI key diff to config-Server-2022-UEFI

image_name=Azure Stack HCI SERVERAZURESTACKHCICORE
image_path=C:\BuilderFiles\Images\HCI.10.2022.tgz
custom_scripts_path="C:\BuilderFiles\scripts\HCICS"
unattend_xml_path="UnattendTemplateHCI.xml"

# new parameter in section
[sysprep]
run_sysprep_generalize=False

I have created a copy of unattendTemplate2022.xml and save as unattendTemplateHCI.xml stored here C:\BuilderFiles\windows-openstack-imaging-tools with the following changes.

# Delete the following component from specialize node
#     <settings pass="specialize">

        <component name="Microsoft-Windows-TerminalServices-LocalSessionManager" processorArchitecture="amd64" publicKeyToken="31bf3856ad364e35" language="neutral" versionScope="nonSxS" xmlns:wcm="http://schemas.microsoft.com/WMIConfig/2002/State" xmlns:xsi="http://www.w3.org/2001/XMLSchema-instance">
            <fDenyTSConnections>false</fDenyTSConnections>
        </component>
        <component name="Microsoft-Windows-TerminalServices-RDP-WinStationExtensions" processorArchitecture="amd64" publicKeyToken="31bf3856ad364e35" language="neutral" versionScope="nonSxS" xmlns:wcm="http://schemas.microsoft.com/WMIConfig/2002/State" xmlns:xsi="http://www.w3.org/2001/XMLSchema-instance">
            <UserAuthentication>0</UserAuthentication>
        </component>
        <component name="Networking-MPSSVC-Svc" processorArchitecture="amd64" publicKeyToken="31bf3856ad364e35" language="neutral" versionScope="nonSxS" xmlns:wcm="http://schemas.microsoft.com/WMIConfig/2002/State" xmlns:xsi="http://www.w3.org/2001/XMLSchema-instance">
            <FirewallGroups>
                <FirewallGroup wcm:action="add" wcm:keyValue="RemoteDesktop">
                    <Active>true</Active>
                    <Profile>all</Profile>
                    <Group>@FirewallAPI.dll,-28752</Group>
                </FirewallGroup>
            </FirewallGroups>
        </component>

Next is changes to C:\BuilderFiles\windows-openstack-imaging-tools\UnattendResources\Logon.ps1

# line  575 under 
#     if ($installQemuGuestAgent -and $installQemuGuestAgent -ne 'False') {
#        Install-QemuGuestAgent
#    }

# add the following get-ini parameter call

    try {
        $generalizeWindowsImage = Get-IniFileValue -Path $configIniPath -Section "sysprep" -Key "run_sysprep_generalize" -Default "True"
    } catch{}

then, lets a simple if statement to flip the call

# line 741 under
# Optimize-SparseImage

if ($generalizeWindowsImage -eq "False") {
    & "$ENV:SystemRoot\System32\Sysprep\Sysprep.exe" `/oobe `/shutdown `/unattend:"$unattendedXmlPath"
} else {
    & "$ENV:SystemRoot\System32\Sysprep\Sysprep.exe" `/generalize `/oobe `/shutdown `/unattend:"$unattendedXmlPath"
}

Next, create the C:\BuilderFiles\Scripts\HCICS folder. Which will also copy in the RunBeforeSysprep.ps1 script for HCI I have added an additional script C:\BuilderFiles\Scripts\HCICS\RunBeforeWindowsUpdates.ps1 with a script to install the pre-requisites needed for HCI clusters.

function Write-Log {
    Param($messageToOut)
    add-content -path "c:\build.log" ("{0} - {1}" -f @((Get-Date), $messageToOut))
}

Write-Log "RunBeforeWindowsUpdate.ps1 starting" 

Write-Log "install windows Features"
install-windowsfeature FS-Data-Deduplication,BitLocker,Data-Center-Bridging,Failover-Clustering,NetworkATC,RSAT-AD-PowerShell,RSAT-Hyper-V-Tools,RSAT-Clustering,RSAT-DataCenterBridging-LLDP-Tools

Write-Log "RunBeforeWindowsUpdate.ps1 finished"

And to bring it all together the script to call this Build-HCI.ps1. These can be more normalized but for now, create a separate file with the appropriate parameters.

# Build-HCI.ps1 parameters

Param ( 
    $VerbosePreference = "Continue",
    $ISOImage =  "C:\BuilderFiles\ISOs\AzureStackHCI_20348.587_en-us.iso",
    $ConfigFilePath = "C:\BuilderFiles\Scripts\config-Server-HCI-UEFI.ini",
    $CloudBuildModules = "C:\BuilderFiles\windows-openstack-imaging-tools"
)

Fingers crossed, let’s run the Build-HCI.ps1 script

After deployment we can RDP to the server, as it is named in MAAS

Let’s try the credentials and add the server to Windows Admin Center

I believe there is room to refine this process and automate more of it, but these are the steps I took to get an Azure Stack HCI image with updates, users and features installed and able to deploy directly to bare metal with MAAS

Creating a MAAS Image Builder Server (Windows Server 2022 example)

This blog post is a walkthrough for building out an image server for MAAS to create custom images. For this first image, we will build a Windows 2022 server Image.

MAAS | Metal as a Service does include built-in features that support adding Linux images, you do need to build your own Windows images for use with MAAS. I used to create and script this process to make it easier. For this image builder, I am using a Dell R630 physical host with windows 2019 installed. The code base I am leveraging can be found here cloudbase/windows-imaging-tools: Tools to automate the creation of a Windows image for OpenStack, supporting KVM, Hyper-V, ESXi and more. (github.com).

There is a follow up article for creating an Azure Stack HCI image Creating an Azure Stack HCI Image for MAAS — Crying Cloud

# Enable Remote Desktop
# Manually disabled IE Enhanced security
# Install Windows Updates
# Install Windows Assessment 
# Install Deployment Kit (ADK) https://learn.microsoft.com/en-us/windows-hardware/get-started/adk-install

# Run as Admin

# set execution policy bypass
Set-ExecutionPolicy -ExecutionPolicy bypass -Force:$true

# install chocolatey  
Set-ExecutionPolicy Bypass -Scope Process -Force; [System.Net.ServicePointManager]::SecurityProtocol = [System.Net.ServicePointManager]::SecurityProtocol -bor 3072; iex ((New-Object System.Net.WebClient).DownloadString('https://chocolatey.org/install.ps1'))

# Useful Choco installs (you may need to relaunch Powershell)
choco install vscode -y
choco install git -y
choco install microsoft-edge -y
choco install chrome-remote-desktop-chrome -y
choco install beyondcompare -y
choco install putty.install -y
choco install winscp -y

# Install Hyber-V and management tool 
Install-WindowsFeature -Name Hyper-V -IncludeManagementTools -Restart

# Reboot Server

# Create an external virtual switch called External
$adapter = Get-NetAdapter | ?{$_.status -eq "up"} | select -first 1
new-vmswitch "External" -NetAdapterName $adapter.name

Next is to get the files local so we can use them to build our images

mkdir BuilderFiles
cd builderfiles
mkdir ISOs
mkdir ISOCopy
mkdir Scripts

# Clone Repo
git clone https://github.com/cloudbase/windows-openstack-imaging-tools.git
git submodule update --init

# Load Modules
pushd windows-openstack-imaging-tools
Import-Module .\WinImageBuilder.psm1
Import-Module .\Config.psm1 
Import-Module .\UnattendResources\ini.psm1

# Create a empty config.ini file
$ConfigFilePath = ".\config.ini"
New-WindowsImageConfig -ConfigFilePath $ConfigFilePath

I have saved 3 ISO files to c:\BuilderFiles\ISOs

Additionally, if you want to customize using the deployment tool kit you will need to extract the ISOs to C:\BuilderFiles\isoCopy. This way you can use “Windows System Image Manager” to build custom unattend files.

We are going to start with building a Windows 2022 Image. I am starting with 2022 as there are fewer updates to execute so it’s faster to test the process. First, mount the Windows 2022 ISO.

Copy the config.ini file we just created and rename it to config-Server-2022-UEFI.ini. We do need to make a few changes. You can explore the differences here in the compressed contents of the file. Any value not listed is =““

# C:\BuilderFiles\Scripts\config-Server-2022-UEFI.ini

[DEFAULT]
wim_file_path=F:\Sources\install.wim
image_name="Windows Server 2022 SERVERDATACENTER"
image_path=C:\BuilderFiles\Images\WinSvr2022DC.tgz
virtual_disk_format=RAW
image_type=MAAS
disk_layout=UEFI
product_key="ASDFG-GHJKL-WERTY-WERTY-ASDFG"
force=False
install_maas_hooks=True
compression_format="tar.gz"
gold_image=False
custom_scripts_path="C:\BuilderFiles\Scripts\2022CS"
enable_administrator_account=True
shrink_image_to_minimum_size=True
enable_custom_wallpaper=False
disable_first_logon_animation=False
compress_qcow2=False
zero_unused_volume_sectors=False
extra_packages_ignore_errors=False
enable_shutdown_without_logon=False
enable_ping_requests=False
enable_ipv6_eui64=False
enable_active_mode=False
[vm]
administrator_password=getBENT123!
external_switch=external
cpu_count=4
ram_size=12884901888
disk_size=42949672960
disable_secure_boot=True
[drivers]
[custom]
install_qemu_ga=False
[updates]
install_updates=True
purge_updates=True
clean_updates_offline=True
clean_updates_online=True
[sysprep]
run_sysprep=True
unattend_xml_path=UnattendTemplate2022.xml
disable_swap=True
persist_drivers_install=True
[cloudbase_init]
beta_release=False
serial_logging_port=COM1
cloudbase_init_use_local_system=False
cloudbase_init_delayed_start=False

While building and testing your images I would suggest disabling updates, for faster testing cycles, including install, purge, and clean turning these settings in the ini to false.

[updates]
install_updates=False
purge_updates=False
clean_updates_offline=False
clean_updates_online=False

We added a reference for an UnattendTemplate2022.xml file. Copy UnattendTemplate.xml from git repo to c:\builderFiles\Scripts and rename the file. Using the files in isoCopy you can edit the unattend.xml. There are lots of internet sources to assist with that process.

Here are a few small changes you can make

# DELETE Lines

<VisualEffects>
    <FontSmoothing>ClearType</FontSmoothing>
</VisualEffects>

<NetworkLocation>Work</NetworkLocation>

# ADD/EDIT Lines

<AdministratorPassword>
    <Value>getBENT123!</Value>
    <PlainText>true</PlainText>
</AdministratorPassword>
<!-- The following is needed on a client OS -->
<LocalAccounts>
    <LocalAccount wcm:action="add">
        <Password>
            <Value>getBENT123!</Value>
            <PlainText>true</PlainText>
        </Password>
        <Description>Admin user</Description>
        <DisplayName>Admin</DisplayName>
        <Group>Administrators</Group>
        <Name>Admin</Name>
    </LocalAccount>
</LocalAccounts>

# Microsoft-Windows-TerminalServices-RDP-WinStationExtensions
<UserAuthentication>0</UserAuthentication>

Another way you can configure the images is with Custom Scripts in the CustomScripts folder. I find this easier than working through windows Image settings. Some files you can use are RunAfterCloudbaseInitInstall.ps1, RunBeforeWindowsUpdates.ps1, RunBeforeCloudbaseInitInstall.ps1, RunAfterWindowsUpdates.ps1.

Here is a file I have created C:\BuilderFiles\Scripts\2022CS\RunBeforeSysprep.ps1 and the parameter is already set in the ini custom_scripts_path="C:\BuilderFiles\Scripts\2022CS\"

# C:\BuilderFiles\Scripts\2022CS\RunBeforeSysprep.ps1 
function Write-Log {
    Param($messageToOut)
    add-content -path "c:\build.log" ("{0} - {1}" -f @((Get-Date), $messageToOut))
}

function Disable-IEESC {
    $AdminKey = "HKLM:\SOFTWARE\Microsoft\Active Setup\Installed Components\{A509B1A7-37EF-4b3f-8CFC-4F3A74704073}"   
    $UserKey = "HKLM:\SOFTWARE\Microsoft\Active Setup\Installed Components\{A509B1A8-37EF-4b3f-8CFC-4F3A74704073}"
    Set-ItemProperty -Path $AdminKey -Name "IsInstalled" -Value 0
    Set-ItemProperty -Path $UserKey -Name "IsInstalled" -Value 0
    Stop-Process -Name Explorer
    Write-Host "IE Enhanced Security Configuration (ESC) has been disabled." -ForegroundColor Green
}

Write-Log "RunBeforeSysprep.ps1 starting"

write-Log "Disable-IEESC"
Disable-IEESC

write-Log "Allow RDP"
Set-ItemProperty -Path 'HKLM:\System\CurrentControlSet\Control\Terminal Server' -name 'fDenyTSConnections' -value 0
Enable-NetFirewallRule -DisplayGroup 'Remote Desktop'

write-Log  "Allow All RDP clients"
(Get-WmiObject -class 'Win32_TSGeneralSetting' -Namespace root\cimv2\terminalservices -ComputerName $env:COMPUTERNAME -Filter 'TerminalName="RDP-tcp"').SetUserAuthenticationRequired(0)

write-Log  "set updates"
Set-ItemProperty -Path "HKLM:\SOFTWARE\Policies\Microsoft\Windows\WindowsUpdate\AU" -Name AUOptions -Value 4

write-Log "avahcAdmin"
$Password = ConvertTo-SecureString -String "getBENT123!" -AsPlainText -Force
New-LocalUser -Name "avahcAdmin" -Password $Password -AccountNeverExpires 
Add-LocalGroupMember -Group "Administrators" -Member "avahcAdmin"
& cmd.exe /c 'net.exe user "avahcAdmin" "getBENT123!"'

write-Log "avaAdmin"
$Password = ConvertTo-SecureString -String "getBENT123!" -AsPlainText -Force
New-LocalUser -Name "avaAdmin" -Password $Password -AccountNeverExpires 
Add-LocalGroupMember -Group "Administrators" -Member "avaAdmin"
& cmd.exe /c 'net.exe user "avaAdmin" "getBENT123!"'

write-Log "disable administrator"
& cmd.exe /c 'net.exe user Administrator /active:no'

write-Log "disable admin"
& cmd.exe /c 'net.exe user Admin /active:no'
#& cmd.exe /c 'net.exe user "Administrator" "getBENT123!"'

Write-Log "RunBeforeSysprep.ps1 Finished"

Next, create a file called Build-2022.ps1.

# C:\BuilderFiles\Scripts\Build-2022.ps1
Param ( 
    $VerbosePreference = "Continue",
    $ISOImage = "C:\BuilderFiles\isos\en-us_windows_server_2022_updated_april_2022_x64_dvd_d428acee.iso",
    $ConfigFilePath = "C:\BuilderFiles\Scripts\config-Server-2022-UEFI.ini",
    $CloudBuildModules = "C:\BuilderFiles\windows-openstack-imaging-tools"
)
Set-Location $CloudBuildModules 

Import-Module .\WinImageBuilder.psm1
Import-Module .\Config.psm1
Import-Module .\UnattendResources\ini.psm1

Mount-DiskImage -ImagePath $ISOImage
$MountLetter = (Get-DiskImage $ISOImage| Get-Volume).DriveLetter

# Create a config.ini file using the built in function, then set them accordingly to your needs
# New-WindowsImageConfig -ConfigFilePath $ConfigFilePath
# To automate the config options setting:
Set-IniFileValue -Path (Resolve-Path $ConfigFilePath) -Section "DEFAULT" -Key "wim_file_path" -Value ("$MountLetter" + ":\Sources\install.wim")

#New Online image 
New-WindowsOnlineImage -ConfigFilePath $ConfigFilePath

Dismount-DiskImage $ISOImage

Execute this script, which will use DISM to create the initial image

Which will then be booted by Hyper-V and any scripts specified executed locally

This shows the custom script log c:\build.log has completed and sysprep running

Once this is complete because we are loading this to MAAS the image will be compressed and converted to a RAW image and then tarballed and gzipped.

Using Putty create a session to one of the servers you manage MAAS

you can also import this into winSCP and copy the image file up to the ubuntu server directory. My goal was to automate this but didn’t manage to get the process fully end-to-end, so this part is still manual.

Then we can log into that server and upload the boot image. To keep track of files and images I add an instance numbering to the name.

# Must have the MAAS CLI installed 
# Must have a MAAS profile (in this case mquick)

maas mquick boot-resources create name='windows/WS2022DC01' title='WinServer2022DC01' architecture='amd64/generic' filetype='ddtgz' content@=WinSvr2022DC01.tgz

# Additional Boot-resource management commands
# Show all
maas mquick boot-resources read
# delete one
maas mquick boot-resource delete id
maas mquick boot-resource delete 80

Now for the final test, deploying the newly created image using MAAS

After MAAS finishes the deployment, we can log in using the pre-staged Admin accounts and the other settings we configured, RDP, etc

You can mix and match depending on your needs. Here is a follow-on article of how to create an image for Azure Stack HCI Creating an Azure Stack HCI Image for MAAS — Crying Cloud

If you are new to MAAS or having issues with custom windows images hopefully this is helpful.

Creating MAAS workload annotations for Kubernetes using kubectl output

Trying to manually keep track of servers and versions is challenging. MAAS has a workload annotation feature that allows you to create name=value using command line calls using MASS cli. I wanted to explore creating a script to pull data from kubectl and create workload annotations for machines in a Kubernetes cluster.

For this exercise, I intend to execute the script from a MAAS rack controller, on which I have installed kubectl and PowerShell. In the lab, there are three microk8s clusters. The first job was to collect the config files from each cluster and combine them into a single config so I can use contexts from within the kubectl commands. Using the command ‘kubectl config view --raw > kn.conf’ I created one file for each k8s cluster on the region controller in directory ~/.kube/clusters.

mkdir ~/.kube/clusters
mv /path/k1.conf ~/.kube/clusters
mv /path/k2.conf ~/.kube/clusters

export KUBECONFIG=$(find ~/.kube/clusters -type f | sed ':a;N;s/\n/:/;ba')

kubectl config get-clusters

kubectl config view --flatten > ~/.kube/config

There are various methods to combine and clean up k8s cluster contexts. I had to clean up the file to create unique cluster names as well as user token names. I manually edited the ~/.kube/config combined file and tweaked these settings.

This is the script I created. It does require that you have a MAAS profile created already.

# tag-maasworkloadannotations.ps1

[CmdletBinding()]
param (
    $k8scontext ,
    $maasProfile
)
write-verbose "executing tag kubernetes workload annotation for MAAS"
$LastUpdated = Get-Date

# Kubectl contexts
Write-Verbose "Retrieving Kubernetes cluster details from context $k8scontext"
$kcontexts = kubectl config view -o json | convertfrom-json
Write-Verbose "$(($kcontexts.contexts | Measure-Object).count) kube contexts found"
$kcontext = $kcontexts.contexts | Where-Object {$_.name -eq $k8scontext}
$kversion = kubectl version --context $k8scontext -o json | convertfrom-json

# K8s nodes
Write-Verbose "Retrieving Kubernetes nodes from context $k8scontext"
$nodes = kubectl get nodes --context $k8scontext -o json | convertfrom-json
Write-Verbose "$(($nodes.items | Measure-Object).count) k8s nodes found"

# Maas machines
Write-Verbose "Retrieving machines from MAAS using profile $maasProfile"
$machines = maas $maasProfile machines read | convertfrom-json
Write-Verbose "$($machines.count) maas machines found"
$powerParams  = maas $maasProfile machines power-parameters  | convertfrom-json

# Build Annotations
Write-Verbose "Building workload annotation records"
$WorkloadAnnontations = @()
foreach ($node in $nodes.items) {

    $WorkloadAnnontation = @{}
    $WARecord = '' | select-object systemid, hostname, WA 

    $machine = $machines | Where-Object {$_.hostname -eq $node.metadata.name} 
    if ($machine -ne ""){
        $WARecord.systemid = $machine.system_id
        $WARecord.hostname = $machine.hostname

        #$WorkloadAnnontation.add("osImage",  $node.status.nodeInfo.osImage)
        #$WorkloadAnnontation.add("systemUUID",  $node.status.nodeInfo.systemUUID)
        #$WorkloadAnnontation.add("machineID",  $node.status.nodeInfo.machineID)

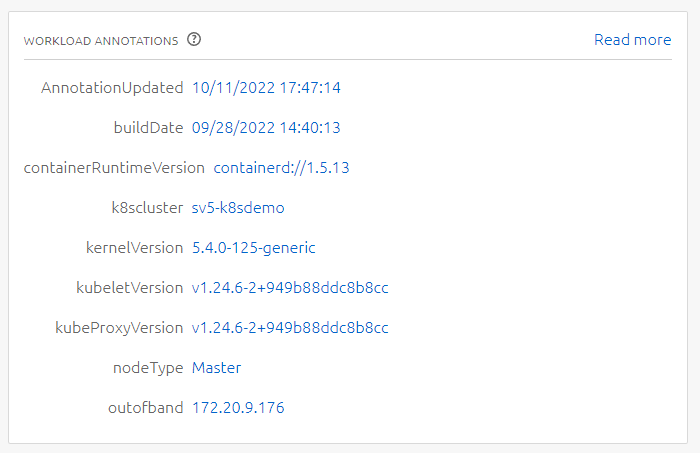
        $WorkloadAnnontation.add("k8scluster", $kcontext.context.cluster )
        $WorkloadAnnontation.add("buildDate", $kversion.serverVersion.buildDate)
        $WorkloadAnnontation.add("containerRuntimeVersion",   $node.status.nodeInfo.containerRuntimeVersion)
        $WorkloadAnnontation.add("kernelVersion",   $node.status.nodeInfo.kernelVersion)
        $WorkloadAnnontation.add("kubeProxyVersion",   $node.status.nodeInfo.kubeProxyVersion)
        $WorkloadAnnontation.add("kubeletVersion",   $node.status.nodeInfo.kubeletVersion)
        $WorkloadAnnontation.add("outofband",  $powerParams.$($machine.system_id).power_address)
        $WorkloadAnnontation.add("AnnotationUpdated",$LastUpdated)

        if ($node.metadata.labels.'node.kubernetes.io/microk8s-controlplane' -eq "microk8s-controlplane")
            {$WorkloadAnnontation.add("nodeType", 'Master')}
        if ($node.metadata.labels.'node.kubernetes.io/microk8s-worker' -eq "microk8s-worker")
            {$WorkloadAnnontation.add("nodeType", 'Worker')}

        $WARecord.wa = $WorkloadAnnontation
    }
    $WorkloadAnnontations += $WARecord
} 

# publish workload annotations
$i = 1
$c = $($WorkloadAnnontations.count)
Write-Verbose "Publishing $c workload annotation records"
foreach ($WA in $WorkloadAnnontations){
    $KeyValueData = ""
    foreach ($key in $WA.wa.keys) {
        $KeyValueData += "$($key)='$($wa.wa.($key))' "
    }
    Write-Verbose "[$i/$c] Building command for $($WA.hostname)"
    $execmd = "maas $maasProfile machine set-workload-annotations $($WA.systemID) $KeyValueData > /dev/null 2>&1"
    write-debug $execmd
    Invoke-Expression $execmd
    Write-Verbose "[$i/$c] Command executed for $($WA.hostname)" 
    $i++ 
}

$RunTime = New-TimeSpan -Start $LastUpdated -End (get-date) 
$ExecutionTime = "Execution time was {0} hours, {1} minutes, {2} seconds and {3} milliseconds." -f $RunTime.Hours,  $RunTime.Minutes,  $RunTime.Seconds,  $RunTime.Milliseconds 
write-verbose $ExecutionTime

Using the [CmdletBinding()] allows me to leverage verbose and debug options.

./tag-maasworkloadannotations.ps1 -k8scontext k8sdemo -maasprofile mquick -Verbose -debug

./tag-maasworkloadannotations.ps1 -k8scontext microk8s -maasprofile mquick -Verbose

This took 12 minutes but could probably create streamlined script with PowerShell jobs

which can allow combinations of filters on the workload annotations

There is a lot more possible here, this was helpful for me while consolidating microk8s clusters and making sure I wasn’t releasing machines that were in use in a cluster if I had tagged them incorrectly in MAAS.

External Reference

Using multiple kubeconfig files and how to merge to a single – Oueta