Azure Stack Hub

ARM Limits on Azure Stack Hub

I came across an interesting error when I was doing some maintenance work on an Azure Stack Hub stamp. I was updating App Service to version 2020 Q2 and also installing the Event Hubs Public Release preview. I got the following error message:

‘Number of read requests for subscription ‘‘ exceeded the limit of ‘15000’ for time interval ‘01:00:00’. Please try again after ‘‘ seconds. (Code: SubscriptionRequestsThrottled)’


I’d certainly not come across this before and was intrigued to see if I could find out any more information about this. I checked the Azure Stack Hub documentation and couldn’t find any reference to this limit, nor could I find anyone else who had come across this before.

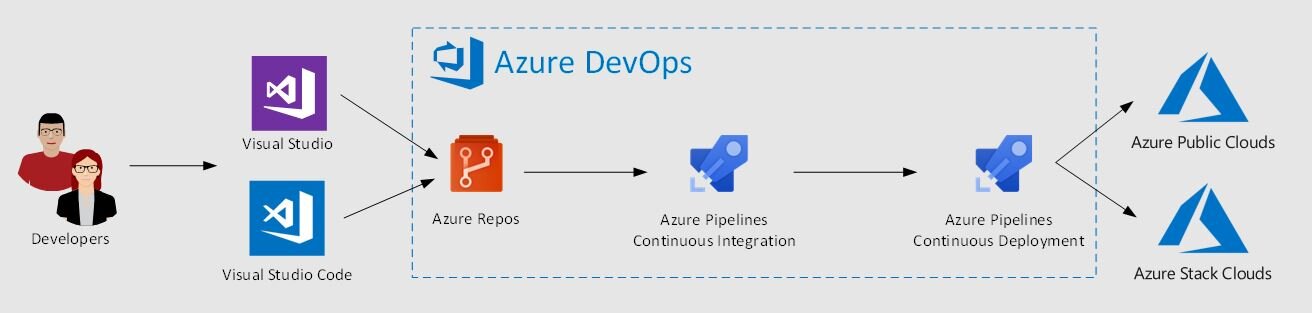
What I did find related to Azure, so I thought it should be relevant. Details of the limits applied can be found in the article Throttling Resource Manager requests.

It turns out that Azure Stack Hub also applies limits to requests via ARM, although the limits are slightly different. Whereas for Azure the Read limit for a subscription is set to 12000, for Azure Stack Hub, it is set to 15000, per the error message I received.

I don’t know what the write / delete limits are, but assume they are similar to the ones set for Azure, give or take a thousand :)

So, how can you check how many read operations are remaining before hitting the limit?

The Throttling Resource Manager requests article details the methods you can use, by inspecting headers, or by using a script that was referenced in the doc:  Check Resource Manager Limits for a Subscription.

This script doesn’t quite work for Azure Stack Hub, also, it doesn’t work if you’re the the AZ PowerShell Module, so I made some modifications and made them available here.

There are two versions, one for AzureRM and the other for Az PowerShell modules

Get-AzArmLimits.ps1

Get-AzureRMArmLimits.ps1

You need to be logged in to the Azure environment you want to check, but it will work for Azure and Azure Stack Hub

Here are some examples of the output:

Using AzureRM module; Azure

Using AzureRM module; Azure Stack Hub

Using Az module; Azure Stack Hub


Azure Stack Hub: When you can't view/add permissions in a tenant subscription from the portal

I have noticed on a few occasions that for a tenant subscription hosted in an Azure Stack region that I am either unable to view the IAM permissions, or add a user/service principal/group for the subscription. I have needed to do this to assign a service principal as a contributor to a subscription so that I can deploy a Kubernetes cluster via AKSE.

Typically for viewing the permissions, clicking on the Refresh button does the trick. More problematic is adding permissions via the portal. Doing so renders a screen like below:

As highlighted, the animated ‘dots’ show the blade constantly trying to retrieve the data but can’t. It is actually a known issue and is highlighted in the release notes.

The remediation it offers is to use PowerShell to verify the permissions, and gives a link to the Get-AzureRmRoleAssignment CmdLet. Not helpful if you want to set permissions, so here’s a step-by-step description of what you’ll need to do.

Pre-Reqs:

For the example shown, I am using Azure AD identities, I have more than one tenant subscription assigned to my user account and I am adding a service principal. At the end of the post, I will show the commands for adding a group or a user .

Step-By-Step

From PowerShell, connect to the tenant subscription you want to change the permissions on. The documentation is for connecting as an operator, so here’s how to do it as a user:

$Region = '<yourRegion>'
$FQDN = '<yourFQDN>'
$AADTenantName = '<yourAADTenantName>'
$envName = "AzureStack$region" 

 # Register an Azure Resource Manager environment that targets your Azure Stack instance. Get your Azure Resource Manager endpoint value from your service provider.
Add-AzureRMEnvironment -Name $envName -ArmEndpoint "https://management.$Region.$FQDN" `
    -AzureKeyVaultDnsSuffix vault.$Region.$FQDN `
    -AzureKeyVaultServiceEndpointResourceId https://vault.$Region.$FQDN

# Set your tenant name.
$AuthEndpoint = (Get-AzureRmEnvironment -Name $envName).ActiveDirectoryAuthority.TrimEnd('/')
$TenantId = (invoke-restmethod "$($AuthEndpoint)/$($AADTenantName)/.well-known/openid-configuration").issuer.TrimEnd('/').Split('/')[-1]

# After signing in to your environment, Azure Stack cmdlets
# can be easily targeted at your Azure Stack instance.
Add-AzureRmAccount -EnvironmentName $envName -TenantId $TenantId

As I have more than one subscription, let’s get a list so we can select the correct one:

Get-AzureRmSubscription | ft Name

I got the following output:

  • I want to modify the AKSTest subscription:

#Set the context
$ctx = set-azurermcontext -Subscription AKSTest
$ctx

Running that command, I get :

Cool; I’ve got the correct subscription now, so let’s list the permissions assigned to it:

Get-AzureRmRoleAssignment

OK, so those are the standard permissions assigned when the subscription is created. Let’s add a service principal.

First, let’s get the service principal object

Get-AzureRmADServicePrincipal | ? {$_.DisplayName -like '*something*'} |ft DisplayName
subPerms-5.png

I want to assign AKSEngineDemo

$spn = Get-AzureRmADServicePrincipal -SearchString AKSEngineDemo

Lets assign the service principal to the tenant subscription:

New-AzureRmRoleAssignment -ObjectId $spn.Id -RoleDefinitionName Contributor -scope "/subscriptions/$($ctx.Subscription.Id)"

When I take a look in the portal now (after doing a refresh :) ), I see the following:

Here’s the commands for adding an Azure AD User:

#Find the User object you want to add
Get-AzureRmADUser | ? {$_.DisplayName -like '*something*'} |ft DisplayName

#Assign the object using the displayname of the user
$ADUser = Get-AzureRmADUser -SearchString <UserName>
New-AzureRmRoleAssignment -ObjectId $ADUser.Id -RoleDefinitionName Contributor -scope "/subscriptions/$($ctx.Subscription.Id)"

Finally, how to add an Azure AD Group:

#Find the Group object you want to add
Get-AzureRmADGroup | ? {$_.DisplayName -like '*something*'} |ft DisplayName

#Assign the object using the displayname of the user
$ADGroup = Get-AzureRmADGroup -SearchString <GroupName>
New-AzureRmRoleAssignment -ObjectId $ADGroup.Id -RoleDefinitionName Contributor -scope "/subscriptions/$($ctx.Subscription.Id)"

Fixing the SQL / MySQL RP update procedure on Azure Stack Hub 1910

Anyone who has been running and operating Azure Stack Hub for a while is hopefully aware that there are a number of activities that need to take place to keep it up to date and supported. The most obvious one is updating the core infrastructure using the integrated update process. It’s made easier in that the main dashboard on the admin portal for your stamp informs you of the update status - if it’s up to date or if there’s an update to apply. When it comes to additional Resource Providers, you have to do the work your self. This post details how to fix the update process for the SQL and MySQL RP’s for systems running version 1910.

I’m making the assumption that you have already deployed the RP’s previously, and have access to the pfx file that contains the sqladapter certificate for your stamp.

Version 1910 of Azure Stack Hub requires version 1.1.47.0 of the SQL & MySQL Resource Providers.

The first thing you will need to do is download the respective RP install binaries:

Extract the contents of the downloaded file(s) on a system that has access to the PEP and also has the compatible Azure Stack Hub PowerShell modules installed for Azure Satck Hub 1910: https://docs.microsoft.com/en-us/azure-stack/operator/azure-stack-powershell-install?view=azs-1910

Create a directory in the location where you extracted the RP files called cert.  You will need to copy the pfx file containing the certificate for the SQL adapter into this directory. This step is the same for both SQL and MySQL.

We need to modify the common.psm1 file in the Prerequisites folder, similar to an earlier blog post on deploying the RP (based on 1.1.33.0)

Taking a look at the file shows us the prerequisites for the function:

It expects the Azure RM module version to be 2.3.0 and that the installation path for the modules to be \SqlMyslPsh.
If following the official instructions for deploying the Azure Stack PowerShell module compatible with 1910, this will never work, so we need to modify the Test-AzureStackPowerShell function.

Change the $AzPshInstallFolder on line 82 from "SqlMySqlPsh" to "WindowsPowerShell\Modules"

Change the $AzureRmVersion on line 84 from "2.3.0" to "5.8.3"

We need some further changes to the function to ensure that the correct path for the module is evaluated:

Locate line 118/119 in the module.

We need to modify the path so it reflects that of the loaded module.  Change the "AzureRM" to AzureRM.Profile", as highlighted in the images below.

N.B. - The instructions for the fix are also applicable for new SQL & MySQL Resource Provider deployments, as they use the common.psm1 module too.

Save the file and using the update script example tailored to your environment, the update should now work.

You should see status messages like below:

Overall, it takes approximately 50 minutes to run through the update.


Rotating App Service Certificates on Azure Stack Hub

If anyone has seen my previous post about using Lets Encrypt open source certificates with Azure Stack Hub may remember that those certs have a 90 day lifetime. This means that if you do use them, you’ll need to rotate your certificates on a more regular cadence than the normal 1 year with paid for third party cert authorities. For me, this isn’t a problem as it adds only a small amount of overhead to managing my stamps, assisted by helper scripts to generate the certs and some clear documentation on the process for rotating the core infra SSL Certs (found here).

What isn’t so clear is how to rotate the certs for your App Service PaaS infrastructure. I haven’t found any easily findable (is that a word?) reference to it in the online documentation. Not to worry, it’s actually a fairly simple process and I’ve recorded step-by-step how to perform it.

One thing I’ll point out first - you won’t find any alerts regarding impending App Service certificates expiration like you do with the core infrastructure, so you’ll have to make a note in your calendar for a suitable date to renew your certs, or just periodically check the admin portal.

  • From the Admin Portal, open up the App Service blade

  • Open the Secrets blade

  • From here you can check how many days you have left until your certs expire. As you can see in my case I have 11 days, so time to rotate!

  • Selecting the Rotate button brings up a new blade. From here you provide the locations of the Default App Service pfx cert, API pfx, FTP (or publishing) pfx and the SSO (or Identity Application) pfx, along with the corresponding passwords for these files.

  • Once you have entered these details and clicked OK, the Certificate Rotation status window will show you the progress of the task

  • You can navigate from this screen and do other tasks if you want. You can click on the Status button to check on the progress.

What you should see if the details you entered were validated.

Success!

The whole process took between 15-20 minutes. I wasn’t sure as I went and got a coffee!

Just to check that the certificates have actually been updated, I refreshed the Secrets blade and saw that the expiry was now 90 days, per the new Lets Encrypt certs I created.

Hopefully this is of some use to fellow Azure Stack Hub operators who haven’t had to update their App Service Certs yet, and remember, you won’t be alerted if they do expire!

Add a Service Connection to Azure Stack Hub in Azure DevOps

Pipelines.JPG

One of the key aspects of the system formally known as Azure Stack, now to be called Azure Stack Hub (ASH) is, that it is a target for automation. The chances are if you are considering running this at scale and you are deploying content through the portal UI, you’re probably doing it wrong.

ASH makes a great target for among other things a DevOps toolchain. I’m not sure if you have tried connecting from Azure DevOps portal but Azure DevOps has undergone a lot of changes and a lot of the documentation looks different.

I wanted to share the steps to create a ‘Service Connection’ from Azure DevOps. This is assuming you are using an Azure AD connected ASH Installation.

First, you’ll need to create a Service Principal in Azure AD.

The steps are shown here briefly below. Here are some detailed instructions if needed.
https://docs.microsoft.com/en-us/azure/active-directory/develop/howto-create-service-principal-portal


Navigate to your Azure AD and register a new application

Register an application - Microsoft Azure.png

Make sure to copy the Application ID or Client ID, the Directory ID or Tenant ID into some temporarily like notepad

PPE1DatacenterA.png

Next click ‘Certificates & Secrets’
Select ‘+ New Client Secret’
Enter a description and key expiry length
Make sure to copy the secret

CertificatesSecrets.png

You need to add this SPN you have just created to your Azure Stack Subscription through the Access Control (IAM). At this stage you might want to capture the Azure Stack Subscription ID and name for later.

2019-11-06 18_48_12-Users - Microsoft Azure Stack.png

Regarding Azure DevOps I am going to assume you already have an organization and project configured.

If you go to the Project Settings page, under the Pipelines section,
then select 'Service Connections’
click ‘New service connection’

ServiceConnection.png

Finally we can create the ‘Service Connection’ using ‘Service Principal Authentication’

You need to click the hyperlink ‘Use the full version of the service connection dialog’

You need to click the hyperlink ‘Use the full version of the service connection dialog’

Select ‘Azure Stack’ from the drop down list (obviously Azure DevOps hasn’t been told about the name change just yet)Complete the form and select ‘Verify Connection’And you’re done | Good luck on your Pipeline

Select ‘Azure Stack’ from the drop down list (obviously Azure DevOps hasn’t been told about the name change just yet)

Complete the form and select ‘Verify Connection’

And you’re done | Good luck on your Pipeline